2
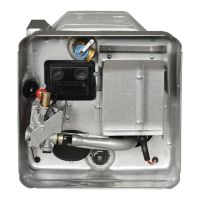
Figure 1
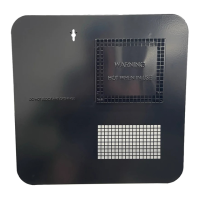
Figure 1A
INSTALLATION REQUIREMENTS
WARNING! Installation of this appliance must be made in accordance with
the written instructions provided in this m anual. No agent, representative
or employee of Suburban or other person has the authority to change,
modify or waive any provision of the instructions contained in this
manual.
CAUTION: If possible, do not install the water heater to where the vent can
be covered or obstructed when any door on the trailer is opened. If this is
not possible, then the travel of the door must be restricted in order to
provide a 6" minimum clearance between the water heater vent and any door
whenever the door is opened.
CAUTION: Due to the differences in vinyl siding, this appliance should not
be installed on vinyl siding without first consulting with the manufacturer of
the siding or cutting the siding away from the area around the appliance
vent.
CAUTION: In any installation in which the vent of this appliance can be
covered due to the construction of the RV or some special feature of the RV
such as slide out, pop-up etc., always insure that the appliance cannot be
operated by setting the thermostat to the positive “OFF” position and
shutting off all electrical and gas supply to the appliance.
CAUTION: Do not install this appliance to where the vent terminates below
a slide-out. This appliance is not to be installed under any overhang. It must
be free and clear of any type overhang.
This installation must conform with the requirements of the authority having
jurisdiction or in the absence of such requirements with the latest edition of the
National Fuel Gas Code ANSI Z223.1; and the latest edition of the American
National Standard for Recreational Vehicles-501C. In Canada the installation
should conform with the following standards.
A. For installation in Recreational Vehicle
1. Gas - CSA standard CSA Z240.4.2 Installation Requirements for Propane
Appliances and Equipment in Recreational Vehicles.
2. Electrical - CSA standard C22.2 No. 148/Z240.6.2 Electrical Requirements
for Recreational Vehicles.
3. Plumbing - CSA standard CSA Z240.3.2 Plumbing Requirements for
Recreational Vehicles.
B. For installation in Mobile Housing
1. Gas - CSA standard CSA Z240.4.1 Installation Requirements for Gas
Burning Appliances and Equipment in Mobile Homes.
2. Electrical - CSA standard CSA C22.1 Canadian Electrical Code Part 1.
3. Plumbing - CSA standard CSA Z240.3.1 Plum bing Requirem ents for Mobile
Homes.
The appliance shall be disconnected from the gas supply piping system during any
pressure testing of the system.
The appliance and its gas connections shall be leak tested before placing the
appliance in operation.
All air for combustion must be supplied from outside the structure. Air for
combustion must not be supplied from occupied spaces.
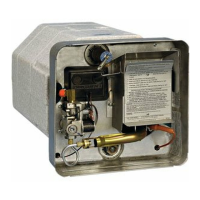
INSTALLATION INSTRUCTIONS
Minimum clearance from combustible construction on sides, top, floor and rear
= 0 inches. Provide room for access to rear of heater for servicing.
Provide an opening flush with floor in outer wall of coach as shown. Wall of coach
should be framed as shown in Figure 1. Maintain inside dimensions listed below.
Do not install on carpet unless the carpet is covered by a metal or wood shield
covering the entire area underneath the water heater. If you prefer, you may cut
away the carpet from this area.
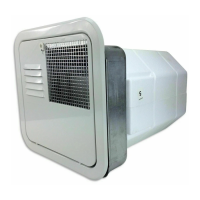
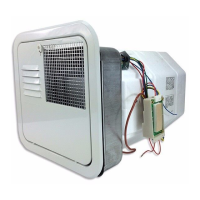
INSTALLATION USING FLUSH MOUNT FRAME & DOOR
(See Figure 2 for Illustration)
A. Position heater into framed opening as illustrated. Slide unit into opening until
the front of the control housing is flush with the exterior coach skin.
B. Secure the control housing to the coach wall (framed opening) at the top and
sides of control housing compartment using screws or other suitable fasteners.
Recess the screws or fasteners back far enough from the front edge of control
housing (approximately 1 1/2") in order to clear the flange on door frame. The door
frame, when installed, must not overlap onto screw or other fastener head. NOTE:
Caulk around screw or fastener heads to assure water tight seal.
C. Install chocks, one on each side of water heater, as illustrated in Figure 1A.
D. On mesa or yoder type sidewalls, flatten the wall area around the opening.
E. Caulk around framed opening (trailer skin) as illustrated.
F. Caulk around door fram e using 2 beads of silicone caulking (or suitable
caulking) - one on flange to seal to control housing and one around back side of
fram e to seal to coach skin. (See detail A in illustration.)
G. Insert door frame into control housing and secure with three (3) No. 8-15 x 3
1/2" screws provided.
H. To install door, place the two holes in the bottom of the door over the door pins
on the frame. Close the door so that the latch protrudes through the slot in the
door. Turn latch 90 degrees to fasten door.
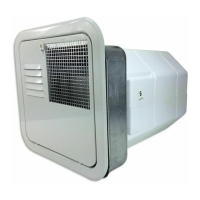
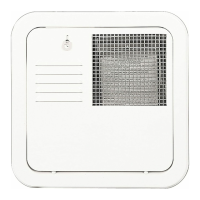
INSTALLATION USING HINGED DOOR
(See Figure 3 for illustration)
A. Position heater into framed opening as illustrated.
B. On mesa or yoder type sidewalls, flatten the wall area around the opening.
C. Caulk around framed opening (trailer skin) as illustrated.
D. Lay a bead of silicone caulking (or suitable caulking) around the inner edge of
the control housing (top, bottom and sides). See detail “A” in illustration. This will
seal frame to control housing.
E. Apply a bead of silicone caulking (or suitable caulking) around back side of
door frame. See detail “A” in illustration. This will seal frame to coach skin.
F. Fit the door frame into control housing (over the caulking already applied) and
pull frame tight to control housing using the three (3) No. 8-15 x 3 1/2" screws
provided.
G. Push water heater into framed opening until back side of door frame (now
attached to control housing) is against the side of the coach and firmly attach with
screws around the perimeter of the frame. NOTE: The two (2) holes in bottom of
frame identified as “A” in Figure 3 are also used to mount door hinge to the frame.
H. Install chocks, one on each side of water heater, as illustrated in Figure 1A.
I. Attach door to frame as illustrated.
J. Close the door so that the door latch protrudes through the slot in the door.
Turn latch 90 degrees to fasten door.
 Loading...