This document describes the SUG AWI Series Digital Torque Wrench, a tool designed for precise torque application.
Function Description
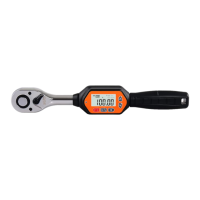
The digital torque wrench features a reversible ratchet (1) and a quick release button (2) for easy socket changes. A forward and reverse selection lever (3) allows for directional control. It comes with square drives of 1/4", 3/8", and 1/2" (4). The handle (6) provides a comfortable grip. The device includes an LED indicator (7) and a buzzer (8) for feedback. All information is displayed on an LCD panel (9).
Control buttons include:
- Button (10): General purpose button.
- Power/Reset Button (11): Turns the device on/off and resets it.
- Unit Selection Button (12): Changes torque units.
- Mode Selection Button (13): Switches between trace (T) and peak (P) modes.
- Up Button (14): Increases values or navigates menus.
- Down Button (15): Decreases values or navigates menus.
The display shows the torque value (16), mode (17), and unit (18). It also indicates battery level (19), memory group number (20), and torque direction (21).
Important Technical Specifications
The AWI series includes models AWI-10, AWI-30, AWI-60, and AWI-100, differing primarily in their maximum operating range and connector size.
General Specifications:
- Minimum division value: 0.01 (AWI-10) or 0.1 (AWI-30, AWI-60, AWI-100).
- Maximum operating range (N.m):
- AWI-10: 10 N.m / 7.37 ft.lb / 88.50 in.lb / 101.97 kgf.cm
- AWI-30: 30 N.m / 22.12 ft.lb / 265.5 in.lb / 305.91 kgf.cm
- AWI-60: 60 N.m / 44.25 ft.lb / 531.04 in.lb / 611.82 kgf.cm
- AWI-100: 100 N.m / 73.7 ft.lb / 885.0 in.lb / 1019.7 kgf.cm
- Connector (inches): 1/4 inch (AWI-10), 3/8 inch (AWI-30, AWI-60), 1/2 inch (AWI-100).
- Setting range of buzzer (N.m):
- AWI-10: 0.3~10 N.m
- AWI-30: 0.9~30 N.m
- AWI-60: 1.8~60 N.m
- AWI-100: 3~100 N.m
- Length (mm): 230mm (AWI-10), 240mm (AWI-30, AWI-60), 285mm (AWI-100).
- Accuracy: Clockwise: ±2%, Counterclockwise: ±2.5%. This accuracy is available within the range of 20% to 100% of the maximum operating value. Recalibration is suggested once a year.
- Preset Value Memory Capacity: 9.
- Operation Mode: Peak mode (P) / Real-time mode (T).
- Units: N.m, kgf.cm, lbf.ft, lbf.in.
- Form of ratchet head: Bidirectional ratchet head.
- Number of ratchet teeth: 72 teeth.
- Number of buttons: 5 buttons.
- Battery: Two AAA batteries.
- Operating temperature: -10°C to 60°C (14-140°F).
- Storage temperature: -20°C to 70°C.
- Test falling height: One meter.
- Vibration test condition: 10G (includes horizontal and vertical tests).
- Service life test: 10,000 times (one test time refers to applying force from 0 N.m to max operating value and returning to 0 N.m).
Usage Features
Battery Installation and Replacement:
- Open the battery cover.
- Insert two AAA batteries, ensuring correct polarity.
- Close the battery cover.
- Press the P/C button to power on.
- Note: Remove batteries for long-term storage. Do not mix old and new batteries or different types. Wipe terminals clean before loading. Dispose of batteries properly.
Power On/Off and Reset:
- Power On: Press the P/C key. The display will show the Max measuring value for 3 seconds, then the last saved data.
- Power Off: Press and hold the P/C key for 2 seconds.
- Reset: Press the P/C key to reset. For accurate data, reset before each use.
Unit Selection:
- Press the U/S key to cycle through N.m, Kg-cm, lb-in, and lb-ft. The preset unit is N.m.
- A conversion table is provided for reference:
- 1 lbf.in = 0.083 lbf.ft = 0.113 N.m = 1.152 Kgf.cm
- 1 lbf.ft = 12 lbf.in = 1.356 N.m = 13.83 Kgf.cm
- 1 N.m = 8.851 lbf.in = 0.737 lbf.ft = 10.2 Kgf.cm
- 1 Kgf.cm = 0.868 lbf.in = 0.072 lbf.ft = 0.098 N.m
Preset Memory Group Function:
- The device has 10 preset memory data sets.
- To set a memory value, press and hold the M KEY for 2 seconds until the memory group number flashes.
- Use the Up (∧) or Down (∨) buttons to select a memory data set. These buttons can be held for continuous adjustment.
- Press the M Key again to exit selection mode.
- Use the Up (∧) or Down (∨) buttons to change the selected preset value.
Setting Target Value:
- In Trace (T) or Peak (P) mode, press and hold the Up (∧) or Down (∨) buttons to increase or decrease the target value.
Trace Mode (T) and Peak Mode (P):
- Press the M key to switch between Trace (T) and Peak (P) modes.
- Trace Mode (T): When force is applied, the displayed value changes in real-time. When the user releases their grip, the reading returns to the preset value.
- Peak Mode (P): When force is applied, the display shows the maximum torque value reached. After releasing the grip, the max value flashes. Pressing the P/C key returns it to the original setting.
LED & Buzzer Feedback:
- A beep sounds with each key press.
- In tracking mode (e.g., preset 20 N.m):
- At 80% of preset value (16 N.m), the red LED flashes, and the buzzer activates.
- As torque approaches the preset value, the LED flashes faster, and the buzzer buzzes faster.
- At 100% of the preset value (20 N.m), the LED and buzzer are continuously on.
- Feedback gradually decreases as force is released.
- Peak mode operates similarly.
Reset Memory Function:
- Press and hold the P/C key and Down (∨) key simultaneously until the screen displays "0 to 00000" and flashes 3 times. All values will revert to factory presets.
Backlight Switch:
- Press the P/C key + Up (∧) key to toggle the backlight on or off. The backlight is preset to be on.
Power Saving Mode:
- The device enters power-saving mode after 2 minutes of inactivity. Press the P/C key to wake it up.
Overload Warning:
- If the screen continuously displays "120%" upon power-on or reset, it indicates the device has been forced beyond 120% of its maximum standard torque value. This can cause damage or accuracy errors.
General Usage Guidelines:
- For hand use only.
- Do not apply excessive torque or force to the tool housing; torque applies only to the driver head.
- Do not shake or shock.
- Never use this digital torque tool to loosen fasteners.
- Always verify the tool's capacity matches or exceeds the application requirements.
- Recalibrate periodically to ensure accuracy, especially if capacity has been exceeded.
- Never force the flex head drive against stops.
- Keep away from magnets.
- Do not apply excessive force to the LCD panel.
- Use only for its intended purpose; do not use as a hammer.
- Do not use if damaged or not working properly.
- Ensure all components (wrenches, extensions, drivers, sockets) are rated to match or exceed the applied torque.
- Do not disassemble.
- Observe all equipment, system, and manufacturer's warnings and procedures.
- Always use the correct size socket.
- Do not use damaged sockets.
- Do not apply torque exceeding rated capacity, even if the tool is off. Avoid shock load. Over-torque (110% of max range) can cause breakage or accuracy loss.
- Always power the tool ON before applying torque.
- Do not press the P/C button while torque is being applied.
- Do not force the torque wrench before the booting process is complete.
- Do not use additional tools (e.g., iron or plastic pipe) to extend the handle.
- Do not touch any button when torque is exerted.
- The digital torque wrench cannot be applied to conductive tools.
Maintenance Features
Cleaning and Care:
- Use a soft, dry, clean cloth to clean the wrench and LCD panel.
- Clean by wiping; do not immerse.
- Store in its protective case at the lowest torque setting. Do not force the handle below the lowest setting.
- If the wrench gets wet, wipe it dry immediately. Saltwater is especially damaging.
- Do not use organic solvents (alcohol, paint thinner) for cleaning.
- Do not place near magnetic products.
- Do not exert heavy force or pressure on the LCD screen.
- Do not use as a striking tool or hit with a hammer.
- Avoid exceeding 110% of the largest standard torque value, as this can cause damage or accuracy errors.
- Do not use near or place in water.
- Avoid high temperature, damp environments, direct sunlight, dust, or sand.
- Do not violently shake or drop the product.
- Remove batteries if not used for a long period.
- Recycle batteries; do not throw them into fire.
- Read and follow the operating manual carefully.
- Prohibited for use in the "Off" state.
Lubrication:
- The internal mechanism is permanently lubricated during assembly. Do not attempt to lubricate it.
Accessories:
- Use only manufacturer-recommended accessories for your model. Unauthorized parts can be hazardous.
- Recommended accessories are available at extra cost from your local service center.
Safety and Reliability:
- Repairs, maintenance, and adjustments should be performed by certified service centers or qualified service organizations, always using identical replacement parts.
- To maintain accuracy, annual calibration is recommended.
- Remove batteries before cleaning.
Environmental Protection:
- Before disposing of damaged tools, check with your state Environmental Protection Agency for special restrictions or return them to a certified service center for recycling.