40
Super X11DPT-B User's Manual
DESIGNED IN USA
BAR CODE
BIOS LICENSE
IPMI CODE
1
+
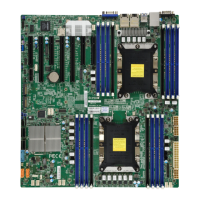
X11DPT-B
REV:1.02
SXB1
SXB2
FAN3
FAN4
BMC_HB_LED1
UID_LED1
HDD_LED1
JPME1
SXB3_1
JSIOM1
SXB4
JSDCARD1
I-SATA6
JTAG1
JCPLD1
JRK1
BT1
JBT1
JF1
JF2
JNVI2C1
JTPM1
JSD1
CPU1 PCI-E 3.0 X4
CPU2 PCI-E 3.0 X24
I-SATA0~5
P2-DIMMF2
P2-DIMMF1
P2-DIMMD1
P2-DIMME1
P2-DIMME2
P2-DIMMD2
P2-DIMMC2
P2-DIMMC1
P2-DIMMA1
P2-DIMMA2
P2-DIMMB1
P2-DIMMB2
P1-DIMMF2
P1-DIMMF1
P1-DIMMC1
P1-DIMMC2
SIOM:CPU1 PCI-E 3.0 X16
CPU1 PCI-E 3.0 X4
S-SATA0~5
TPM/PORT80
CPU1 SLOT1 PCI-E 3.0 X16
COM1
IPMI_LAN
CPU2
PCH
USB0/1(3.0)
BIOS
FLASH
BMC
UID SW
VGA
CPU2 SLOT2PCI-E 3.0 X16
JSD1:SATA DOM POWER
CPU1
P1-DIMMD1
P1-DIMMD2
P1-DIMME1
P1-DIMME2
P1-DIMMA1
P1-DIMMA2
P1-DIMMB1
P1-DIMMB2
JVRM1
JPB1
JPG1
DIMM Installation
Please follow the instructions given in the
previous section to install the DIMM modules.
For the system to work properly, please use
memory modules of the same type and speed
on the motherboard.
Push the release tabs outwards on both ends
of the DIMM slot to unlock it.
1. Align the key of the DIMM module with the
receptive point on the memory slot.
2. Align the notches on both ends of the
module against the receptive points on the
ends of the slot.
3. Use two thumbs together to press the
notches on both ends of the module
straight down into the slot until the module
snaps into place.
4. Press the release tabs to the lock positions
to secure the DIMM module into the slot.
Release Tabs
Notches
Press both notches
straight down into
the memory slot.
DIMM Module Removal
Press the release tabs on both ends of the
DIMM socket to release the DIMM module from
the socket as shown in the drawing on the right.
Warnings:
1. Please do not use excessive force when pressing the release tabs on the ends of the DIMM
socket to avoid causing any damage to the DIMM module or the DIMM socket.
2. Please handle DIMM modules with care. Carefully follow all the instructions given on Page
1 of this chapter to prevent ESD-related damages to your memory modules or components.
 Loading...