Do you have a question about the Suptek A1+ and is the answer not in the manual?
Details TV size range (23-55"), load capacity (6-48CM), and model number (A1+).
Covers critical warnings about small parts, maximum load capacity, wall suitability, and potential damage.
Lists necessary tools for mounting, including metal detector, screwdriver, drill bits, and wrench.
Inventory of all included components for assembling the TV bracket, such as brackets, screws, and spacers.
Measure and confirm the VESA mounting hole pattern on the back of your TV.
Choose between A or B panel based on TV hole pitch (e.g., 200MM*200MM) for proper attachment.
Guidance on selecting appropriate screws and washers to securely fix the TV without damage.
Instructions for wall preparation, including stud detection, marking, leveling, and securing the bracket.
Hooking the TV onto the bracket, securing it, and managing cable routing for a clean setup.
This document provides a comprehensive guide for the installation and use of the Suptek Full-featured TV Bracket, Model A1+. Designed to support televisions ranging from 23 to 55 inches, this bracket is suitable for various wall types and offers a secure mounting solution.
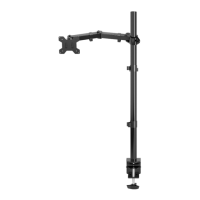
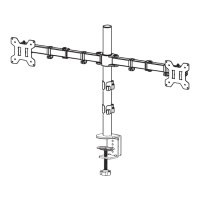
The Suptek A1+ TV bracket serves as a robust mounting system for flat-panel televisions. Its primary function is to securely attach a TV to a wall, providing a stable and space-saving display solution. The bracket is designed to accommodate TVs with a weight not exceeding 45 kg (100 lbs). It features a full-motion design, allowing for adjustments to the viewing angle, though specific tilt and swivel ranges are not detailed in the provided excerpts. The installation process is broken down into clear, sequential steps, ensuring that users can safely and effectively mount their televisions. The bracket's design includes various components such as a main bracket, punched cardboard for marking, cable ties for cable management, and a selection of screws and washers to suit different TV models and wall types. A key feature is its adaptability to different VESA mounting patterns, indicated by the "A panel" and "B panel" configurations, which cater to various hole pitches on the back of the TV.
The Suptek A1+ bracket is designed with user convenience and safety in mind. Before installation, users are advised to confirm their TV's weight and VESA hole pattern. The bracket supports common VESA patterns, including 100x100mm, 200x100mm, 200x200mm, 300x200mm, 300x300mm, 400x200mm, 400x300mm, and 400x400mm. The installation process begins with identifying the TV's VESA pattern and selecting the appropriate panel (A or B). If the B panel is used, an expanding slice is provided to connect it with the screw.
Wall mounting is a critical step, and the manual emphasizes safety precautions. Users must first determine the wall material to ensure it is suitable for mounting. The bracket is designed for general wood and brick walls, but not plasterboard walls. A metal detector is recommended to locate any hidden wires in the wall, ensuring the base is installed in a safe location. The wall must be capable of supporting at least five times the combined weight of the TV and the bracket. For wood walls, self-tapping screws are used directly. For cement walls, plastic expansion plugs are inserted first, followed by self-tapping screws. A level tool is essential during installation to ensure the bracket is mounted straight.
The bracket includes various screws (M4, M5, M6, M8) and washers to ensure compatibility with different TV models. The manual provides clear guidance on correct screw and washer usage, warning against screws that are too short (which may not fix the TV securely) or too long (which could damage the TV). Proper tightening of screws is highlighted as crucial before proceeding to subsequent steps. Once the wall bracket is securely mounted, the TV, with its attached panel, is hooked onto the head frame and pushed into place. Finally, the pre-installed screws, which were removed earlier, are screwed back in to secure the TV to the bracket. Cable ties are provided for neat cable management, helping to maintain an organized appearance.
While the Suptek A1+ TV bracket is primarily a "set and forget" device once installed, certain aspects contribute to its long-term reliability and user experience. The robust construction, designed to withstand up to 45 kg, suggests durability. The emphasis on correct screw usage and proper wall material selection during installation is a preventative maintenance measure, ensuring the bracket remains securely attached and functional over time. The inclusion of cable ties for routing helps prevent cable damage and entanglement, which can contribute to the longevity of both the TV and its accessories.
The manual also outlines a clear customer service contact for any issues, indicating a commitment to supporting the product throughout its lifecycle. This includes assistance with damaged or missing parts, which is crucial for maintaining the integrity of the installation. Although explicit maintenance instructions like periodic tightening checks are not detailed, the initial thorough installation process, guided by the manual, is designed to minimize the need for ongoing maintenance. The warning against exceeding the maximum load-bearing capacity is a critical maintenance-related instruction, as overloading can lead to equipment failure and potential damage. By adhering to these guidelines, users can ensure the bracket continues to function safely and effectively for an extended period.
| VESA Compatibility | 75x75mm, 100x100mm, 200x100mm, 200x200mm |
|---|---|
| Tilt | Yes |
| Swivel | Yes |
| Rotation | No |
| Material | Steel |
| Color | Black |
| Profile | 2.4 inches |