EasyManua.ls Logo

Suptek MD6821 - User Manual

Suptek MD6821
2 pages
Print Icon
To Next Page IconTo Next Page
Loading...
(2) pole-a (1) clamp-b (1) clamp brace-c (1) swivel arm-d
(1) VESA plate-e (3) M5x16 bolt-f (2) M8x12 bolt-g (1) nut-h
(2) wire clip-n1 (2) wire clip-n2
(1) allen key-o
(1) M10 bolt-i (1) support plate-j (1) M10 washer-k (1) spring washer-l
(1) wrench-p (4) M4X12 bolt-q (4) M4X30 bolt-r (8) M8 spacer-s
(3) M5X16 bolt-t
Self Drilled Grommet Hole Installation
Step 1
Install the pole to the desktop
Option A: desk clamp install
Option B: grommet base install
Existing grommet hole installation
figure 3
a
m
f
figure 4
j
k
l
i
figure 5
a
m
f
figure 6
j
k
l
i
figure 2
g
o
b
plastic knob
(1) grommet base
plate-m
Tools Required
Phillips Screwdriver
MD6821
INSTALLATION MANUAL
figure 1
a
c
f
UNPACKING INSTRUCTIONS
·Carefully open the carton, remove contents and lay out on cardboard or
other protective surface to avoid damage.
·Check package contents against the supplied parts list in the next page
to assure that all components wete received undamaged. Do not use
damaged or defective parts.
·Carefully read all instructions before attempting installation.
IMPORTANT SAFETY INFORMATION
·Install and operate this device with care. Please read this instruction
before installation, and carefully follow all instructions contained herein.
Use proper safety equipment during installation.
·Please call a qualified installation contractor for help if you don’t
understand these directions or have any doubts about the safety of the
installation.
Do not use this product for any purpose or in any configuration not
explicitly specified in this instruction. We hereby disclaims any and all
liability for injury or damage arising from incorrect assembly, incorrect
mounting, or incorrect use of this product.
Supplied parts list
WARNING
CAUTION!
This monitor desktop mount must be securely
attached to the horizontal desk. If the mount isnot
properly installed it may fall, resulting in possible
injury and/or damage.
If the existing grommet hole comes with a plastic
protector, remove it to ensure a flat surface before
installing the desk mount.
1. Install the grommet base plate (m)
to the pole (a) using 3 pcs M5x16
bolts (f) , and tighten using the allen
key (o), see figure 3.
2. Position the pole (a) on the
mounting surface and secure using
the suport plate (j), M10 Washer (k),
spring washer (I), and M10 bolt (i).
fasten the M10 bolt using provided
wrench (p), see figure 4.
1. Position the pole (a) on the
mounting surface and amark the
center hole. Drill a 3/8”(10mm)
diameter hole at the marked position
through the mounting surface.
2. Install the grommet base plate (m) to
the pole(a) using 3 pcs M5x16 bolts (f),
and tighten using the allen key (o), see
figure 5.
3. Position the pole (a) on the mounting
surface and secure using the support
plate (j). M10 washer (k), spring washer
(l) and M10 bolt (i), fasten the M10 bolt
using provided wrench (p), see figure 6.
2. Install the “c”-clamp (b) to the pole
assembly according to the thickness of
the desktop. The thickness can be
changed of three positions. Connect it
using 2 pcs M8x12 bolts (g), and tighten
using the allen key (o).Tighten the
“c”-clamp to the desktop using the
plastic knob, see figure 2.
1. Install the “c”-clamp brace (c) to the
pole (a) using 3pcs M5x16 bolts (f), and
tighten using the allen key (o) , see figure
1.
Question and Answer IconNeed help?

Do you have a question about the Suptek MD6821 and is the answer not in the manual?

Summary

Safety and Preparation

Important Safety Information

Covers critical safety guidelines, professional installation advice, and product usage disclaimers for safe operation.

Warnings and Cautions

Highlights essential caution and warning messages regarding secure desktop attachment and potential hazards.

Installation Guide

Option A: Desk Clamp Installation

Step-by-step instructions for mounting the monitor pole using a desk clamp mechanism.

Option B: Grommet Base Installation

Detailed steps for installing the monitor pole using either an existing or self-drilled grommet hole.

Assembly Steps

Install Arm to Pole

Guide on how to attach the swivel arm assembly to the installed monitor pole.

Attach VESA Plate to Monitor

Instructions for securing the VESA plate to the back of the monitor for both flat and curved backs.

Mount Monitor to Swivel Arm

Steps for sliding the monitor onto the swivel arm head and securing it with a nut.

Adjustments and Cable Management

Guidance on making necessary adjustments for tilt and height, and managing wires.

Overview

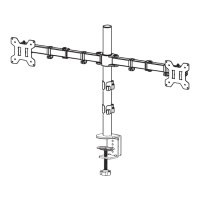
This document outlines the installation and features of a monitor desktop mount, designed to securely hold a monitor on a horizontal desk. The mount offers flexibility in installation, adjustability for optimal viewing, and integrated cable management.

Function Description

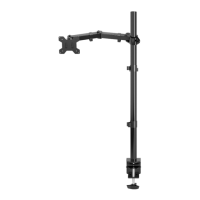
The Suptek MD6821 monitor desktop mount is designed to provide a stable and adjustable platform for a single monitor. It allows users to free up desk space by elevating the monitor and offers various adjustments to achieve an ergonomic viewing experience. The mount supports two primary installation methods: desk clamp and grommet base, catering to different desk configurations. Once installed, the monitor can be tilted, rotated, and its height adjusted to suit individual preferences. The design also incorporates features for organizing cables and storing tools, contributing to a tidy workspace.

Usage Features

Installation Flexibility:

The mount offers two distinct installation options:

  • Desk Clamp Installation (Option A): This method involves attaching a "c"-clamp brace and a "c"-clamp to the pole. The "c"-clamp can be adjusted to accommodate different desktop thicknesses, providing a secure grip on the edge of the desk. The assembly is tightened using M5x16 bolts, M8x12 bolts, and a plastic knob, ensuring stability.
  • Grommet Base Installation (Option B): This option is suitable for desks with existing grommet holes or for users willing to drill a new hole.
    • Existing Grommet Hole: If an existing grommet hole has a plastic protector, it should be removed to ensure a flat mounting surface. The grommet base plate is attached to the pole using M5x16 bolts. The pole is then positioned over the hole and secured from underneath the desk using a support plate, M10 washer, spring washer, and M10 bolt, tightened with a wrench.
    • Self-Drilled Grommet Hole: For desks without an existing grommet hole, users can mark a center point and drill a 3/8" (10mm) diameter hole. The grommet base plate is then attached to the pole, and the entire assembly is secured to the desk in the same manner as with an existing grommet hole.

Monitor Attachment:

The mount utilizes a VESA plate (e) for attaching the monitor. This plate is compatible with both flat-back monitors and monitors with curved or recessed backs, using M4x12 or M4x30 bolts respectively, along with M8 spacers for recessed backs. Once the VESA plate is secured to the monitor, the monitor assembly slides onto the head of the swivel arm (d). A security nut (h) is then installed to prevent accidental detachment, ensuring the monitor is firmly in place before any rotation.

Adjustability:

The mount provides several adjustment features to optimize viewing comfort:

  • Height Adjustment: The swivel arm (d) can be placed at various heights along the pole (a) and secured with an allen key (o). Additionally, the tightness of screws on the arm assembly allows for fine-tuning the monitor's height.
  • Tilt Adjustment: The monitor's tilt angle can be adjusted by loosening or tightening a bolt on the VESA plate assembly using the supplied allen key (o).
  • Swivel/Rotation: The swivel arm allows the monitor to be rotated horizontally, providing flexibility in screen orientation.

Cable Management:

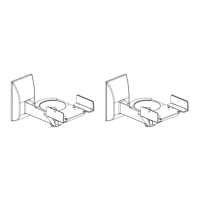
The mount includes wire clips (n1, n2) that attach to the pole and the swivel arm. These clips are designed to route and organize monitor cables, preventing clutter and maintaining a clean aesthetic.

Maintenance Features

Tool Storage:

The wire clips (n1, n2) not only manage cables but also serve as convenient storage for the allen key (o), which is frequently used for adjustments. This ensures that the necessary tool is always at hand when needed for height, tilt, or other adjustments.

Durability and Safety:

The installation manual emphasizes the importance of careful assembly and adherence to instructions to ensure the mount's stability and prevent injury or damage. The use of robust components like M5x16, M8x12, M10 bolts, and various washers contributes to the mount's long-term durability and secure operation. Regular checks of tightened bolts are recommended to maintain stability.

Troubleshooting and Support:

The manual provides contact information for customer service, indicating that support is available for any issues or questions that may arise during installation or use. This ensures users can receive assistance if they encounter difficulties, contributing to the overall usability and longevity of the product.

Suptek MD6821 Specifications

General IconGeneral
TypeFull motion
VESA Compatibility200x200mm to 600x400mm
Swivel Range+90°/-90°
MaterialSteel
Rotation360°
ColorBlack
Profile2.4 inches
Compatible TV Sizes32" - 65"
Tilt Range+5° to -15°

Related product manuals