Do you have a question about the SureShot 510 and is the answer not in the manual?
Critical safety warnings and preparation steps before commencing assembly to prevent injury.
Instructions to read all instructions and verify parts before starting assembly.
Comprehensive list of all components, including part numbers, descriptions, and quantities for assembly.
Detailed identification of top, mid, and bottom pole sections based on hole configurations.
List of necessary tools and materials, including sandbags, wrenches, and wood blocks.
Steps 1-3: Assembling the base, attaching support tubes, and connecting the lower pole section.
Step 4: Instructions for filling the base with water or sand for stability, including warnings.
Steps 5-6: Attaching the backboard, angle bracket, and hoop using bolts and U-bolts.
Step 8: Connecting the top and middle pole sections to the lower pole using wood blocks and hammer.
Steps 9-10: Securing the pole with support strips and tightening connections with spanners.
Step 11: Installing ground anchors for enhanced stability at the playing location.
Instructions for net installation, covering the top pole with a cap, and securing nuts with plastic caps.
Guidelines for cleaning the pole and repairing scratches or rust to prolong its life.
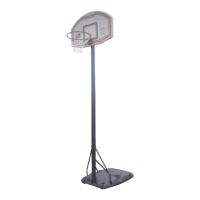
The Sure Shot Portable Court System, Model 510, is a mobile basketball hoop designed for recreational use. This system offers the flexibility to be set up in various locations, providing a convenient way to enjoy basketball without permanent installation. The design emphasizes portability and ease of assembly, allowing users to quickly set up and take down the unit as needed.
The primary function of the Sure Shot Portable Court System is to provide a complete and adjustable basketball hoop for recreational play. It consists of a base, a multi-section pole, a backboard, and a rim with a net. The system is designed to be filled with sand or water in its base to ensure stability during use, preventing tipping and ensuring a safe playing experience. The adjustable height feature allows the system to cater to players of different ages and skill levels, making it suitable for family use or various recreational settings. The wheels integrated into the base facilitate easy movement of the unit once assembled, allowing users to reposition it without significant effort. The ground anchor system provides additional stability, especially in outdoor environments or during more vigorous play, securing the unit firmly to the ground.
| Magnification | 6x |
|---|---|
| Objective Lens Diameter | 21mm |
| Accuracy | +/- 1 yard |
| Display | LCD |
| Battery Type | CR2 |