592860 4/20 | 80-000224_INST_C
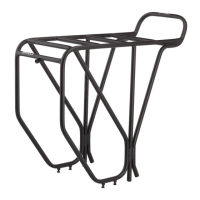
Rear Rack Instructions
Hi there. Thanks for spending your hard-earned cash on this Surly product. Surly stuff is designed to be useful and durable.
We’re confident it will serve you well for years to come.
Read these instructions completely before beginning installation of this product. Have your local professional bicycle mechanic
perform the installation if you lack the knowledge or tools to perform installation correctly.
Always use genuine Surly replacement hardware for your rack. Genuine replacement hardware is available from your local
bicycle retailer.
WARNING:
• Cycling can be dangerous. Bicycle products should be installed and serviced by a professional mechanic.
Never modify your bicycle or accessories. Read and follow all product instructions and warnings including
information on the manufacturer’s website. Inspect your bicycle before every ride. Always wear a helmet.
• Check with your bicycle’s manufacturer to verify proper fit, mounting points, bicycle cargo load capacity,
and compatibility for carrying cargo. Do not exceed the bicycle manufacturer permissible load
• Do not exceed the load capacity of 36kg (80 lb) for the Rack
• Not designed to pull a trailer
• Rack is only designed to carry rack-specific bags or panniers. Not compatible with child seats, or for use with any
passenger accessories
• Do not modify the luggage carrier in any way. Hardware included with the rack must be used. Do not use hardware
included on your bike. NEVER MODIFY YOUR RACK OR RACK HARDWARE
• Position reflectors and lights so that they are not obstructed when the rack is loaded
• Make sure your load is evenly balanced and secure before every ride (i.e. no loose straps to get caught in the wheels)
• The bicycle may behave differently (particularly with regard to steering and braking) when the luggage carrier is loaded
• Improper installation of bolts may lead to product failure, causing serious injury. Do not exceed specified torque values.
Periodically inspect bolts and tighten if required
Additional Product and Safety Information can be found at the website: surlybikes.com/safety
Intended Use
INTENDED USE: CONDITION 2
This is a set of conditions for the operation of a bicycle that includes Condition 1 as well as unpaved and gravel roads
and trails with moderate grades. In this set of conditions, contact with irregular terrain and loss of tire contact with
the ground may occur. Drops are intended to be limited to 15cm (6") or less. Please see link to Bike Owner’s Manual
on surlybikes.com/safety for complete list of riding condition descriptions.
Compatibility
The hardware we provide will enable you to fit our rack to most rigid 26" and 700c frames. Our rear rack WILL work with disc
brakes on our Troll, Ogre, ECR, and Disc Trucker frames. 300mm upper tubes are available aftermarket to allow the Rear Rack to fit
on smaller frames and still keep things level. Compatible with panniers that use attachment clamps that fit a 10mm tubing diameter.
NOTE: 300mm tubes are not included in the original hardware but are available aftermarket. Use only as rear rack upper struts,
never use as a replacement for lower struts.
Tools Required
• 4mm hex key
• Grease
• Mallet
• Torque wrench with 4mm bit that measures in Nm
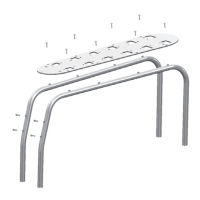
Hardware Included
(2) M8 x 1.25 x 10mm
set screw
(2) Upper barrel
(1) Right lower clamp
(1) Left lower clamp
(4) M5 x .8 x 16mm
socket head cap screw
(4) M5 x .8 x 12mm
socket head cap screw
(2) Upper tube block
(2) Lower tube block
(2) Upper stay tube
(2) Lower stay tube
For off-road
riding and
jumps less than
12" (30cm)
Upper stay tube Lower stay tube
M8 x 1.25 x 10mm
set screw
M5 x .8 x 16mm
socket head cap screw
Upper barrel
M5 x .8 x 12mm
socket head cap screw
Upper tube block
Right lower clamp
Lower tube block
Left lower clamp