Do you have a question about the Suzuki K9K and is the answer not in the manual?
Defines signal words like WARNING, CAUTION, and NOTE for hazard communication.
Warns against unqualified technicians and improper repairs causing injury or vehicle unsafety.
Advises on safe service procedures for air bag systems, potential hazards, and modifications.
Discusses the impact of non-genuine parts on performance and warranty coverage.
Prohibits re-use of safety-critical parts like air bags and seatbelts due to hazards.
Instructions for installing the oil pressure gauge and measuring pressure.
Procedure for reinstalling the oil pressure switch and tightening torque.
Step-by-step guide to measure valve lash and its specifications.
Outlines how to determine the correct tappet thickness for replacement.
Steps for removing and installing the air cleaner filter and assembly.
Procedure for checking filter condition and cleaning it with compressed air.
Illustrates intercooler parts and torque specs.
Specifies the tightening torque for the air cleaner outlet hose clamp.
Steps to remove the intercooler, including hoses and bracket.
Details the specified tightening torques for bracket bolts and hose clamps.
Shows the parts of the cylinder head cover assembly with torque specifications.
Step-by-step instructions for removing the cylinder head cover.
Details sealant application and fitting the cover with bolts.
Specifies the tightening procedure and torque for cylinder head cover bolts.
Procedure for removing and installing the oil pressure switch with specified torque.
Steps for removing the heat exchanger, including draining coolant.
Steps for installing the heat exchanger with a new gasket and specified torque.
Refers to another section for installing the engine left mounting bracket.
Instructions for installing the oil filter unit bracket, aligning lug and hole.
Refers to another section for installing generator and compressor brackets.
Final checks for oil and coolant leakage after assembly.
Illustrates components of the EGR valve and intake pipe with torque specifications.
Explains symbols for tightening torque and parts that should not be reused.
Steps for disconnecting electrical connectors, hoses, and removing EGR valve.
Identifies the specific tool required for EGR valve removal.
Procedure for installing EGR valve body and associated pipes with gaskets and bolts.
Steps for installing the EGR cooler water pipe assembly and connecting hoses.
Instructions for installing intake pipes with new gaskets and O-rings, including torque specs.
Steps for installing the EGR valve with gasket and specified bolt torque.
Details on how to disassemble the EGR valve body, cooler, and pipe.
Instructions for reassembling the EGR valve body, cooler, and pipe with gaskets.
Guidance on inspecting the EGR valve body for wear or damage.
Illustrates turbocharger parts, including pipes, bolts, and solenoid valve with torque specs.
Warns against servicing the exhaust system while hot.
Detailed procedure for removing the turbocharger assembly and associated pipes.
Specifies torques for turbocharger nut, oil return pipe bolt, and lubrication pipe union bolt.
How to check the turbocharger turbine shaft for smooth rotation.
Shows exhaust manifold parts, nuts, gasket, and safety warning.
Procedure for loosening exhaust manifold nuts and removing the manifold.
Steps for installing the manifold with a new gasket and specified nut torque.
Illustrates oil pan, baffle plate, strainer, and bolts with torque specifications.
Notes on applying sealant and engine oil to specific parts.
Includes disconnecting battery, draining oil, and removing hood.
Procedure to hoist the engine for clearance to remove the oil pan.
Specifies the numerical order for loosening lower oil pan bolts.
Specifies the numerical order for loosening upper oil pan bolts.
Steps to remove the oil pump strainer and oil pan baffle plate.
Instructions for cleaning sealing surfaces and applying sealant.
Procedure for installing the oil pan baffle plate with specified bolt torque.
Details the multi-stage tightening of upper oil pan bolts.
Procedure for installing the oil pump strainer with O-ring and bolt torque.
Specifies the tightening procedure for lower oil pan bolts.
Steps for installing the engine into the vehicle, including mountings and nuts.
Specifies tightening torques for drain plug and transmission bolts.
Procedures for installing the oil level gauge and clutch operating cylinder.
Steps for removing fuel filter and A/C compressor discharge pipe.
Refers to other sections for transmission and starting motor removal.
Lists various electrical connectors to be disconnected from the engine harness.
Lists various hoses and wiring harnesses to disconnect before engine removal.
Procedure for removing engine mounting nuts and final checks before lifting.
Specifies the tightening torque for engine mounting nuts during installation.
Refers to other sections for transmission installation and general part reinstallation.
Instructions for refilling engine oil, cooling system, and charging A/C.
Illustrates timing belt, tensioner, pulleys, and covers with torque specifications.
Specifies the tightening procedure and torque for the crankshaft pulley bolt.
Steps for removing the upper and lower timing belt covers.
Procedures for removing the CMP sensor and generator upper bracket support.
Step to remove the TDC pin cap.
Procedure for aligning crankshaft pulley and inserting special tools for timing.
Steps for locking the flywheel and loosening the crankshaft pulley bolt.
Instructions for removing the timing belt and tensioner components.
Confirms installation of special tools for timing belt installation.
Instructions for installing timing belt inner cover, pulley, and tensioner.
Procedure for aligning timing belt matching lines with camshaft and pump pulley marks.
How to adjust tensioner position and tighten its bolt.
Instructions to check camshaft pulley bolts and tighten them to specification.
Steps to temporarily install the crankshaft pulley bolt.
Procedure for rotating crankshaft and checking alignment with special tool.
Important note about not fully tightening camshaft pulley bolts at this stage.
Check that timing belt pulley key is positioned vertically upwards.
Detailed steps for adjusting timing belt tension using the tensioner.
Steps for installing the crankshaft pulley, including locking flywheel and tightening bolt.
Specifies the torque and angle for tightening the crankshaft pulley bolt.
Procedure for installing the TDC pin cap with sealant and specified torque.
Steps for installing the generator upper bracket support.
Instructions for installing timing belt covers and the CMP sensor.
Steps for installing generator bracket and injector cover.
Guidance on inspecting the timing belt for wear or cracks.
How to check the timing belt tensioner and roller for smooth rotation.
Illustrates oil pump, chain, sprockets, and gasket holder plate with torque specifications.
Warns against disassembling the oil pump as it will spoil its function.
Steps for removing the oil pump, chain, and drive sprocket.
Procedure for installing the oil pump assembly with specified bolt torque.
Instructions for installing the gasket holder plate with gasket and bolts.
Detailed procedure for installing the oil seal using special tools, with caution.
How to check the oil pump rotor and cases for wear or damage.
Checking the teeth of oil pump drive sprocket and sprocket for wear or damage.
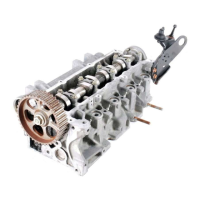
Illustrates camshaft, housing, tappets, pulley, and bolts with torque specifications.
Specifies tightening torques for camshaft housing and cover bolts.
Steps for fixing and removing the camshaft pulley using special tools.
Procedures for removing the camshaft cover and housing bolts.
Caution to note original tappet positions to avoid performance issues.
Instructions for cleaning and applying sealant to the cylinder head sealing surface.
Procedure for installing camshaft pulley, nut, and applying oil to journals.
Steps for installing camshaft housing with bolts, following numerical order.
Procedure for installing new oil seal using special tools and protector.
Specifies torque and angle for tightening camshaft pulley nut.
Installing special tool into timing belt pulley and cylinder head hole.
How to check camshaft sprocket teeth, journals, and cam faces for wear.
Procedure for measuring cam height using a micrometer and replacing if out of spec.
Inspecting camshaft journals and housings for pitting, scratches, or damage.
Detailed steps to measure journal clearance using gauging plastic.
Shows the locations of the door lock controller, actuators, and switches.
Differentiates keys used for M13 and K9K engine models.
Describes signal modes for LOCK and UNLOCK signals, including light flashes.
Steps to change the signal mode for the keyless entry system.
Steps to inspect the operation of the keyless entry system.
Steps to check LOCK and UNLOCK button functions on the transmitter.
Guidance for rechecking the keyless entry system circuit if issues are found.
Voltage specifications for the key remainder circuit under different conditions.
Checks for door switch and interior light circuit conditions using figures A, B, and C.
Procedure to check hazard warning signal circuit by pressing transmitter buttons.
Specifications for hazard warning signal circuits on the K9K model.
Conditions and figures for checking door switch and interior light circuit on K9K model.
Caution regarding grease/dirt on circuit board and battery disposal.
Step-by-step guide to replace the battery in the M13 model transmitter.
Step-by-step guide to replace the battery in the K9K model transmitter.
Procedure for registering key codes for the M13 model transmitter.
Procedure for registering key codes for the K9K model transmitter.
Steps to inspect door mirror operation by applying voltage to terminals.
Table showing mirror operation based on terminal connections.
Caution to avoid pinching the harness when installing the door mirror.
Procedure to check for continuity in the door mirror heater terminals.
| Engine Code | K9K |
|---|---|
| Engine Type | Diesel |
| Fuel Type | Diesel |
| Bore | 76 mm |
| Stroke | 80.5 mm |
| Aspiration | Turbocharged |
| Turbocharger | Yes |
| Cooling System | Water-cooled |
| Displacement | 1461 cc |
| Torque | 240 Nm |
| Injection | direct injection |
| Compression Ratio | 18.8:1 |
| Valvetrain | DOHC |