EasyManua.ls Logo

SWF SWF/E-T1501C User Manual

Default Icon
75 pages
To Next Page IconTo Next Page
To Previous Page IconTo Previous Page
Page #60 background image
55
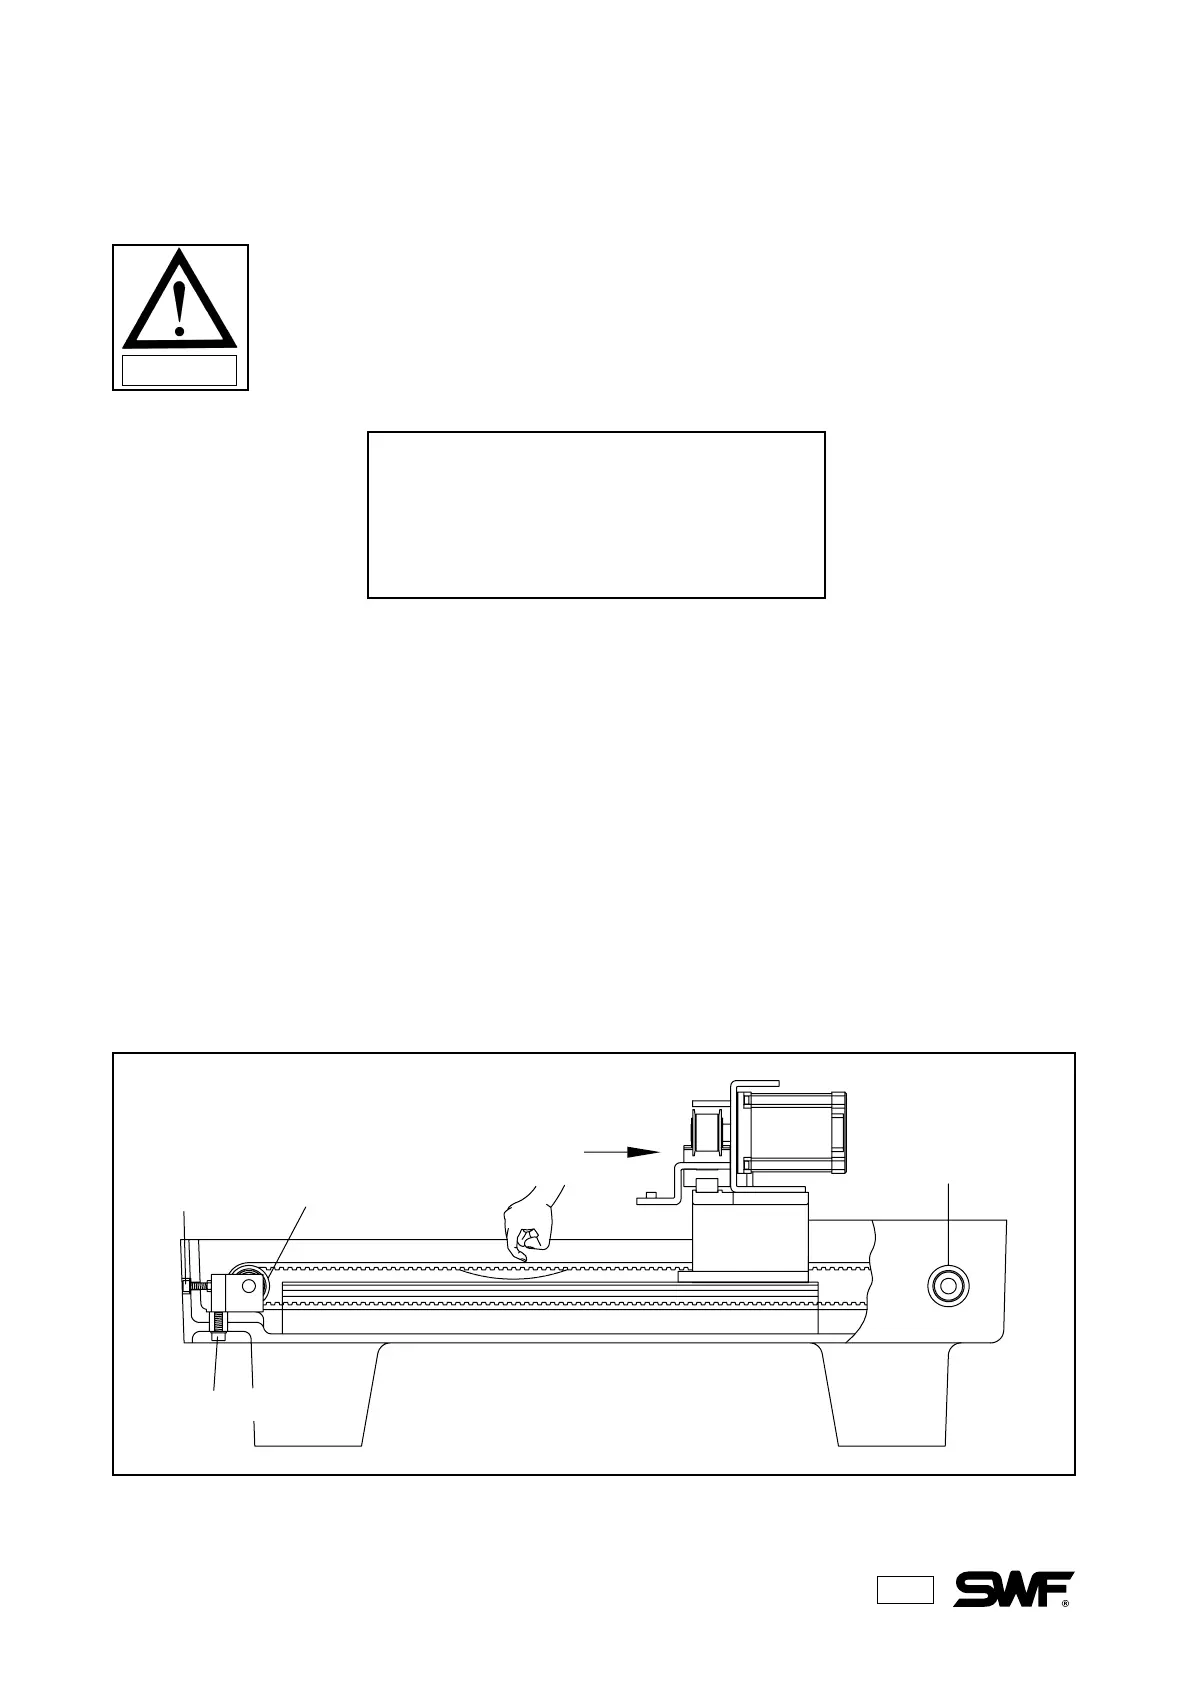
ADJUSTMENT OF DRIVE BELT TENSION
TIMING BELT OF Y-AXIS
Check the belt with a sound wave tension meter. Pluck the end of the X drive at the center of the belt with a
finger or tool and then adjust the Y-axis belt to 30~32 kgf. The input data should be :
Weight : 003.8gf/m
Width : 015.0mm/#R
Span : 0540mm
Release the tension base fixing bolts and turn the tension adjusting bolt to achieve the proper tension.
Turning the bolt clockwise increases the belt tension. Turning it counter-clockwise decreases the tension.
CAUTION
The main power should be off when adjusting drive belt tensions.
When drive belt tension adjustments are needed, contact your service technician
as the loss of tension will adversely affect the quality of embroidery as well as the
operation of the machine.
Tension Adjustment Specifications
Model Name : U-305 Series – Standard
Phonometry Belt Tester
Manufacturer : UNITTA
Tension Base Bolt
Drive Pulley
Driven Pulley
Tension
Adjusting Bolt
X-Drive
Question and Answer IconNeed help?

Do you have a question about the SWF SWF/E-T1501C and is the answer not in the manual?

SWF SWF/E-T1501C Specifications

General IconGeneral
BrandSWF
ModelSWF/E-T1501C
CategorySewing Machine
LanguageEnglish

Summary

SAFETY RULES

Delivery of Your Machine

Procedures for safe receipt and handling of the embroidery machine.

Installation Safety

Precautions for safe installation and environmental setup.

Machine Operation Safety

Guidelines for safe operation to prevent injury and damage.

Troubleshooting Safety Precautions

Safety measures before performing troubleshooting or maintenance.

Placement of Warning Stickers

Understanding and adhering to warning labels on the machine.

INSTALLATION AND MACHINE ASSEMBLY

Environment Requirements

Optimal temperature, humidity, and lighting for machine installation.

Electrical Setup and Grounding

Proper electrical connection, voltage, and grounding for safety.

Leveling the Machine

Steps to ensure the machine is balanced horizontally for stable operation.

Peripheral Device Assembly

Instructions for assembling stands and tables for the machine.

Frame Conversion Procedures

Steps for converting between tubular and border frames.

Optional Component Installation

Guidance on installing optional accessories like lamps.

PARTS OF THE MACHINE

FUNCTIONS AND FEATURES

Expanded Memory Size

Details on the machine's design storage capacity and stitch limits.

Design Manipulation Features

Capabilities like mirror image, size adjustment, and repetition of designs.

Operational Control Features

Functions like auto-offset, manual offset, return to start, non-stitching, and frame reversal.

Automatic Systems and Safeguards

Features like auto-trimming, thread break detection, and power failure safeguards.

Data Management and Compatibility

Information on floppy drives, editing, and tape code compatibility.

BUTTON AND SWITCH OPERATION

Emergency Stop Button

How to use the emergency stop for immediate machine halt.

Power and Control Board Switches

Operation of ON/OFF buttons and toggle switches on the control panel.

THREADING AND TENSION

Upper Thread Path Guide

Detailed path of the upper thread from stand to needle.

Machine Threading Procedure

Step-by-step instructions for threading the machine.

Upper Thread Tension Adjustment

How to properly set upper thread tension for quality stitching.

Take-Up Spring Adjustment

Adjusting the take-up spring for correct thread tension and break detection.

Bobbin Threading and Tension

Steps for inserting and setting bobbin tension.

Bobbin Winder Operation

Instructions for winding bobbins correctly.

THE NEEDLE, THE HOOK AND THE STITCHES

Stitch Formation Process

Understanding how embroidery stitches are created.

Needle Selection and Care

Choosing the right needle and proper handling for optimal stitching.

Changing the Needle

Step-by-step guide for safely replacing the needle.

Needle and Hook Timing

Relationship and timing adjustments between needle and hook for stitch formation.

Take-Up Lever and Hook Relationship

How take-up lever movement affects hook timing and stitch quality.

Thread Break Detecting Unit

Function and maintenance of the thread break detection system.

MAINTENANCE AND INSPECTION

Regular Inspection Checklist

Key points to check during routine machine inspections.

Cleaning Procedures

How to clean the machine for optimal performance and longevity.

Oil Supply and Application

Where and how to apply oil for lubrication.

Grease Supply and Application

Where and how to apply grease for lubrication.

MACHINE ADJUSTMENTS

Trimmer and Blade Adjustments

Steps for adjusting thread trimmers, movable blades, and their tension.

Picker Adjustment

Adjusting the picker mechanism for correct thread separation.

Presser Foot Adjustments

Adjusting presser foot for minimal noise and correct height.

Encoder Adjustment

Adjusting encoder position for precise operation and troubleshooting.

Drive Belt Tension Adjustment

Setting the correct tension for drive belts for optimal performance.

TROUBLESHOOTING

Machine Operation Errors

Troubleshooting common issues like failure to operate or incorrect needle position.

Incorrect Color Change Issues

Diagnosing and resolving problems with the color change function.

Frequent Thread Break Issues

Identifying causes and solutions for recurring thread breaks.

Stitching Quality Problems

Addressing issues like skipped stitches and poor stitch formation.

NEEDLE CHART

BACKING

HOOPING AND TENSIONS

Related product manuals