Do you have a question about the Swiss Madison Delice Ceramic Farmhouse Kitchen Sink and is the answer not in the manual?
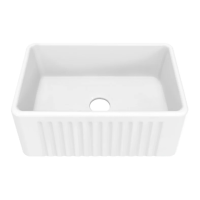
| Material | Ceramic |
|---|---|
| Type | Farmhouse Kitchen Sink |
| Color | White |
| Product Type | Kitchen Sink |
| Style | Farmhouse |
| Manufacturer Warranty | 1 Year Limited Warranty |
| Number of Basins | Single Bowl |
| Overall Dimensions | 30" (Width) x 20" (Front to Back) x 10" (Depth) |
Official branding and contact information for Swiss Madison products.
Identifies the specific sink model: Delice Ceramic Farmhouse Kitchen Sink.
Read instructions thoroughly, use proper tools, and wear safety gear.
Farmhouse cabinets must be 3" larger than the sink for proper fit.
Specifications for SM-KS243 sink, including dimensions and cabinet size.
Specifications for SM-KS245 sink, including dimensions and cabinet size.
Specifications for SM-KS246 sink, including dimensions and cabinet size.
List of recommended tools and materials for sink installation.
Identifies the included components, like the Swiss Madison Sink and optional grid.
Build support frames inside the cabinet based on sink measurements.
Measure and cut the base cabinet front for sink installation.
Carefully place sink into opening, ensuring it is level and sealed.
Use adhesive to attach the countertop to the sink rim.
Connect drain, trap, and water supply, then check for leaks.
Details on what the warranty covers, conditions, and voiding factors.
Provides contact details for claims and important safety warnings.