Do you have a question about the Swiss Madison SM-WC326 and is the answer not in the manual?
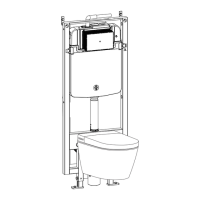
Inspect carrier for damage, observe codes, measure toilet, read instructions, ensure safety gear.
Follow guidelines, consider professional installation, bleed air from piping, avoid freezing.
Lists safety glasses, grease, wrench, tape measure, drill, file, hacksaw, level for installation.
Labeled diagram of carrier system parts, including flush actuator note.
Secure carrier at 39 3/8" height in wood framing, ensure plumb and horizontal alignment.
Measure, cut, and de-burr the drain pipe (L=X-H) according to bowl measurements.
Lubricate pipe ends with grease, insert dirt cap during construction for protection.
Remove cover plate to install the water supply valve.
Use Teflon tape, attach to supply valve, install and secure into tank.
Flush supply line before connecting to tank, then connect and tighten valve.
Attach flush actuator, listening for a "click" to confirm proper installation.
Insert, measure, cut, de-burr, lubricate, and install drain tube into wall and bowl.
Ensure toilet bowl is level, install, caulk, and seal around the base.
Shut water, remove valves, adjust outlet (A, B) and inlet (C) dimensions per specifications.
Covers material/craftsmanship defects within one year; proof of purchase required.
Void if not installed by professional, modified, or misused; excludes consequential damages.
| Product Type | One-Piece Toilet |
|---|---|
| Color | White |
| Material | Ceramic |
| Flush Type | Dual Flush |
| Bowl Shape | Elongated |
| Seat Included | Yes |
| Seat Material | Plastic |
| Rough-in | 12 inches |
| Seat Height | 16.5 inches |
| Trapway Size | 2 inches |
| ADA Compliant | Yes |
| Warranty | 1 Year Limited |
| Depth | 27 inches |
| Water Consumption | 0.8/1.28 GPF |
| Features | Soft Closing Seat |