EasyManua.ls Logo

Swiss Madison SM-WC427 - User Manual

Swiss Madison SM-WC427
19 pages
Print Icon
To Next Page IconTo Next Page
Loading...
Concealed In-Wall Toilet Tank
Carrier System 2x4
SM-WC427
@SwissMadison
#WellMadeForever
INSTALLATION INSTRUCTIONS
Wall-Hung Carrier System
well made forever
www.swissmadison.com | 1-434-623-4766 | info@swissmadison.com
Question and Answer IconNeed help?

Do you have a question about the Swiss Madison SM-WC427 and is the answer not in the manual?

Summary

Measure Frame for Cistern Installation

Confirm Cistern Installation Location

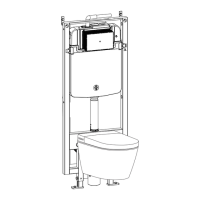
Measure the frame to confirm the cistern installation location, noting key dimensions.

Carrier System Mounting and Pipe Connection

Fasten Mounts and Install Stop Valve

Fasten four mounts after adjusting bowl height, ensure frame is flush and level. Install stop valve on water line.

Connect Discharge Pipe

Find center of discharge pipe, drill 3 5/8” hole through framing, and connect bracket.

Carrier System Component Installation

Install T-Connector

Install the t-connector inside the mounting box for plumbing connections.

Install Auto Flush Module

Insert module at top right, connect wires, and perform water test by turning on stop valve.

Carrier System Power Connection

Connect Power Source

Attach corrugated pipe to frame, pass through designated hole to junction box, remove covers, and install power cord connector.

Complete Power Source Connection

Finalize Power Cord and Circuit Breaker Installation

Install power cord connector, cut plug, pass cord through pipe to junction box, and install circuit breaker.

Smart Toilet Installation Steps

Remove Seat

Open seat lid, remove screws/washers, and remove bidet seat from toilet bowl.

Dry Fit Outlet and Inlet Pipes

Attach mounting pad, insert straight tube, connect pipe to discharge outlet, and mark wall locations.

Determine Pipe Size

Apply lubricant to washers, insert pipes, and draw lines on pipes to mark size.

Cut Pipes

Measure marked distance, cut pipes, file edges, and remove burrs. Bevel pipe edges.

Mount Toilet Bowl

Apply lubricant to joint surfaces and mount toilet bowl to the wall.

Level and Attach Bowl

Attach bowl with washers/bolts, ensure level, cover with cap, remove liner, and fill gaps with sealant.

Connect Bidet Seat

Connect water inlet hose, power cords, and flush wire using Velcro. Secure seat with screws/covers.

Install Flush Plate

Install flush actuator plate according to installer instructions.

Smart Toilet Daily Maintenance

Main Unit Maintenance

Disconnect power, clean with soft damp cloth. Avoid harsh chemicals.

Spray Nozzle Maintenance

Extend nozzle, clean separately with soft cloth. Re-install nozzle and housing.

Safety Self-Inspection

After cleaning, reconnect the toilet with the power supply.

Smart Toilet Troubleshooting

Filter Maintenance

Turn off water, disconnect hose, remove and clean filter. Re-install and turn on water supply.

Water and Power Failure Flushing

Fill bucket with water and flush toilet from bowl center. Avoid overflow.

Main Unit Operation

Operate functions using buttons on the main unit when remote is not working.

Remote Control Battery Replacement

Remove remote from hanger, open cover, replace batteries, and return remote to hanger.

Main Unit Button Functions

Operation Instructions

Details on using STOP, DRY, FRONT/MOVE, and REAR/MOVE buttons for various functions.

Troubleshooting Guide

Spray Nozzle and Water Pressure Issues

No water from nozzle, poor water pressure. Check hose, valve, filter, and supply.

Temperature and Dryer Function Problems

High/low water, seat, or drying temperature. Dryer not blowing. Adjust settings or switch to operating mode.

Nozzle Rod and Remote Control Issues

Nozzle rod won't retract/extend, remote not working. Manual retraction, sensor adjustment, battery check.

Deodorization and General Troubleshooting

Deodorization function behavior is normal. Address general issues by turning off power and contacting service.

Safety Precautions

General Safety Guidelines

Follow basic safety precautions, especially with children. Not for unsupervised children or individuals with reduced capabilities.

DANGER - Risk of Electrocution

Avoid water contact, wet hands on plug, blocking dryer outlet, disassembly, and ensure power is unplugged during maintenance.

WARNING - Risk of Burns, Injury, or Fire

Supervise children, use as intended, avoid damaged cords, keep cord from heat, do not use while drowsy, use grounded outlets.

Important Safety Instructions

CAUTION - Injury or Property Damage Risk

Avoid wet locations, ensure dry outlet, use correct electrical current (110-120V, 15A), use GFCI, unplug during thunderstorms.

Usage and Maintenance Precautions

Do not stand on product, lean on seat cover, push seat closed forcefully, use caustic chemicals, expose to sunlight, use hot water supply, or freeze.

Extended Non-Use and Malfunction Procedures

Unplug and drain if not used for over 3 days. Unplug and turn off water if malfunctioning.

Electrical Safety and Grounding Instructions

Ensure proper grounding, use correct plug, no adapters, and connect to grounded outlet. Reconnection by qualified personnel.

Smart Toilet Parts Identification

Left Side Components

Identifies Lid, Bumper, Seat, Ceramic toilet, and control buttons (ECO, Stop, Drying, Front/Rear Wash).

Right Side Components

Identifies Drying baffle, Spray nozzle, Rear/Front washing, and Night light sensitive window.

One Year Limited Warranty Information

Warranty Coverage Details

Covers defects in materials/craftsmanship within the first year, providing replacement parts or products.

Conditions That Void Warranty

Voided if installation recommendations not followed, product moved, modified, misused, or subject to accidents.

Consumer Responsibilities and Liability Limits

Consumer must ensure code compliance. Warranty excludes consequential damages, freight, labor, and other indirect costs.

Contact Information and Important Warning

Contact for questions or concerns. Warning about sharp parts and potential personal damages.

Overview

The provided document is an installation and maintenance manual for a Wall-Hung Carrier System, specifically the Concealed In-Wall Toilet Tank Carrier System 2x4 (SM-WC427), and a Smart Toilet.

Function Description

The Wall-Hung Carrier System is designed to conceal the toilet tank and support structure within a 2x4 wall, providing a sleek and modern aesthetic for wall-hung toilets. It includes a cistern, flush pipe, drain pipe, and discharge pipe assemblies, along with mounting hardware for secure installation. The system is compatible with a Smart Toilet, which offers advanced features such as auto-flush, bidet functions (front and rear washing), a drying function, and a soft-closing seat. The Smart Toilet is designed for ease of use and maintenance, with a focus on hygiene and convenience.

Important Technical Specifications

Carrier System (SM-WC427):

  • Frame Dimensions (approximate):
    • Width: 535mm (top), 381mm (bottom)
    • Height: 1256mm
    • Mounting hole spacing: Ø10 x 75mm (top and bottom)
    • Discharge pipe hole: 3 5/8” diameter (drilled through framing)
  • Mounting: Designed for 2x4 wood framing, requiring 2 1/2” screws and 1 1/4” fender washers for fastening.
  • Water Supply: Includes a stop valve for water line connection in the unfinished wall.
  • Power Source: Requires a wired connection to a junction box/circuit breaker, with a corrugated pipe for cable routing. A power cord connector is provided.
  • Components: Cistern cover, mounting box, flush pipe assembly, drain pipe assembly, discharge pipe assembly, pipe clamp, ground fixation screws, Allen screws, anchor & screw components, bellows, braided hose, stop valve, bolt components, tee, panel holder and rods, mounting panel, dust covers, power wire, off-seat flushing module, flush plate.

Smart Toilet:

  • Electrical Requirements: 110V-120V, 50/60Hz electrical current, load current at least 15A. Power plug must be equipped with ground fault circuit interrupter or ground fault electrical leakage protector (rated sensitive current under 6mA).
  • Water Supply: Tap water or portable water only. Inlet water temperature should be between 37.4~95°F. Do NOT connect to a HOT water supply.
  • Features: Bidet functions (front/rear washing, moving wash), drying function, auto-flush module, soft-closing seat, night light sensitive window.
  • Controls: Main unit buttons (STOP, Dry, Front/Move, Rear/Move) and a remote control.
  • Safety: Grounded electrical outlet required. Extension cords are NOT permitted. Disconnect power before maintenance.

Usage Features

Carrier System:

  • Concealed Installation: The primary feature is the ability to hide the toilet tank and support frame within the wall, creating a minimalist bathroom design.
  • Adjustable Height: The system allows for adjustment of the bowl height during installation to suit user preferences.
  • Robust Support: Designed to securely hold a wall-hung toilet.

Smart Toilet:

  • Bidet Functions: Offers both front and rear washing options, with a "moving wash" feature for thorough cleaning. The spray nozzle extends for use and retracts for cleaning access.
  • Drying Function: An integrated dryer provides a comfortable post-wash experience.
  • Auto-Flush Module: Automatically flushes the toilet, enhancing hygiene and convenience.
  • User-Friendly Controls: Main unit buttons provide essential functions, while a remote control offers comprehensive command over all features.
  • Energy Saver Mode (ECO): Reduces power consumption when the toilet is not in active use.
  • Soft-Closing Seat: Prevents slamming and reduces noise.
  • Night Light: A sensitive window activates a night light for visibility in low-light conditions.
  • Safety Self-Inspection: After cleaning, the toilet can be reconnected to power for a safety check.

Maintenance Features

Carrier System:

  • Dust Covers: Protect internal components during wall finishing.
  • Accessible Components: The cistern cover and mounting box are designed for access to internal mechanisms if needed.

Smart Toilet:

  • Main Unit Maintenance:
    • Disconnect power before cleaning.
    • Clean with a soft, damp cloth. Avoid harsh chemicals.
  • Spray Nozzle Maintenance:
    • The spray nozzle extends for cleaning by pressing the "REAR/MOVE" button (without sitting on the unit).
    • The nozzle can be removed from its housing for separate cleaning.
    • Clean with a soft, damp cloth. Avoid harsh chemicals.
    • DO NOT pull the nozzle housing to prevent damage.
    • After cleaning, re-install the nozzle and press "STOP" to retract it.
  • Filter Maintenance:
    • If spray performance is poor, turn off water supply and disconnect the water inlet hose.
    • Remove and clean the filter under running water.
    • Re-install the filter and reconnect the water inlet hose.
  • Remote Control Battery Replacement:
    • The remote control can be taken down from its hanger to replace batteries.
    • Note that replacing batteries will reset auto functions and energy saver settings to default.
  • Troubleshooting Guide: A comprehensive guide is provided to address common issues such as no water release, poor water pressure, temperature control problems, dryer malfunction, nozzle retraction/extension issues, remote control not working, and deodorization malfunction.
  • Emergency Flushing: In case of water and power failure, the toilet can be manually flushed by pouring approximately 8L of water into the center of the bowl.
  • Safety Precautions: Emphasizes disconnecting power, avoiding water contact with electrical components, and not disassembling or modifying the product.
  • Long-Term Storage: If not used for more than 3 days, it is recommended to unplug the electrical connection, turn off water supplies, and drain any water from the product.

Swiss Madison SM-WC427 Specifications

General IconGeneral
BrandSwiss Madison
ModelSM-WC427
CategoryPlumbing Product
LanguageEnglish

Related product manuals