16
4. Pull out the headrest poles
FIG 25
5. Insert the shoulder anchors into the shoulder slots on the backrest. Note that
you have two slot height options – low position for infants and high position
for toddlers
FIG 25
6. Re-insert the headrest poles to secure the harness in place
FIG 25
7. Connect the two ends of the crotch buckle
FIG 25
8. If the harness is too small for your child (in maximum length, after adjustment)
– use the harness extension
FIG 25
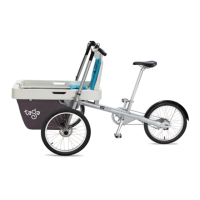
If you only have one child seat, you should only install it on the part
of the Cargo Compartment closest to the rider (rear part), either facing
forward or connected to the bar and facing the parent
FIG 26
. When
riding with one child, do not attempt to install it in the front part of the
Cargo Compartment, as this is dangerous.
WARNING
Child Seat Disassembly
1. Pull the external latch located on the underside of the seat bottom and pull
the front part of the seat
FIG 27
. The two rear bolts will still remain locked.
2. Pull the internal latch located on the underside of the seat bottom, and pull
the seat out of the Cargo Compartment rails
FIG 27
.
3. Slide the Child Seat backrest out of the anchor
FIG 27
.
4. Remove the anchor by releasing the screws
Child Seat Usage
To recline the seat, pull the external latch located on the underside of Child Seat
bottom, push the backrest backwards and simultaneously pull the seat bottom
forward
FIG 28
When reclining the seat, note that the harness straps may need to
be extended. If they reached their maximum length, use the harness
extension
CAUTION
To bring the seat back to its upward position, pull the external latch located on
the underside of the Child Seat bottom, pull the backrest and simultaneously push
the seat backwards.
FIG 28