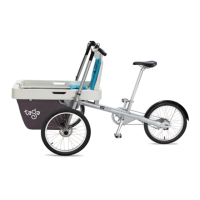
27
Adjusting the gear
If your gear makes noises or changes gears unexpectedly (while the shifter
remains on the same gear), it means that it needs adjustment.
Adjusting the Taga gear is easy and takes few seconds. However - It is recommended
that you take your Taga to your local reseller for gear adjustment.
1. Turn to second gear by rotating the shifter until the mark faces the digit “2”
FIG 58
2. Look at the little window on the gear controller (located on the rear wheel
axle, at the end of the mud guard). Is the yellow spot located between the
two yellow lines?
FIG 62
3. If not, adjust the gear
FIG 58
a. Release the nut using a wrench.
FIG 58
b. Adjust the screw to move the yellow spot until it is located between
the two yellow lines
FIG 58
c. Refasten the nut
FIG 58
4. If the gear seems adjusted but the problem still persists, contact us or see your
local reseller.
Adjusting the chain tension
FIG 59
If you hear noises from your chain or it falls frequently, the chain might be loose
and requires adjustment.
Below you can find explanations how to adjust the chain tension.
However, it is highly recommended that you ask your authorized reseller
or the bike shop near you for help with the adjustment of the chain
tension.
CAUTION
1. Remove the gear controller by releasing the screw that attaches it to the axle
FIG 59
2. Slacken the rear wheel nuts slightly with a wrench, but do not remove them.
FIG 59
3. Tighten the screws of the chain tensioners with a wrench by half a turn or
180 degrees to tighten the chain.
FIG 59
4. Check that the pedals turn freely with no resistance in the rotation. If you feel
resistance, the chain is too tight. In that case loosen the screws of the chain
tensioners by quarter of a turn or 90 degrees.
5. Fasten the nuts
FIG 59
6. Reattach the gear controller to the axle and fasten the screw
FIG 59