Do you have a question about the Taiji TSK-130B and is the answer not in the manual?
Select a suitable location considering stability, ventilation, and heat sources.
Connect the dispenser to a dedicated electrical outlet for safe operation.
Position the bottle holder to align the nozzle with the server bottle mouth.
Initial cleaning of the heat exchanger pipe before first use or after long non-use.
Fill the water tank to the optimum level using the provided funnel.
Set the desired temperature for warming sake using the control switch.
Install the cubic container for sake, ensuring proper connection of the stopcock.
Operate the dispenser to serve warmed sake into a server bottle.
Procedures for draining residual sake from the unit for maintenance.
Routine cleaning of the internal sake passage using hot water.
Replace the water in the water bath tank monthly by opening the drain valve.
Instructions for cleaning the exterior of the sake warmer unit with a dry cloth.
Regular cleaning of the nozzle tip, including the sensor electrode, with a toothbrush.
Steps for removing and washing the server bottle holder and tray with warm water.
Troubleshooting guide to resolve common issues before contacting support.
Warning against user disassembly and repair due to specialized techniques.
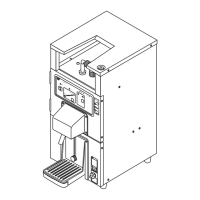
The TAIJI TSK-130B is a sake warmer dispenser designed exclusively for indoor use, intended to warm Japanese sake to a preferred temperature for optimal taste. This manual provides comprehensive instructions for its safe and correct operation, including setup, usage, and maintenance.
The TSK-130B operates as an indirect heating sake warmer. It features a water bath tank that holds approximately 4.7 liters of water, which is heated to warm the sake. Sake is supplied from a cubic container (ranging from 5 to 18 liters) and dispensed through a nozzle. The device includes a temperature control switch, allowing users to select desired warming levels, such as "Lukewarm" (approx. 45 °C) or "Hot" (approx. 65 °C). An indicator lamp system displays the current temperature setting and warming status. The dispensing process is largely automated: once a server bottle is placed on the holder, the device detects its presence and dispenses the warmed sake until the required volume is reached, at which point dispensing automatically stops. A manual dispensing switch is also available for continuous dispensing. The unit is designed with safety features, including an automatic shut-off for dispensing when the nozzle touches the sake in the server bottle, although this may vary with bottle shape.
Initial Setup and Preparation: Before first use or after a long period of non-use, the sake warmer's heat exchanger pipe must be cleaned. This involves running hot water through the system, with caution advised due to the hot water discharged from the nozzle. The device should be placed on a level, stable, and well-ventilated surface, away from heat sources and direct sunlight, and not in humid or wet environments. It requires an independent electrical outlet (AC110-120V, 15A minimum). The server bottle holder is adjustable to ensure the nozzle end is about 2 cm into the server bottle, optimizing the automatic dispensing function.
Operation: To begin, the power cord is plugged into a wall outlet, and the power switch is pressed. The power lamp illuminates, and the water supply lamp lights up, accompanied by an alarm, indicating the need for water. Water or hot water is added to the water tank using the provided funnel until the "optimum" level on the water level indicator is reached. The water supply lamp and alarm will cease once sufficient water is added. It is crucial to only add water or hot water to the tank.
Sake Container Setup: The cubic sake container is prepared by ensuring the stopcock knob is in the "CLOSE" position before screwing it onto the container. The container is then placed on the sake warmer with its mouth facing downward and the stopcock outlet to the left. The joint hose connects the stopcock to the warmer's main body. Before dispensing, the stopcock joint hose must be firmly mounted, and the nozzle pulled toward the user. The stopcock knob is then turned to the "OPEN" position.
Temperature Adjustment: Pressing the "temperature control switch" once enters the temperature setting mode, with "OFF" as the initial setting. Each subsequent press cycles through the temperature indicator lamps, moving diagonally to select "Lukewarm" or "Hot." If no selection is made for 5 seconds, the device reverts to "temperature display mode," showing the current tank temperature. The lamp flashes to indicate the present temperature until the preset temperature is attained, at which point all lamps up to the preset level remain lit. Achieving "Hot" temperature typically takes about 20 minutes.
Dispensing Sake: To dispense, a sake server bottle is fitted onto the nozzle and lightly pushed until the nozzle is straight down, then placed on the server bottle holder. The dispensing lamp flashes, and warmed sake begins to flow. The device automatically stops dispensing when the server bottle is filled to the desired volume, and the dispensing lamp turns off. For manual dispensing, the "manual dispensing switch" is pressed and held.
Draining Remaining Sake: After use, any remaining sake in the dispenser should be drained. This involves turning the stopcock knob to "CLOSE," then turning on the power switch and lightly pushing the nozzle down to drain all sake from the main body. The joint part between the stopcock and the joint hose is then loosened to ensure complete drainage. If the sake warmer is not used for more than 24 hours, the remaining sake must be drained, and the inner sake passage cleaned. Drained sake can be used for cooking.
Daily Maintenance (Cleaning Sake Passage):
Water Bath Tank Maintenance: The water in the water bath tank should be replaced once a month. This requires turning off the power switch and opening the water drain valve to drain the old water through the drain tubing.
Main Unit Care: The main unit should be wiped with a dry cloth. For more thorough cleaning, a cloth dipped in a neutral detergent solution or soap and water can be used, followed by a good wipe with a dry cloth. Avoid using paint thinner, volatile fluids, or alkaline detergents on the resin front of the machine.
Nozzle Cleaning: The nozzle should be cleaned at least twice a month. Gently scrub the sensor electrode on the tip of the nozzle with a toothbrush.
Server Bottle Holder and Tray Maintenance: The server bottle holder and tray are removable for cleaning. They should be detached from the main unit and washed neatly with warm water.
| Model | TSK-130B |
|---|---|
| Category | Dispenser |
| Rated Voltage | 220V |
| Rated Frequency | 50Hz |
| Power Supply | AC |