Do you have a question about the Tappan TGF605WFW5 and is the answer not in the manual?
Lists the necessary tools for installing the new range, including wrenches and screwdrivers.
Lists essential additional materials required for installation, such as a gas shut-off valve and flexible metal connector.
Instructions to remove all packaging, tape, and shipping materials from the range before installation.
Details on ensuring a proper gas supply for the range, including pressure requirements and connector types.
Instructions to seal openings in the wall and floor behind the range after hookups are complete.
Guidance on safely connecting the range to the gas supply, including shut-off valve and union adaptor installation.
Procedure to adjust the low setting of surface burner valves for optimal flame size without extinguishing.
Instructions for leveling the range using leveling legs or shims to ensure stability and proper operation.
Final installation tasks including connecting the power cord and setting the time of day on the electronic oven control.
Instructions to verify the proper operation of all electronic control functions as per the owner's guide.
Confirmation that air flow from the oven vent and to the bottom front of the range is not obstructed.
Requirements for connecting the range to a properly grounded and polarized 120-volt, 15-amp circuit.
Critical safety instructions emphasizing the necessity of proper grounding for the appliance.
Procedure to check the operation of surface and oven igniters for proper lighting after installation.
Steps to convert the pressure regulator for LP gas by adjusting the nylon gas indicator.
Procedure to convert surface burner spuds for LP gas by turning them to restrict gas flow.
Guidance on adjusting the air shutter for optimal flame quality, ensuring steady burning and no noisy operation.
Instructions on locating and adjusting the air shutter on the burner venturi tube for proper air intake.
Steps to convert the oven burner orifice and adjust the spud for proper flame with LP gas.
Procedure for converting the broiler burner orifice and adjusting the spud and air shutter for LP gas.
Lists the tools needed for installing the anti-tip brackets, including a nutdriver and adjustable wrench.
Instructions on securely attaching the anti-tip brackets to the floor or rear wall using provided screws.
Procedure to level the range front-to-back and side-to-side after the anti-tip brackets are installed.
Final steps to slide the range into place, ensuring rear legs are trapped by brackets and checking anchoring.
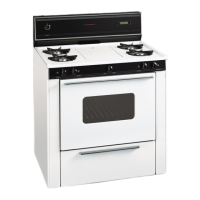
| Type | Freestanding |
|---|---|
| Fuel Type | Gas |
| Color | White |
| Convection Oven | No |
| Warming Drawer | No |
| Oven Capacity | 5.0 cu. ft. |