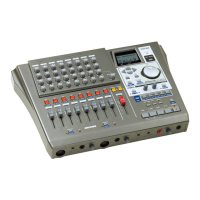
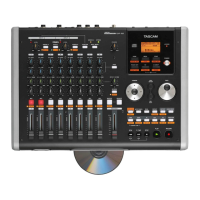
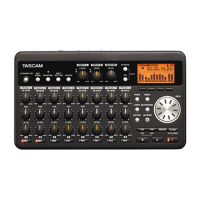
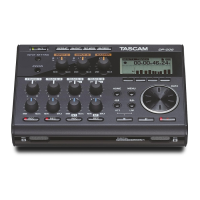
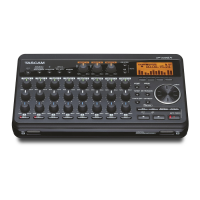
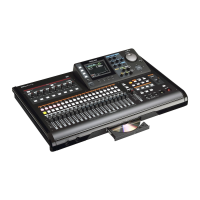
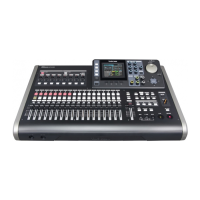
The Tascam DP-01, DP-01FX, and DP-01FX/CD are portable digital multitrack recorders designed for musicians and producers to record, mix, and master their music. These devices offer a straightforward workflow for capturing audio, layering tracks, and preparing a final mix for export.
Function Description
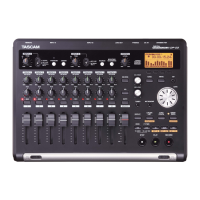
At its core, the Tascam DP-01 series functions as a self-contained recording studio. It allows users to record multiple audio tracks, mix them down, and then master the resulting stereo file. The DP-01FX and DP-01FX/CD models also include built-in effects, such as reverb, to enhance recordings without the need for external processors. The DP-01FX/CD variant further integrates a CD burner, enabling direct burning of mastered tracks to CD.
The primary function involves capturing audio from various sources. Users can connect microphones to the MIC IN inputs or instruments and line-level devices to the LINE/GUITAR IN L input. The device's faders and knobs provide tactile control over input levels, panning, and equalization for each track. Once recorded, tracks can be played back, overdubbed, and mixed. The mastering process consolidates the individual tracks into a stereo file, which can then be exported for further use or burned to a CD.
Usage Features
Recording a Track:
To begin recording, users first connect powered speakers or an amplifier to the LINE OUT to monitor their audio. An audio source, such as a CD player, tape deck, or a stereo receiver's output, is connected to the MIC IN or LINE/GUITAR IN L. All channel faders are set to the grey line for initial level.
The recording process involves a specific sequence of button presses:
- Press and hold the ASSIGN A button (which should blink) and simultaneously press the REC button above channel 1 (which should also blink). Both lights indicate readiness for assignment and recording.
- Release both ASSIGN A and REC buttons.
- Press the REC button above channel 1 again; it will now blink by itself, indicating the track is armed.
- The meters in the display above Input A and Track 1 should show activity, confirming signal presence.
- To ensure recording from the beginning, press the REWIND BUTTON twice until the display reads ABS 00.00.00.00.
- To start recording, press and hold the RECORD button and simultaneously press the PLAY button. The REC light above channel one, the PLAY light, and the RECORD light will all become solid, indicating active recording.
- After recording, press the STOP button.
- To review the recording, press the REWIND button twice until the display reads ABS 00.00.00.00, then press the PLAY button. The recorded audio should now be audible.
Recording to Other Tracks:
The process for recording additional tracks is similar, allowing users to layer instruments or vocals. The key difference is selecting a new channel number for the REC button press. This enables building up a song with multiple parts.
Mastering:
Mastering is the final stage where the individual tracks are mixed down into a stereo file.
- Adjust the level for each track using the channel faders.
- Use the PAN knobs to position each track in the stereo field (left to right).
- Adjust the tone of each track using the EQ HIGH and EQ LOW knobs.
- For models with effects (DP-01FX/CD), use the EFFECT SEND knob to route a track to the internal reverb or an external effects processor. The EFFECT RETURN knob controls the overall level of the effect.
- Fast forward to the desired end point of the song.
- Press the SHIFT button and simultaneously press the SET OUT button to define the mastering end point.
- Press the REWIND button twice to return to the beginning.
- Press the MASTER button; it will start flashing, indicating readiness for mastering.
- To begin the mastering recording, press the RECORD button and simultaneously press the PLAY button. During this process, users can dynamically adjust levels, panning, and effects, and even fade the Master level at the song's end. The recording will automatically stop at the previously set "SET OUT" point.
- After mastering, press the MASTER button again; it will light up solid. Rewind to the beginning and press PLAY to listen to the newly created stereo mix.
Exporting a Master to a PC or Mac:
To transfer the mastered stereo file to a computer, it must first be exported to the device's FAT partition.
- Ensure the MASTER button light is OFF.
- Press MENU.
- Select WAVE.
- Press the RIGHT ARROW.
- Select EXPORT MASTER.
- Press the RIGHT ARROW.
- The display will show suggested file names based on the mastered tracks. Select the desired master.
- Press ENTER/YES. The display will show the free space on the FAT partition and the space the exported tracks will occupy.
USB Open and Close:
To allow the computer to access the FAT partition, the DP-01 must be in USB OPEN mode. During this mode, no operations involving the DP-01 hard disk (recording, playback, REW, FFW) can be performed.
- Press MENU.
- Select DISK.
- Press the RIGHT ARROW.
- Select USB OPN/CLS.
- Press the RIGHT ARROW. The display will show "USB OPN/CL [ENTER] -> Exe".
- Press ENTER/YES to enable USB/OPEN. A confirmation message will appear.
- Press ENTER/YES again to confirm. The display will show "[EXIT]->close".
- The DP-01 is now in USB OPEN mode until EXIT/NO is pressed.
Accessing Files from the Computer:
- Connect the USB cable to the computer.
- On a PC, open MY COMPUTER. On a Mac, a hard drive icon will appear on the desktop.
- Click on the removable drive icon labeled "DP-01".
- Open the WAVE folder.
- Use the computer's operating system to copy the exported tracks from the WAVE directory to the computer.
Maintenance Features
The manual does not explicitly detail maintenance features beyond the operational steps. However, general best practices for electronic devices apply:
- Keep the device clean and free from dust.
- Avoid exposing it to extreme temperatures or humidity.
- Handle faders and knobs gently to prevent wear and tear.
- Ensure proper power supply and cable connections to prevent damage.
- Regularly back up important recordings to a computer to prevent data loss.
The Tascam DP-01 series is designed for robust use in a home studio or on the go, providing a reliable platform for creative audio production.