EasyManua.ls Logo

tau K130MA - User Manual

tau K130MA
19 pages
Print Icon
To Next Page IconTo Next Page
Loading...
Questions service@automaticsolutions.com.au
Page 1
TAU 130MA
TIPYou need solid opening and closing stops. The control board will search for these when
programming. Make sure they have no movement or flex.
TIPYou need to fit three small loops of wire to your safety inputs to make anything work. These
can be removed later if you install safety devices to these input terminals. But for now, take three
pieces of light gauge wire (speaker or telephone wire is good) about 50mm long and strip both ends
7mm and insert them as above from 7 to 8, 7 to 9 and 7 to 10.
TIPThe STOP input will not seal unless you have the manual override handle closed.
TIP To program and to run all safety inputs need to be sealed. The LED lights 5,6,7 and 8 should all
be lit green. (Not so when solar powered)
TIPStart with dip switches 1 to 8 and 12 in the off position. You can adjust 9,10 and 11 to suit
your model of motor.
TIPDo not install any accessories until after you have programmed the unit and have it operating
as you would like. You can then add each accessory one at a time.
TIP If using solar power refer to the manual for correct input power connection. When solar
powered the logic automatically enters power save mode and only LED 1&2 will work.
QUICKSTART
1. Ensure you have followed the instructions above and that you have the four green LED lights lit.
2. Carefully turn trimmer V-RAL anti clockwise until it comes to a stop. (Do nor force)
3. Release the gate and position it 500mm from the fully open stop.
4. Press the PROG button and hold until DL2 LED starts flashing orange. Release the button.
5. The gate should start to open slowly to find the open stop. If the gate closes instead remove power,
change the polarity of the motor by swapping terminals 23 and 24 and start again from point three.
6. When the opening stop is found the gate will close slowly searching for the closing stop.
7. When the closing stop is found the gate will run a full open and close before exiting programming.
8. If using remote controls press and release quickly CH1. Green LED2 should light to indicate ready.
9. In the next ten seconds press for one second and release one of the buttons on your remote
control. The green LED turns off and on again waiting for further remote controls.
10. When you have programmed all remote controls simply wait ten seconds until DL2 goes out.
11. Test your install.
12. You can now adjust and connect accessories one at a time and test each time.
Question and Answer IconNeed help?

Do you have a question about the tau K130MA and is the answer not in the manual?

tau K130MA Specifications

General IconGeneral
Supply voltage24 VDC
Communication interfaceRS-485, Ethernet
ProtocolsModbus RTU, Modbus TCP
Digital inputs8
Digital outputs4
Analog outputs2

Summary

TIPS & TRICKS

QUICKSTART GUIDE

Concise steps for initial setup and basic operation of the control unit.

SAFETY AND INSTALLATION GUIDELINES

Important Safety Warnings

Critical precautions and advisories before commencing installation and setup.

Control Panel Overview

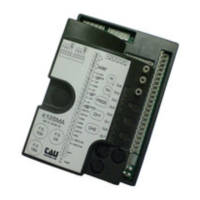
Describes key features of the K130MA control unit for single motor automation.

SYSTEM INTRODUCTION AND SPECIFICATIONS

Introduction to K130 MA Board

Overview of the control unit's operational modes and basic functionalities.

Technical Characteristics

Details specifications including power supply, motor limits, and operating environment.

Terminal Board Overview

Introduces the terminal board layout and its connection points for various functions.

TERMINAL CONNECTIONS: INPUTS

Terminals 1-10 Descriptions

Explains functions for power, pedestrian, open/close, stop, and photocell inputs.

LOGIC ADJUSTMENTS AND CONFIGURATION

Trimmer Adjustments

Guides for setting V-RAL, FR, and T.C.A. trimmers for performance tuning.

Dip Switch Settings Part 1

Explains configurations for automatic closing, 2/4 stroke, and photocell behaviors.

Motor, Encoder & Auxiliary Connections

Details connections for motor supply, encoder, auxiliary devices, and interface modules.

ADVANCED CONFIGURATION AND MEMORIZATION

Dip Switch Settings Part 2

Explains settings for reverse, pre-flashing, phototest, master/slave, and sensitive edge.

Automation Type Selection

Details how to select the correct automation type based on motor specifications.

Stroke Memorization Procedure

Step-by-step guide for programming the gate's opening and closing limits.

K130 MA CHARACTERISTICS AND DIAGNOSTICS

Operational Features

Describes timer-operated cycles and obstacle detection functionality.

Diagnostic LED Indicators

Explains LED status lights for error codes and operational feedback.

RADIO CONTROL SYSTEM

Radio Receiver Overview

Details the built-in radio receiver and its code learning capabilities.

Learning Radio Controls

Step-by-step guide for associating remote controls with the system.

Restoring Automatic Operation

Procedure for re-establishing automation after manual intervention or power loss.

ADVANCED RADIO CONTROL FEATURES

Remote Programming and Code Management

Instructions for remote self-learning and cancelling stored radio control codes.

Memory Expansion and Reset

Covers memory capacity upgrades and radio memory/factory reset procedures.

TROUBLESHOOTING AND APPLICATION SETUP

Malfunctions and Solutions

Identifies common problems with automation and radio control, providing corrective actions.

TAU Apps Integration

Instructions for connecting and using mobile applications with the control unit.

MANUFACTURERS DECLARATION OF INCORPORATION

Declaration of Compliance

Official statement of product compliance with relevant European directives and standards.

Related product manuals