EasyManua.ls Logo

Tech 21 Paul Landers PL1 FLY RIG User Manual

Tech 21 Paul Landers PL1 FLY RIG
8 pages
To Next Page IconTo Next Page
Page #1 background imageLoading...
Page #1 background image
POWER REQUIREMENTS
Utilizes included 9V DC, 100-240V universal auto-switching power
supply, 200mA, center negative.
Tech 21 Model #DC9.
NOTE: See page 3 for instructions how to change the prong
assembly.
For replacements, contact your local dealer/distributor, or Tech 21.
Maximum power consumption of the Fly Rig: approx 100mA.
W
ARNINGS:
* There are no user-serviceable parts inside. Attempting to repair unit is
not recommended and may void warranty.
* Missing or altered serial numbers automatically void warranty. For
your own protection: be sure serial number labels on the unit’s back
plate and exterior box are intact, and return your warranty
registration card or register online.
Note: This equipment has been tested and found to
comply with the limits for a Class B digital device, pursuant
to part 15 of the FCC Rules. These limits are designed to
provide reasonable protection against harmful interference
in a residential installation. This equipment generates, uses and can radi-
ate radio frequency energy and, if not installed and used in accordance
with the instructions, may cause harmful interference to radio commu-
nications. However, there is no guarantee that interference will not
occur in a particular installation. If this equipment does cause harmful
interference to radio or television reception, which can be determined
by turning the equipment off and on, the user is encouraged to try to
correct the interference by one or more of the following measures:
• Reorient or relocate the receiving antenna.
• Increase the separation between the equipment and receiver.
• Connect the equipment into an outlet on a circuit different from that
to which the receiver is connected.
• Consult the dealer or an experienced radio/TV technician for help.
WARRANTY:
ONE YEAR LIMITED. PROOF OF PURCHASE REQUIRED.
Manufacturer warrants unit to be free from defects in materials and
workmanship for one (1) year from date of purchase to the original
purchaser and is not transferable. This warranty does not include dam-
age resulting from accident, misuse, abuse, alteration, or incorrect cur-
rent or voltage. If unit becomes defective within warranty period, Tech
21 will repair or replace it free of charge. After expiration, Tech 21 will
repair defective unit for a fee.
REPAIRS:
ALL REPAIRS for residents of U.S. and Canada: Call Tech 21 for
Return Authorization Number. Manufacturer will not accept
packages without prior authorization, pre-paid freight (UPS preferred)
and proper insurance. International residents should contact our local
distributor, which can be found on the Support page of our website.
FOR PERSONAL ASSISTANCE & SERVICE:
Contact Tech 21 weekdays 10:00 AM to 5:00 PM, EST: 973-777-6996.
Hand-built in the U.S.A. using high-quality components
sourced domestically and around the globe.
T: 973-777-6996 F: 973-777-9899
E: info@tech21nyc.com www.tech21nyc.com
©2018 Tech 21 USA, Inc.
Question and Answer IconNeed help?

Do you have a question about the Tech 21 Paul Landers PL1 FLY RIG and is the answer not in the manual?

Tech 21 Paul Landers PL1 FLY RIG Specifications

General IconGeneral
BrandTech 21
ModelPaul Landers PL1 FLY RIG
CategoryMusic Pedal
LanguageEnglish

Summary

Power Requirements and Safety

Power Supply Specifications

Details on voltage, current, and power consumption for the unit.

Safety Warnings and Compliance

User serviceability, serial number importance, and FCC compliance.

Warranty, Repairs, and Support

Limited Warranty Terms

One-year limited warranty details, conditions, and exclusions.

Repair and Service Procedures

Instructions for obtaining repairs and customer assistance contact.

Product Overview and Applications

Tech 21 Company and Fly Rig Concept

Company background and the Fly Rig's compact, all-analog design.

Paul Landers Signature Model

Collaboration details and unique features of the PLI.

Usage Scenarios

Direct to PA/recording and integration with guitar amps.

Getting Started and Controls

Initial Setup and Operation Tips

Understanding signal path, unity gain, and clip warnings.

Connections and Power

Universal Power Supply

Instructions for changing the power supply prong assembly.

Input and Output Jacks

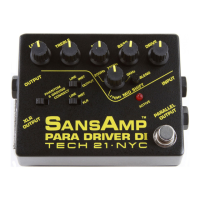
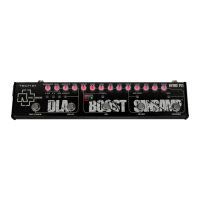
Details on 1/4" input/output, XLR output, and ground connect switch.

SansAmp Controls Explained

SansAmp Wasser Section

Controls for clean tones: LEVEL, HIGH, LOW, COMP, BITE.

SansAmp Feuer Section

Controls for dirty tones: LEVEL, HIGH, MID, LOW, DRIVE, MID SHIFT.

Effect Section Controls

Boost Section

Dual-mode boost for volume or mid-range enhancement.

DLA Section Controls

Delay, Repeats, Level, Tap Tempo, Vibrato, and Ambiance.

Additional Features and Notes

Chromatic Tuner

Using the footswitch to engage the tuner and tune the instrument.

Headphone Output

Switching the 1/4-inch output to headphone mode.

Noteworthy Usage Tips

Tips for headphones, control sensitivity, noise, and pedal placement.

Sample Settings

Paul Landers Main Settings

Sample settings for Main and Lead configurations.

Paul Landers Clean Settings

Sample settings for Clean and Surf configurations.

More Sample Settings

Artist-Inspired Settings

Sample settings for Doom, Ride the Lightning, and Hurricane styles.

Iconic Song Settings

Sample settings for Come As You Are and other styles.

Additional Sample and Custom Settings

Specific Artist Settings

Sample settings for Avenged Sevenfold and Def Leppard styles.

Custom Settings Input

Space for users to record their own custom settings.

Related product manuals