3
2. Initiate Easy IP-Cam
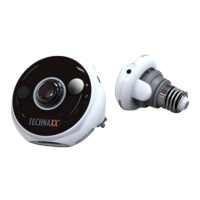
The Easy IP-Cam has a built-in WIFI chipset and can directly connect to your home WIFI
network. Therefore, for the first time use the Easy IP-Cam, you need to set up the WIFI
network and assign an available network which can link to the internet for the camera from
the AP (Access Point) Mode.
Install Easy IP-Cam
Insert a MicroSD card in the MicroSD card slot max.32GB.
Insert the AC Plug of the camera to the wall AC outlet and the Easy IP-Cam turns on.
Adjust the camera up or down to the applicable angle.
Note:
1. The Easy IP-Cam has no built-in battery. If you take out the camera from the AC outlet,
the camera will be offline and turns off.
2. All settings have saved in camera even power off. When the power supply restore, the
camera will turn on and reconnect to the set WIFI network automatically.
Access AP Mode
If the Easy IP-Cam was never be used. It will enter the AP Mode directly.
The RED Status LED lights on for about 8 seconds to initiate. After that it flashes slowly for 20 or
more seconds and active the WIFI function.
The Ready LED flashing fast in GREEN when the camera enters the AP Mode.
Note: Press the Reset Button to restore the default setting of camera in AP Mode.
3. Setup Easy IP-Cam
Install Technaxx Easy IP App
Search and find the Technaxx Easy IP App from the Apple Store for iOS or the
Google Play for Android. Then install it in your mobile device. Press the Easy IP
icon to start it.
Add Camera ( )
Press the Add Camera icon
to add camera. Find the UID QR Code Label on the
camera body. Use the QR Code Reader to read the UID of camera.
Enter UID Password "888888" and name (customizable) the camera.