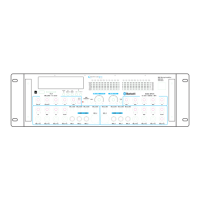
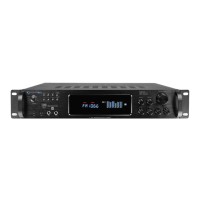
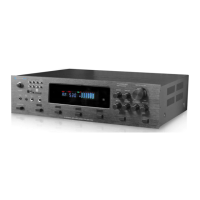
MM3000 Front Panel
1.Power Button: Press this button to power the unit on and off.
2.Music Treble Control: Turn this knob to adjust the treble of music input signal.
3.Music Mid Control:
Use this knob to adjust the mid level frequencies of music input signal.
4.
Headphone Output:
Connect your headphone here. Make sure the volume level of the unit is turned down before
making the connection.
5.Music Bass Control: Turn this knob to adjust the bass of music input signal.
6.Music Balance Control: Turn this knob to adjust the balance of music input signal.
7.Music Volume: Turn this knob to adjust the volume of music input signal.
8.Dual Ten Band Equalizers: Use the sliders to increase or decrease the signal strength of the respective frequencies.
The equalization points are 32Hz, 64Hz,125Hz, 250Hz, 500Hz,1KHz, 2KHz, 4KHz, 8KHz and 16KHz.
9.Music Volume: Use this knob to adjust the music input signal volume level.
10.MIC/Line 1-8 Volume: UUse this knob to adjust the volume for all the eight microphone / line 1-8 inputs.
11.MP3(1/8”) Input: Connect your MP3 player here. Make sure to press the input selector button (13) until “MP3”
appears on the display screen to play the signal from the MP3 player.
12.MIC Priority:
Press this button to enable the microphone priority function. When this function is turned on, the unit will
decrease the music input signal level if the microphones are connected to the unit and are transmitted a signal. If there is
no signal coming through the microphones, the music input signal will not decrease. Press again to disable this function.
13.Input Selector: Press this button to switch through the various inputs; USB flash drive, SD card, MP3, FM tuner,
Bluetooth, AUX and DVD.
14.Recording from the AUX / MP3 / DVD and Microphone Inputs:
When the input selected is MP3/AUX/DVD
and there is an USB flash drive or SD card (with blank space on it) inserted into their respective slot, pressing and
holding this button will activate the recording function. Press this button and hold for several seconds and the word
“REC” will display on the screen. The unit will create a new file in the connected USB flash drive or SD card and get
ready to make a recording. At this point there is no actual recording yet. Press the button again and the unit will start
recording onto the USB flash drive or SD Card and the elapsed time and “REC” will display on the screen. Press the
button a third time to pause the recording and the word “REC” and the elapsed time displayed on the screen will
start flashing. Press again to continue the recording. Press and hold this button for several seconds to save the file
and end the recording and exit. If both USB flash drive and SD card are connected, the unit will begin recording onto
the USB flash drive. If the USB flash drive is full, remove it and then press the record button again to start another
recording. The unit will also be able to record the signal from microphones onto the USB flash drive or SD Card.
MM3000
L
R
1567
4
2
32223
2425
17
18
192021 16 15 14 13
9
12
11 10
8
31 353329
32 34
3026 27 28 39 4036
37
38
41
42