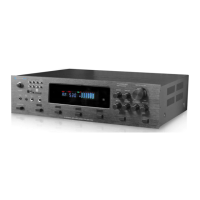
When the recording function is activated and there is a microphone connected to the unit, the unit will mix the signal
from MP3 or AUX inputs with the microphone into one track. If two microphones are connected and turned on, both
microphone signals will be recorded and mixed into one track with the signal from MP3, AUX or DVD inputs.
THERE IS NO RECORDING FUNCTION WHEN INPUT SELECTED IS USB/SD, BLUETOOTH OR FM TUNER.
THE RECORDING FILE FORMAT IS .mp3.
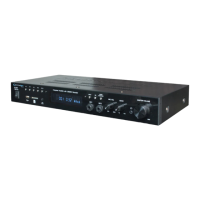
15. Next Track / Fast Forward / Next Preset Station Button:
When playing from the USB/SD/Bluetooth inputs: Press this button to go to the beginning of the next track on either the
USB flash drive, SD Card or Bluetooth input. Press this button and hold for several seconds to fast forward. The unit will
keep fast forwarding until this button is released. This function only works for USB flash drive or SD Card signal.
When playing from the Tuner input: Press this button to go to the next station stored station.
16.Previous Track / Fast Rewind / Previous Preset Station Button:
When playing from the USB/SD/Bluetooth inputs: Press this button to go to the beginning of the previous track on either the USB
flash drive, SD Card or Bluetooth input. Press this button and hold for several seconds to fast rewind.
The unit will keep fast
rewinding until this button is released. This function only works for USB flash drive or SD Card signal.
When playing from the Tuner input: Press this button to go to the previous station stored station.
17.
Play / Pause / Scan Button:
When playing from the USB/SD inputs: Press this button to pause the signal from the USB flash drive,SD card connected
to the USB input. Press this button again to play. The play / pause function will only work for the USB flash drive, SD card or
Bluetooth.
When playing from the Tuner input: Press this button to make the unit scan all the available stations from lowest frequency
to the highest frequency. The unit will automatically save all the stations searched and start to play the first station saved after
searching. You can press the NEXT button (15) or PREV button (16) to go to the next or previous saved station.
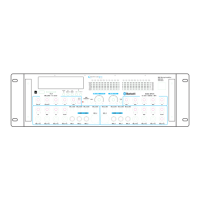
18. Microphone / Line 1-8 Echo Bass Control: Use this knob to adjust the bass of the echo of microphone / Line
1-8 signal.
19. Microphone / Line 1-8 Echo Treble Control: Use this knob to adjust the treble of the echo of microphone / Line
1-8 signal.
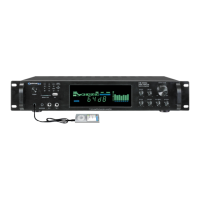
20.SD Card Input:
Insert your SD card into this slot. The unit will only read .mp3, .wav, .wma files from SD card. The
maximum storage size of the SD card cannot exceed 32GB. Make sure to set the input selector button to “SD CARD” to
play the signal from the SD Card. When the unit is playing tracks from the SD Card the track and elapsed time will display
on the screen.
21.Microphone / Line 1-8 Echo Repeat control: Use this knob to adjust the repeat effect of the echo of
microphone / Line 1-8 signal.
22.USB Input: Insert your USB flash drive into this slot. The unit will only read .mp3, .wav, .wma files from the USB flash
drive. The maximum storage size of the USB flash drive cannot exceed 32GB. Make sure to set the input selector button to
“USB” to play the signal from the USB flash drive. When the unit is playing tracks from the USB flash drive the track and
elapsed time will display on the screen.
23. Microphone / Line 1-8 Echo Delay Control: Use this knob to adjust the delay effect of the echo of microphone
/ Line 1-8 signal.
24.Microphone / Line 1-8 Echo Volume: Use this knob to adjust the volume of echo of microphone / Line 1-8 signal.
25.Stereo/Mono Switch: Press this button to switch between stereo & mono for microphone echo.
26.Group 1 Microphone / Line Treble Control: Use this knob to adjust the treble of the Group 1 (microphones /
Lines 1, 2, 3 & 4) signal output.
27.Group 1 Microphone / Line Mid Control: Use this knob to adjust the mid level frequencies of the Group 1
(microphones / Lines 1, 2, 3 & 4) signal output.
28.Group 1 Microphone / Line Bass Control: Use this knob to adjust the bass of Group 1 (microphones / Lines 1,
2, 3 & 4) signal output.
29.Group 1 Microphone / Line Volume Controls: Use these knobs to adjust corresponding volume of
microphones / Lines 1, 2, 3 & 4.
30.Group 1 Microphone / Line Echo Control: Use this knob to adjust the echo of Group 1 (microphones / Lines 1,
2, 3 & 4) signal output.
31. Group 1 Microphone
/ Line
Inputs:
Microphone /Line inputs
¼"
.
MM3000