PAPER
Fit
TEA
>:lII
...
....---FOAM
FILTER
BASE
0
/
F.
DAM.
F
..
ILTER
. / /
0
'
/'
1'>
G?
COVER
SCREWS
(2)
\
COVER
AIR
CLEANER
B
~_.
--WING
NUT
~~~--BASE
AIR
CLEANER
C
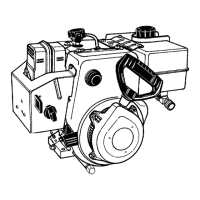
"'AIR
INTAKE
SCREEN
(IF
SO
EQUIPPED)
NUT
ori;;=i
I
(J(.
COVER
SCREWS
121
t \
FOAM
FIlTER
(IF
SO
EQUIPPED)
AIR
CLEANER
A
MAl
NTENANCE (Continued)
Figure
6
®
ALTERNATOR
AND
BATTERY
(if
so
equipped):
A.
ALTERNATOR:
For electrical problems such
as
inoperative starter or
discharged battery
see
equipment manufacturer's instruc-
tions for fuse replacement (if so equipped), maintenance and
repairs.
B.
BATTERY:
1.
When servicing battery, always connect cables to battery
exactly
as
they were before removal (ground cable to bat-
tery negative
[-
or neg.] post). If incorrectly connected,
fuse (if so equipped) will blow and alternator
won't
charge battery.
If
this happens, connect cables correctly
and replace fuse.
2. Never expose engine ignition system
to
battery power. If
battery cable or any live wire contacts ignition system
ground wire, engine ignition system may
be
damaged.
3.
If
external battery charger is used, disconnect positive (+
or pos.) cable from battery to prevent possible damage.
4.
See
battery manufacturer's instructions
for
service and
storage.
®
COOLING
SYSTEM
(see
Figure 1 and Figure 7):
IMPORTANT:
Frequently remove grass clippings, dirt and
debris from cooling fins, air intake screen and levers and
linkage. This will help ensure proper cooling and correct engine
speed.
(Continued)
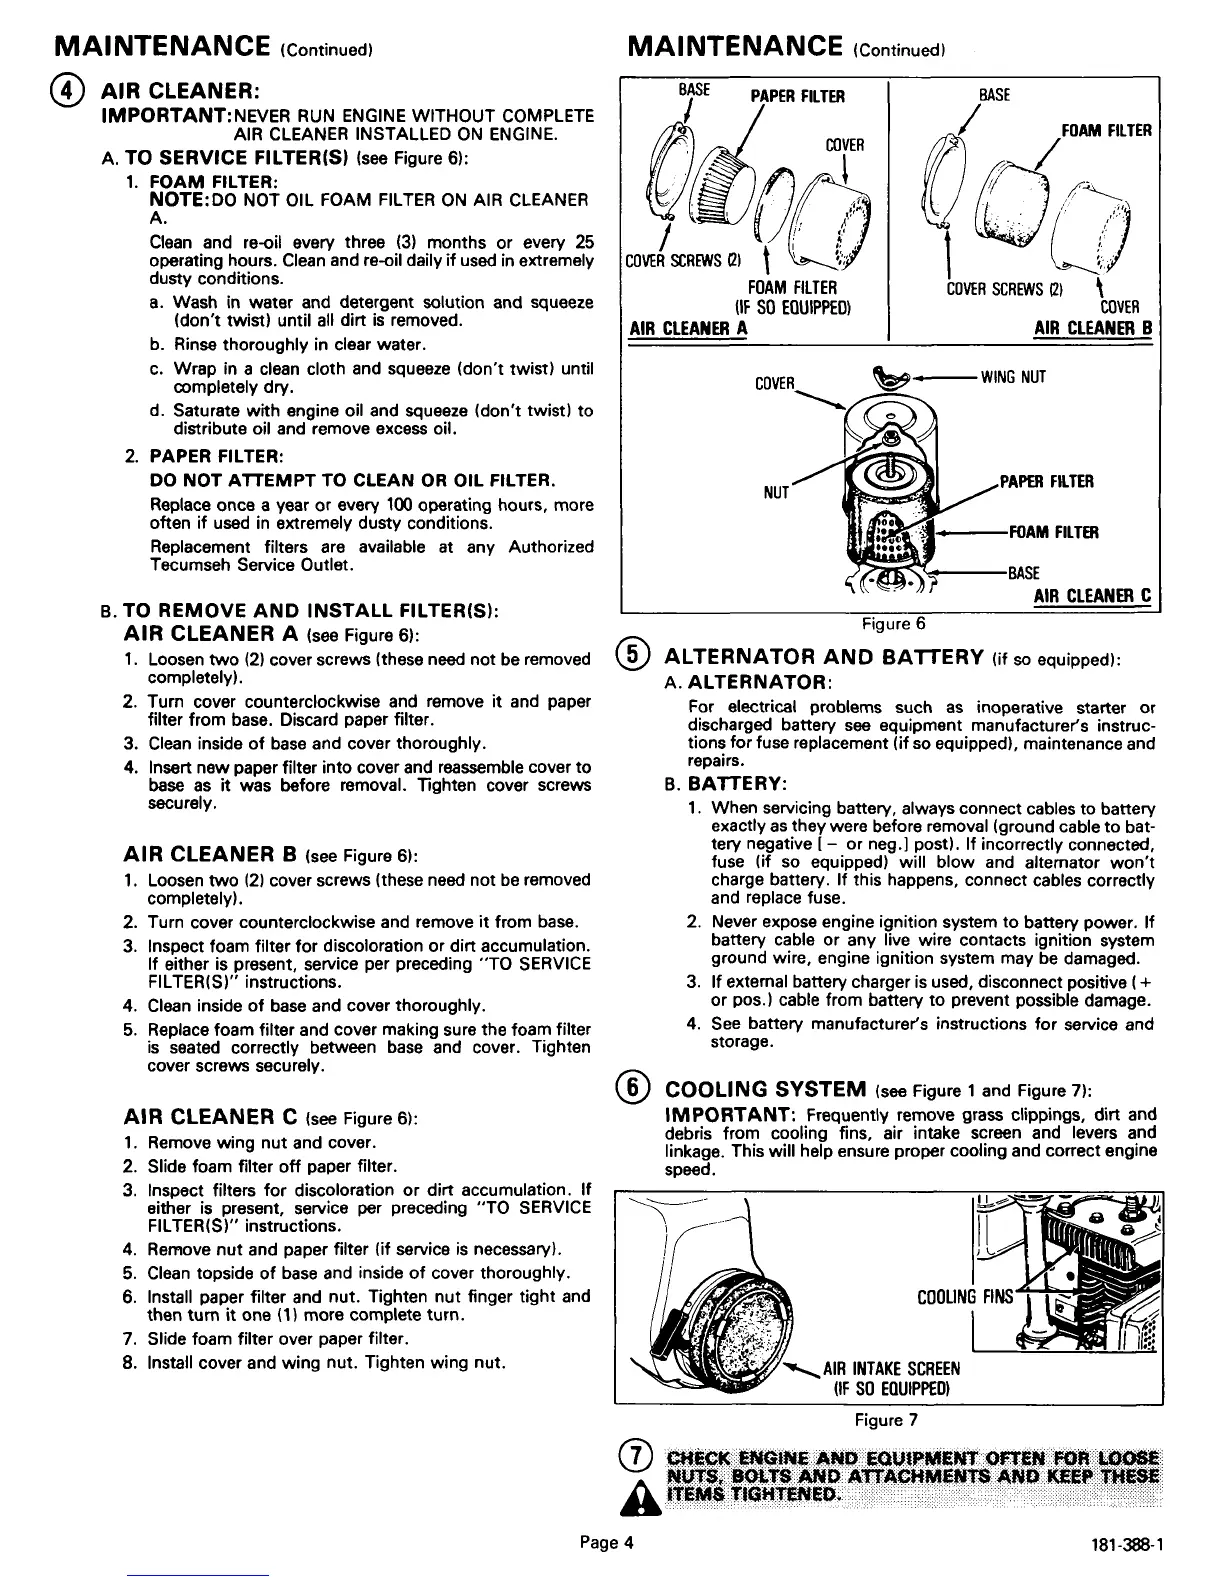
AIR
CLEANER
B
(see
Figure 6):
1.
Loosen
two
(2)
cover screws (these need not
be
removed
completely).
2. Turn cover counterclockwise and remove
it
from base.
3.
Inspect foam filter for discoloration or dirt accumulation.
If either is present, service per preceding
"TO
SERVICE
FILTER(S)" instructions.
4. Clean inside
of
base and cover thoroughly.
5.
Replace foam filter and cover making sure the foam filter
is seated correctly between
base
and cover. Tighten
cover screws securely.
B.
TO
REMOVE
AND
INSTALL
FILTERIS):
AIR
CLEANER
A
(see
Figure 6):
1.
Loosen
two
(2) cover screws (these need not
be
removed
completely).
2.
Tum
cover counterclockwise and remove
it
and paper
filter from base. Discard paper filter.
3.
Clean
inside
of
base
and cover thoroughly.
4. Insert new paper filter into cover and reassemble cover to
base
as
it
was before removal. TIghten cover screws
securely.
AIR
CLEANER:
IMPORTANT:NEVER
RUN
ENGINE
WITHOUT COMPLETE
AIR CLEANER INSTALLED
ON
ENGINE.
A.
TO
SERVICE
FILTER(S)
(see
Figure 6):
1.
FOAM
FILTER:
NOTE:DO
NOT OIL FOAM
FILTER
ON
AIR CLEANER
A.
Clean
and re-oil every three
(3)
months or every
25
operating hours.
Clean
and re-oil daily
if
used in extremely
dusty conditions.
a.
Wash in water and detergent solution and squeeze
(don't twist) until
all
dirt
is
removed.
b.
Rinse thoroughly in clear water.
c.
Wrap in a clean cloth and squeeze (don't twist) until
completely dry.
d. Saturate with engine oil and squeeze (don't twist) to
distribute oil and remove excess oil.
2.
PAPER FILTER:
DO
NOT
ATTEMPT
TO CLEAN OR
OIL
FILTER.
Replace once a year or every
100 operating hours, more
often
if
used in extremely dusty conditions.
Replacement filters are available at any Authorized
Tecumseh Service Outlet.
AIR
CLEANER
C
(see
Figure 6):
1.
Remove wing
nut
and cover.
2. Slide foam filter
off
paper filter.
3.
Inspect filters
for
discoloration
or
dirt accumulation.
If
either
is
present, service per preceding
"TO
SERVICE
FIL
TER(S)" instructions.
4.
Remove
nut
and paper filter (if service
is
necessary).
5.
Clean
topside
of
base
and inside
of
cover thoroughly.
6.
Install paper filter and nut. Tighten
nut
finger tight and
then turn
it
one
(1)
more complete turn.
7.
Slide foam filter over paper filter.
8. Install cover and wing nut. Tighten wing nut.
MAINTENANCE
o
Figure 7
~._~
••
III
Page
4
181-388-1