EasyManua.ls Logo

Teka EX/90 3G AI TR - User Manual

Teka EX/90 3G AI TR
24 pages
Print Icon
To Next Page IconTo Next Page
Loading...
COD. 04032EOTK - 19.12.2007
Instructions for the installation
and advice for the maintenance
EX/90 3G AI TR - EX/90 3G AI AL TR
EX/90 4G AI AL - EX/90 5G AI AL TR
EX/90 5G AI AL TR CI - EX/90 5G AI AL PC CI
Instructions Manual
EX/90 3G AI TR - EX/90 3G AI AL TR
EX/90 4G AI AL - EX/90 5G AI AL TR
EX/90 5G AI AL TR CI - EX/90 5G AI AL PC CI
Question and Answer IconNeed help?

Do you have a question about the Teka EX/90 3G AI TR and is the answer not in the manual?

Summary

Description of the Hot Plates

Use and Operation

Burners

Information on how to operate the burners, including ignition methods and flame failure device.

How to Use the Burners Efficiently

Guidance on achieving maximum efficiency with minimal gas consumption by following specific usage indications.

Cleaning and Maintenance

Hot Plate Cleaning

Instructions for periodically washing the hot plate and its components with lukewarm soapy water.

Care and Maintenance of Stainless Steel

Guidance on optimizing stainless steel appearance and upkeep through specific cleaning methods.

Installation Guide

Installer Technical Information

Essential technical information and responsibilities for qualified engineers performing installation and maintenance.

Installing the Hot Plate

Procedure for installing the hot plate into a modular cabinet, ensuring correct measurements and safety.

Cylinder Holder Compartment Requirements

Requirements for the cylinder holder compartment, including dimensions, aeration, and cylinder accessibility.

Fixing the Hot Plate Seal

Detailed steps for applying the hot plate seal to prevent liquid infiltration into the cabinet.

Important Installation Specifications

Key specifications for installers regarding surrounding walls, temperature resistance, and adhesive requirements.

Room Ventilation Requirements

Requirements for adequate room ventilation to ensure proper appliance operation and fume dispersal.

Location and Aeration Guidelines

Guidelines for appliance location and ensuring proper aeration for combustion fumes via hoods or fans.

Gas Connection Procedure

Procedure for connecting the appliance to the gas supply, covering different pipe types and pressure regulations.

Gas Connection Instructions

Specific instructions for fitting the gas connection elbow, including gasket placement and leak verification.

Electrical Connection

Guidelines for electrical connection, including mains capacity, socket requirements, and earthing.

Installing the Hot Plate with Battery

Procedure for installing the hot plate, specifically addressing battery compartment and ignition setup.

Adjustments

Taps: Reduced Rate Adjustment

Procedure to adjust the burner flame to the 'Reduced rate' position using a screwdriver and knob.

Conversions

Replacing the Injectors

Steps for replacing injectors to adapt burners for different gas types, including regulation and labeling.

Servicing Procedures

Replacing Hot Plate Parts

Instructions for removing and replacing internal hot plate components like burners and taps.

Greasing the Taps

Procedure for greasing taps that have become stiff to ensure smooth operation and proper sealing.

Replacing the Battery

Instructions for replacing the battery, including warnings on handling, polarity, and disposal.

Cable Types and Sections

Information on the appropriate cable types and cross-sections for gas hot plates and power supply.

Technical Assistance and Spare Parts

Overview

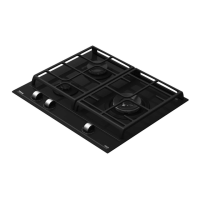
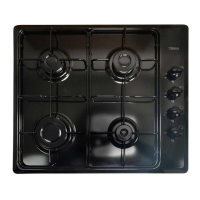
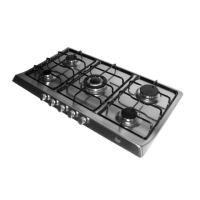
This document provides installation and maintenance instructions for Teka EX/90 series gas hob appliances. The series includes models like EX/90 3G AI TR, EX/90 3G AI AL TR, EX/90 4G AI AL, EX/90 5G AI AL TR, EX/90 5G AI AL TR CI, and EX/90 5G AI AL PC CI. These appliances are designed for domestic use.

Function Description:

The Teka EX/90 series gas hobs are cooking appliances equipped with multiple gas burners. They feature various burner types, including Ultra rapid, Rapid, Semirapid, Auxiliary, and Fish gas burners, each with specific power ratings and recommended pan sizes. The hobs are designed for both manual and electrical ignition, with some models featuring automatic electrical ignition and flame failure devices for safety. The flame failure device requires the knob to be held depressed for about 10 seconds after ignition to ensure the burner remains lit.

Important Technical Specifications:

The hobs are available in configurations with 3, 4, or 5 burners. Burner power ratings:

  • Ultra rapid burner: 3100-3350 W (recommended pan Ø 24-26 cm)
  • Rapid gas burner: 2800-3000 W (recommended pan Ø 20-22 cm)
  • Semirapid gas burner: 1750 W (recommended pan Ø 16-18 cm)
  • Auxiliary gas burner: 1000 W (recommended pan Ø 10-14 cm)
  • Fish gas burner: 2800-3000 W (recommended pan WIDTH 20 cm, LENGHT 36 cm)

The appliances are designed to operate with various gas types, including Butane (G30), Propane (G31), and Natural Gas (G20), with specific normal pressures and injector diameters for each. For example, for Ultra Rapid burners:

  • Butane (G30): 28-30 mbar, 225 g/h, 90 (1/100 mm) injector, 1400-3100 W input.
  • Propane (G31): 37 mbar, 222 g/h, 90 (1/100 mm) injector, 1400-3100 W input.
  • Natural Gas (G20): 20 mbar, 295 l/h, 121 Y (1/100 mm) injector, 1400-3100 W input.

Electrical specifications for models without battery:

  • Voltage: 220-230 V~
  • Frequency: 50 Hz Electrical specifications for models with battery:
  • Voltage: 1.5 V DC

The appliance belongs to class 3 and complies with EEC Directives 90/396 + 93/68 (gas safety), 89/336 + 92/31 + 93/68 (electromagnetic compatibility), and 73/23 + 93/68 (electrical safety). The power supply cable recommended is H05 RR-F, Section 3 x 0.75 mm².

Usage Features:

  • Burner Control: Each burner has a corresponding control knob on the front panel. To light a burner, push and turn the knob anticlockwise to the "full on" position (large flame). For electrical ignition, depress and release the ignition button. For automatic electrical ignition, depress the knob.
  • Flame Failure Device: Burners equipped with this device require the knob to be held depressed for approximately 10 seconds after ignition. If the flame accidentally extinguishes, turn off the burner control and wait at least 1 minute before attempting to re-ignite.
  • Pan Usage: Use appropriate pan sizes for each burner as indicated in the manual. Always use pans with a flat bottom and place a lid on them to maximize efficiency and reduce gas consumption.
  • Reduced Rate Position: Once the pan comes to a boil, set the knob to the "reduced rate" position (small flame) to save energy.
  • Ventilation: Proper room ventilation is crucial. The room must have natural air vents (at least 100 cm²) or a mechanical aeration device (suction hood or electric fan) to ensure regular gas combustion and fume ventilation. Intensive use may require additional ventilation, such as opening a window.
  • Safety Warnings: Never leave the appliance unattended, especially with children nearby. Ensure pan handles are correctly positioned. Be cautious with foods requiring oil or grease, as they can easily catch fire. Avoid using aerosols near the appliance. If the hob has a lid, remove any spilt food before closing it and always switch off all burners first.

Maintenance Features:

  • Cleaning: Always disconnect the appliance from gas and electricity mains before cleaning. Periodically wash the hot plate, enamelled steel pan supports, enamelled burner caps ("C"), and burner heads ("T") with lukewarm soapy water. Rinse thoroughly and dry all parts. Avoid washing while parts are warm or using abrasive powders. Do not allow acidic substances (vinegar, coffee, milk, salted water, lemon, tomato juice) to remain on enamelled surfaces for long periods.
  • Stainless Steel Care: Keep stainless steel surfaces away from acid/acid-based solvents. After installation, wipe with a soft damp cloth to remove dirt or perspiration marks. For persistent spots, use S/Steel Cleaning Powder with a clean damp soft cloth, then rinse thoroughly.
  • Burner Reassembly: Before reassembling, ensure burner head slots ("T") are not clogged and enamelled burner caps ("C") are correctly positioned and steady on the burner head.
  • Injector Replacement (Conversions): To adapt the hob to different gas types, replace the injectors. First, remove burner tops, then unscrew and replace injectors with those suited for the new gas type. After replacement, the burners must be regulated as per the "Reduced rate" adjustment instructions. The technician must affix the correct gas regulation label.
  • "Reduced Rate" Adjustment: For G20 gas, switch on the burner, turn the knob to the "reduced rate" position, remove knob "M," insert a small screwdriver "D" into hole "C," and turn the throttle screw until the flame is adequately regulated. Ensure the flame does not go out when switching from "full on" to "reduced rate." For G30 or G31 gas, the screw must be fully locked (turned clockwise).
  • Greasing Taps: If a tap becomes stiff, remove it, clean the cone and housing with a cloth soaked in diluent, spread grease on the cone, refit, operate several times, then remove again to eliminate excess grease and check gas ducts. Reassemble all parts in reverse order. Check for tightness using soapy water; never use a flame.
  • Battery Replacement (for models with battery): Unscrew cap "T," remove the old battery, insert a new 1.5 V battery with the positive "+" polarity facing inwards, then re-screw cap "T." Dispose of old batteries in a separate and safe container.
  • Servicing: All installation, adjustments, and maintenance must be carried out by a qualified engineer. Only genuine spare parts should be used, available from After Sales Service Centers.

Teka EX/90 3G AI TR Specifications

General IconGeneral
BrandTeka
ModelEX/90 3G AI TR
CategoryHob
LanguageEnglish

Related product manuals