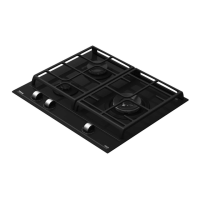
This document describes a built-in glass ceramic hob with Touch-Control switches, available in various models (FGKST 58.., FGKST 75.., .GKST 58.., and .GKST 75..). It provides instructions for fitting, operation, and maintenance, ensuring the hob provides many years of service.
Function Description
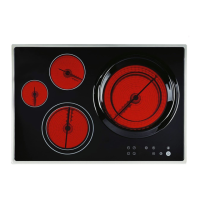
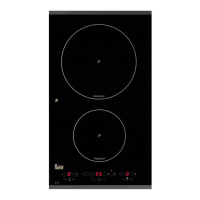
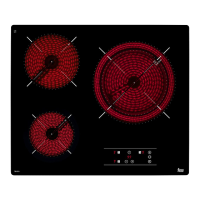
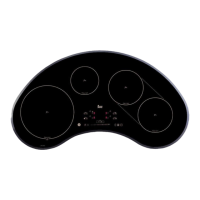
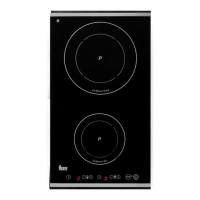
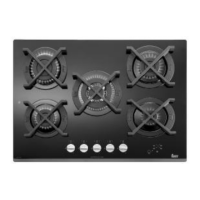
The hob is a glass ceramic cooking surface equipped with Touch-Control switches for operation. After connecting to the mains supply, the control system performs a self-test, confirmed by a short acoustic signal. The hob features individual cooking zones, each with a cooking level display and a readiness indicator.
The Touch-Control panel includes:
- Cooking level display: Shows the current heat setting for each zone.
- Readiness point for cooking zone: Illuminates when a cooking zone is ready for use.
- Multi-circuit control lamp and key: Used to activate additional heating elements for two- or three-circuit cooking zones.
- Plus key (+): Increases the cooking level or timer setting.
- Time display: Shows the timer setting.
- Timer control lamp: Indicates when the timer is active for a cooking zone.
- Locking key and control lamp lock: Prevents accidental operation of the keys (except the On/Off switch).
- Cooking zone key: Activates a specific cooking zone.
- Minus key (-): Decreases the cooking level or timer setting.
- Timer key: Activates and adjusts the timer function.
- On/Off switch (control): Powers the entire control system on or off.
A residual heat display, indicated by an illuminated "H" on the cooking level display, warns when a cooking zone is still hot.
Some models may include a Warming Zone, suitable for keeping cooked food warm. This zone is activated by pressing two specific keys in succession and can be switched off with a dedicated "0-key".
Certain models are equipped with Pot Recognition (PR). This feature checks for the presence of a metal pot on the cooking zone after a cooking level has been selected. If no pot is detected, a "u" appears in the display, and the heating element remains inactive. If a pot is placed within 10 minutes, the heating element activates. PR automatically recognizes the size of the pot and can re-power two-circuit heating or frying zones. For safety, if no pot is placed, the hob turns off after 10 minutes. PR can be switched off for non-metallic cookware by activating the cooking zone, selecting a cooking level, then pressing the Multi-circuit key and the corresponding cooking zone key. To reactivate PR, the cooking zone must be turned off and then on again.
Usage Features
- Switching On/Off: Press the On/Off switch key to power on the control system. "0" will light up on all cooking level displays, and the standby dot will flash. Action must be taken within ten seconds, or the system will switch off. To switch off the entire hob, briefly press the On/Off switch until all control lights go out.
- Activating a Cooking Zone: Press the corresponding cooking zone key. The standby dot for that zone will light up.
- Selecting Cooking Level: Use the Minus or Plus keys to choose a level from 1 to 9.
- Switching Off a Cooking Zone: Activate the desired cooking zone (standby dot lights up), then use the Minus key to set the level to "0". Alternatively, pressing the Minus and Plus keys simultaneously can switch off the cooking level directly.
- Parboiling Boost: To use this feature, switch on a cooking zone, select level 9, then press the Plus key. The cooking level display will alternate between "A" (parboiling boost) and the set cooking level. A subsequent cooking level (1-8) can then be selected. If no subsequent level is chosen within 10 seconds, the boost automatically shuts off. The duration of the parboiling boost depends on the selected subsequent cooking level. The boost time can be adjusted upwards with the Plus key or stopped with the Minus key.
- Multi-Circuit Operation: For two- or three-circuit cooking zones, select the desired cooking level (1-9). Press the Multi-circuit key to activate the second heating element (its control lamp lights up). Pressing the Multi-circuit key again activates the third heating circuit (its control lamp lights up). To switch off outer heating circuits, press the Multi-circuit key again until the control lamps are no longer lit.
- Timer Function: The timer can automatically switch off a cooking zone after a pre-set time (1-99 minutes). Activate the desired cooking zone, select a cooking level, then press the Timer key. "00" will appear on the time display. Use the Minus or Plus keys to set the desired cooking time. The timer control lamp for the selected zone will light up. The timer setting can be changed at any time. To switch off the timer prematurely, activate the cooking zone, press the Timer key, and set the timer to "00" using the Minus key, or by pressing Minus and Plus keys simultaneously. The timer can also be used as an egg timer when no cooking zones are active.
- Safety Switch-off: Each cooking zone has a safety shut-off that limits continuous operation based on the selected cooking level. If the safety switch-off activates, "0" or "H" (for residual heat) will be shown on the display. The control system can be reactivated by pressing the On/Off key.
- Error Detection: If multiple keys are pressed simultaneously (except Minus and Plus), the control system will not accept the command. If one or more keys are activated for over 30 seconds (e.g., due to boiling over or a pan's weight), the system assumes an error and switches off automatically, emitting a constant acoustic signal if key operation continues.
- Pot Usage: Use pots and pans with firm, even, and thick bottoms for optimal heat transmission and energy efficiency. Always use a lid. Fireproof glass or porcelain utensils with flat polished bottoms can be used directly on the cooking zones, following manufacturer instructions. Immediately remove any overflow food.
- Initial Use: Before first use, clean the hob. Then, switch on elements one by one to the highest level for three minutes without pots to eliminate newness odors and evaporate any moisture from the heating element, ensuring proper electronic circuit function.
Maintenance Features
- Cleaning: Always clean the hob after it has cooled down to prevent dirt from burning onto the surface. Use only recommended cleaners; avoid steel wool, abrasive sponges, powders, and oven sprays.
- Light dirt: Use a damp cloth and warm rinse, then dry thoroughly. Vinegar, lemon juice, or calcium dissolving agents can remove water stains. If these agents contact the frame, wipe them off with a wet cloth to prevent loss of gloss.
- Heavy dirt: Use "Sidol Special for Stainless Steel," "Stahlfix," or "Cerafix." Apply with kitchen paper, rub in, let it take effect, then wipe off completely with cold water and dry thoroughly. Residual cleaner can become aggressive when reheated.
- Persistent dirt/caking: Remove with a glass scraper (available in household goods stores or from after-sales service). Ensure the scraper handle is not plastic if the hob is hot.
- Sugar-containing food: Immediately remove melted sugar and sugar-containing food with a glass scraper while still hot to prevent permanent damage (scratches) to the glass ceramic surface.
- Colour Changes: Discolouration on the ceramic surface does not affect function or stability. These are typically burnt-in food residues that were not removed.
- Metallic iridescent discolouring: Caused by wear from pan bottoms or unsuitable cleaning agents. This can be removed with difficulty using "Sidol Special for Stainless Steel" or "Stahlfix," possibly requiring multiple cleanings.
- Worn decoration: Over time, decoration may wear off due to aggressive cleaning agents or faulty pan bottoms, leading to dark stains.
- Protective Film: Using "Cerafix" is recommended as its high silicone percentage creates a protective film that repels water and dirt, making cleaning easier. Clean the hob and cooking zones regularly.
Important Safety Notes:
- The surfaces of heating and cooking zones become hot during use; keep small children away.
- Avoid dropping hard objects onto the cooking surface, as the ceramic material is sensitive to mechanical stress and strain. If the ceramic hob breaks, splits, or cracks, immediately disconnect it from the mains power supply (switch off the safety switch in the fuse box) and contact Customer Service.
- Do not use the glass ceramic hob as a storage area.
- Never prepare food in aluminum foil or plastic containers on the hot cooking area.
- Do not switch on the hob without using it for cooking.
- Do not place combustible, volatile, or heat-deformable objects directly underneath the hob.
- Never leave food cooked with fat or oil unattended, as overheated oil and fat can catch fire.
- Ensure electrical appliance leads from nearby sockets do not contact hot cooking zones.
- Never clean the glass ceramic hob with a steam cleaner.
- For safety reasons, turn off the cooking zone after use with the Touch-Control to prevent accidental activation by shifting pots or setting down metal objects while PR is still on.