Do you have a question about the Teka VT 2 1G AI AL TR CI E1 and is the answer not in the manual?
Instructions for lighting and using traditional burners, including safety cut-off devices.
Detailed steps for lighting and operating the dual burner in different modes.
Crucial safety warnings regarding burner operation, unattended use, and child supervision.
Safety guidelines for users with impaired capacities and children's supervision.
Immediate actions to take in case of hotplate glass breakage.
Mandatory safety step: disconnect power and gas before cleaning.
Instructions for cleaning and maintaining the hob's glass worktop.
Important checks for correct reassembly of burner components.
Technical guidelines for qualified personnel performing installation.
Steps for safely inserting the hob into the worktop and handling packaging.
Key instructions regarding side wall height, temperature resistance, and adhesive requirements.
Instructions for connecting the gas supply, including data checks and safety regulations.
Warning that gas connection must be performed by a CORGI Registered engineer.
Guidelines for electrical connection, including voltage, wiring, and earthing.
Procedure for replacing nozzles to adapt the burners for different gas types.
Mandatory safety step: disconnect power and gas before maintenance.
Critical warning that maintenance must only be done by authorized personnel.
This document serves as an installation and maintenance guide for a gas cooktop, specifically models VT 2 1G AI AL TR CI E1 and VT 2 2G AI AL CI E1. It is designed for domestic use in domestic environments by fully aware adults and emphasizes safety precautions, particularly regarding children and incapacitated individuals, due to the potential for hot surfaces during operation. The cooktop is exclusively for cooking and should not be used for other purposes like heating rooms, which is considered improper and dangerous.
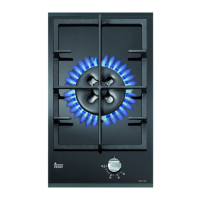
The cooktop features various burners, including "DUAL" burners, Fast burners, and Auxiliary burners, each with specific power outputs. The "DUAL" burner offers flexible use, allowing for separate regulation of its inner and outer rings. This means it can operate with only the inner flame or with both inner and outer flames simultaneously.
The cooktop's burners can be lit using an automatic electric ignition system. To activate a burner, the corresponding knob must be pressed down and turned clockwise to the "Maximum" position. For burners equipped with a safety cut-off device, the knob should be turned anti-clockwise to the "Maximum" position until it stops, then pressed down for approximately 10 seconds after the burner ignites to ensure the flame is maintained. If a flame accidentally extinguishes, the control knob should be turned off, and a minimum of one minute should pass before attempting to relight it.
To optimize performance and minimize gas consumption, users are advised to use suitable pans for each burner, as indicated in a provided table, and to always use pans with lids. Once the boiling point is reached, the knob should be turned to the "Minimum" position.
For the "DUAL" burner, lighting and usage require the pan to be placed on the burner before ignition. It can be used in two ways:
To turn off any burner, the knob is turned clockwise, realigning the indicator with the off symbol. It is possible to switch between the two "DUAL" burner modes by pressing and turning the knob to the desired position.
Several warnings are provided for safe use:
Before any cleaning or maintenance, the appliance must be disconnected from the gas and electricity supplies.
To maintain the ceramic surface's shine, a silicon-based film product can be applied before use to protect against water and dirt; this application should be repeated frequently as the film is not durable. The hob should be cleaned every time it is used, while the glass is still warm. Abrasive metal scourers, powder abrasives, or corrosive sprays should not be used. For light stains, a damp sponge is sufficient. Tough, encrusted dirt can be removed with a scraper (not supplied but available locally), used carefully to avoid damage. Spilled liquids can be cleaned with vinegar or lemon juice. Sugar or sugary foods should never be allowed to fall on the hob; if this occurs, switch off the hob and clean immediately with hot water and a scraper. Metallic reflections, discoloration, or scratches may appear over time due to poor cleaning or incorrect pan movement; these are difficult to eliminate but do not affect hob operation. Steam jets should not be used for cleaning.
Enamelled grids, covers ("A", "B", "C"), and burner heads ("M") must be washed. Ignition elements ("AC") and safety cut-off sensors ("TC") also need cleaning. These parts should not be washed in a dishwasher. Cleaning should be done when the hob and components are not hot, avoiding metal scouring pads, powder abrasives, or corrosive sprays. Vinegar, coffee, milk, salt water, lemon juice, or tomato juice should not remain in prolonged contact with the surfaces.
When reassembling components, ensure:
To replace internal components, the flanges must be removed by loosening screws, and the ceramic glass surface lifted. After this, burners, valves, and electrical components can be replaced. The seal "D" (fig. 17) should be changed every time a valve is replaced to ensure a perfect seal.
If a valve becomes stiff, it should be greased. This involves dismantling the valve body, cleaning the cone and its housing with a thinner-soaked rag, lightly greasing the cone, inserting and maneuvering it several times, removing excess grease, and ensuring gas channels are not blocked. All parts are then reassembled in reverse order. This operation must only be performed by authorized personnel.
When replacing the power cable, the fitter must ensure the earth conductor "B" is longer than the phase conductor and observe the warnings indicated in paragraph 8 of the manual.
| Type | Gas Hob |
|---|---|
| Number of Burners | 2 |
| Width | 30 cm |
| Material | Stainless Steel |
| Ignition Type | Automatic |
| Control Type | Knob Control |