2
Installation Guide
Mount your P3 brake control in the direction of travel
and in a location where display is viewable and buttons
are easily accessible.
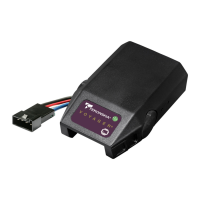
Wiring Brake Control
Your P3 brake control has a unique connector located
at the back of the control. This connector allows you
two options to wire your brake control.
Option 1:
Use Pigtail Wiring Harness included. This harness can
be installed by following the Generic Wiring Guide.
Option 2:
Use an OEM specific wiring harness. If your vehicle
came with a factory tow package that included a 7-way
connector, you can purchase a Tekonsha OEM wiring
harness with the P3 connector on one end and your
specific vehicle's connector on the other.
Display Readings after Wiring the P3
After successfully wiring your P3 you should see the
following on the LCD display:
• Power to P3 without trailer connected.
• Power to P3 with trailer connected Boost feature
engaged (
B1
).
• Manual Knob Activated without trailer connected.
• Manual knob activated (with trailer), 5.4 denotes a
hypothetical power output. This value is set using
the Power Buttons. Range is 0.0 to 15 volts. This
is an indication of voltage output to electric brakes.
ALTERNATING SCREENS