This document serves as a user guide for the TentBox Cargo, a rooftop tent designed for outdoor adventures. It provides comprehensive instructions on assembling, mounting, using, and maintaining the TentBox Cargo, along with important safety information and warranty details.
Function Description
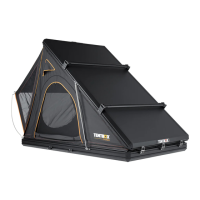
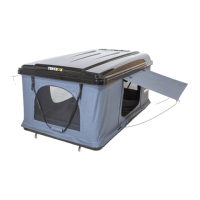
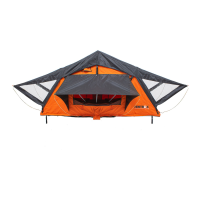
The TentBox Cargo is a rooftop tent that provides a portable and elevated sleeping space for outdoor enthusiasts. It is designed to be mounted on the roof bars of a vehicle, offering a convenient and secure shelter for camping and travel. The tent features a hard shell design, which provides protection from the elements and a streamlined appearance when closed. When opened, it reveals a comfortable sleeping area with a porch that covers the rear door, enhancing the user's outdoor experience. The TentBox Cargo is equipped with gas struts that assist in opening the tent, and it includes various attachment points for accessories such as cross bars, pole bases, a handle, ladder mounts, and closing brackets. The design emphasizes ease of use and durability, making it suitable for various weather conditions.
Usage Features
The TentBox Cargo is designed for straightforward assembly and use. Before installation, users are advised to watch the TentBox Cargo installation video for a clearer understanding of the process.
Assembly:
- Attaching Cross Bars: The guide details how to fix cross bar mounting brackets to each end of the two cross bars using provided bolts and metal plates. These brackets are then adjusted to fit snugly over the TentBox and tightened securely to the top accessory rail. It is crucial to ensure these are very tight to withstand resistance during driving.
- Attaching Pole Bases: Pole bases, which are metal components for porch poles, are slid along the bottom accessory rail on the rear side of the TentBox. Users must ensure the holes face outwards and are secured tightly with allen keys after testing with the tent poles.
- Attaching the Handle: A handle can be attached anywhere along the top accessory rail using small bolts and metal plates. This handle aids in pulling the TentBox closed and buckling it up.
- Attaching Ladder Mounts: Brackets for the ladder can be positioned on either side or the rear of the TentBox. These are slid along the bottom accessory rail and tightened. Users must test the latches with the ladder to ensure correct spacing before final tightening.
- Attaching Closing Brackets: Both the closing buckle and its latch need to be attached. The latch slides along the top accessory rail, and the buckle along the bottom accessory rail, aligning with the latch. Two sets of these buckles are required for secure closure. Users can choose to position them on the rear or sides, with side placement being easier for closing. All bolts must be securely tightened.
Opening and Closing the TentBox:
- Opening: To open, unbuckle the TentBox and push up from the rear. The gas struts will assist, though manual pushing may be needed if there's weight on top. Once fully open, it will stay open unless excessive weight is applied. Tent poles are then inserted into the pole bases to prop open the porch.
- Using the Ladder: The ladder hooks onto the ladder mounts and extends outwards. It must be securely hooked onto the metal latches before climbing. To collapse, black buttons are pushed inwards, requiring caution to avoid finger injury.
- Closing: First, remove the porch poles. Then, pull the elastic cord up to draw the fabric inwards, reducing the need for manual tucking. Use the handle to pull the TentBox closed. Finally, apply the closing buckles and turn the key to secure the TentBox before driving.
Mounting on Vehicle:
- The TentBox Cargo requires two people to carefully lift it onto the vehicle's roof bars and position it centrally.
- It is fixed at four points (corners) to the roof bars using specific fixing parts. The process involves attaching a plate to a t-shaped bolt with a nut, sliding it onto the fixing rail, and positioning one bolt on either side of the roof bar with the plate acting as a clamp underneath. The larger plate is then tightened to the hanging bolts with nuts, ensuring a secure fastening. This process is repeated at all four corners to create four secure fixing clamps.
Maintenance Features
Proper maintenance is crucial for the longevity and performance of the TentBox Cargo.
- Condensation and Mould Prevention: To reduce condensation and prevent mould, users are advised to leave the rear window slightly open while sleeping to improve ventilation. If this is not possible due to cold weather, the TentBox should be aired out before closing. If condensation has built up, it should be opened again as soon as possible to dry, ideally within 24 hours. Before storing for more than 24 hours, ensure the TentBox is completely dry, both inside and out.
- Re-waterproofing: To maintain 100% waterproofness, the exterior canvas material can be reproofed annually with any standard canvas re-proofer.
- Storage: The TentBox Cargo is designed to withstand all weathers and can be kept on the vehicle year-round. If removed for storage, especially during winter, it should be stored indoors in a dry place. It can be stored on its side to save space, but protective matting should be used to prevent scratches.
The guide emphasizes several key safety points:
- Roof bars must be installed safely and securely according to the manufacturer's instructions.
- The TentBox must be installed safely and securely according to the provided fitting instructions.
- Always ensure the TentBox is fully closed and secured with closing straps when driving.
- Regularly check that roof bars are securely fastened and that no components are damaged.
- Regularly check that the TentBox itself is securely fastened to the roof bars and that no components are damaged.
- Always adhere to the National Speed Limit.
- Users must read the 'further safety information' section before using the TentBox.
- The warranty is void if any modifications are made to the TentBox, including the removal of TentBox logos.
- The manufacturer is not liable for damage or accidents due to non-compliance with instructions, modifications, or use of non-original parts.
- Common sense and caution must be applied, and instructions should be passed to any third party user.
- Do not drive over 70mph (110kmh) with the TentBox.
- Check the TentBox and roof bar security at the start and at regular intervals of every journey in a safe location.
- Do not use the TentBox if there is visible damage; contact support.
- Be aware that unsecured loads and incorrectly mounted roof bars can cause accidents.
- Consider changes in vehicle height and drive behavior (side-wind sensitivity, cornering, braking).
- Consult vehicle and roof bar manuals; carry them with TentBox instructions.
- Do not use bleach, alcohol, or ammonia-based cleaning liquids on the TentBox.
- Be aware of increased vehicle height (up to 90cm), low entrances, low hanging branches, and potential wind noise.
- Remove the TentBox before using an automatic car wash.
- Use only tested (e.g., GS-tested) roof bars authorized for the vehicle.
- Mount the TentBox parallel to the road to avoid excessive lifting forces.
- Use the ladder with caution when climbing; children should not use it alone. Ensure ladder hooks are in good condition.
The TentBox Cargo comes with a 24-month warranty from the date of purchase, covering repair or replacement of faulty parts at the manufacturer's discretion. This warranty is limited to manufacturing faults and is valid only if instructions and recommendations are followed. Second-hand sales are not covered, but the company aims to assist all TentBox owners with repairs and spare parts.