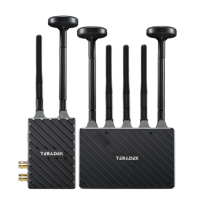
The Teradek Bolt 4K LT is an entry-level wireless video system designed for professional video production, offering zero-delay transmission of high-quality video signals. It is fully compatible with other Bolt 4K devices, ensuring seamless integration into existing Bolt 4K workflows. The system is capable of transmitting 10-bit, 4:2:2 HDR video over the unlicensed 5GHz band, supporting various ranges depending on the model (750, 1500, or 5000 feet line-of-sight). A key feature is its ability to multicast to up to six receivers simultaneously, making it suitable for complex setups requiring multiple monitoring points. For HDR workflows, the Bolt 4K LT supports HDR-10, PQ, and HLG standards, and can also transport extended camera metadata, timecode, and record triggers wirelessly, enhancing its utility in professional environments.
Function Description
The Bolt 4K LT system consists of a transmitter (TX) and a receiver (RX). The transmitter takes video input from a source (either SDI or HDMI) and wirelessly sends it to the receiver. The receiver then outputs the video (SDI or HDMI) to a monitor or other display device. The system operates with zero delay, which is crucial for live monitoring and critical focus pulling.
Usage Features
Connectivity and Setup:
- Video Input/Output: The transmitter features HDMI and 3G-SDI inputs, while the receiver offers HDMI and 3G-SDI outputs. This dual connectivity provides flexibility for various camera and monitor setups.
- Antenna Connection: Both the transmitter and receiver utilize RP-SMA connectors for attaching antennas. The transmitter typically uses four 2dBi antennas, and the receiver uses five. For optimal performance, especially with horizontally polarized "H" antennas, specific placement is recommended: one "H" antenna in front of the transmitter and one on the opposite connector, and three 2dBi antennas on the receiver's center connectors with two "H" antennas on the left and right connectors.
- Array Antenna Usage: When using an Array Antenna with the receiver, the three center connectors on the receiver should be connected to the "V" labeled connections on the Array Antenna, and the left and right connectors to the "H" connections.
- Power Input: The devices are powered via a 2-pin DC power input (6-28V). The system can be powered using the included A/C adapter or compatible battery plate accessories (Gold or V mount). The 2-pin power connector has a specific pin-out: Pin 1 (closest to the red dot) is GND, and Pin 2 is +DC.
- Power On/Off: A power switch on both the transmitter and receiver allows for easy activation. Video typically appears within a few seconds of powering on.
Mounting:
- Standard Mounting: Both Bolt 4K LT devices have a 1/4"-20 threaded hole on the bottom for mounting accessories like light stand adapters. The receiver also has an additional 3/8"-16 threaded hole.
- Orientation: For best results, the transmitter should be mounted vertically with antennas clear of obstructions. Both transmitter and receiver antennas should be oriented parallel to each other, with the transmitter antennas having clear line-of-sight to the receiver.
- Array Antenna Mounting: The Array Antenna has three 3/8" threaded holes: one on the bottom for light stand adapters or other 3/8" mounting accessories, and one on each side for yoke mount bracket assemblies. It should also be mounted vertically, with its front (Teradek logo side) facing the transmitter for clear line-of-sight.
User Interface and Control:
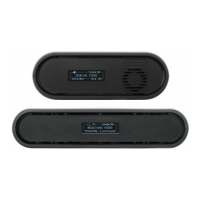
- OLED Display: Both devices feature an OLED display that shows status information and allows for menu navigation.
- Menu Joystick: A menu joystick (G) is used to cycle through status screens and navigate the menu.
- Bolt App: The Bolt App, available for iOS devices, provides remote management and monitoring capabilities. Users can download the app, enable Bluetooth on both devices, and then connect to and monitor the desired device. The app allows for pairing, channel selection, 3D LUTs, and customization of various settings.
- Status Screens: Displays the wireless receiver's status, video resolution, frequency, link quality, time code, voltage, internal temperature, and transmitter name.
- Menu Operation: Access and navigate settings.
- Switch TX: Select a different paired transmitter.
- Wireless Settings:
- Enable Fixed Frequency: Designate a specific non-DFS channel for a stronger connection.
- Bandwidth: Choose between 20MHz and 40MHz.
- Frequencies: Select the operating frequency.
- Spectrum Analyzer: Identify available frequencies.
- Signal Quality Graph: Monitor signal quality and reliability.
- Pair/Unpair: Manage pairing with transmitters.
- HDMI Settings: Select HDMI color output.
- Test Pattern: Output a video test pattern.
- Audio Settings: Configure audio settings, including "Beep on REC" and mute options.
- Bluetooth Settings: Enable or disable Bluetooth communication.
- Video OSD Settings: Control when the On-Screen Display (OSD) is shown (e.g., when no video is received, never, when operating, or always).
- Display Settings: Adjust OLED display behavior, such as inversion intervals (10 or 30 minutes) and dimming/turn-off times (10 seconds or 10 minutes).
- Reset All Settings: Restore factory defaults.
- Device Info/Firmware Versions: View model, serial number, and firmware versions.
- Status Screens: Displays wireless receiver status, video resolution, frequency, link quality, voltage, internal temperature, and HDMI signal status.
- Menu Operation: Access and navigate settings.
- Wireless Settings:
- Enable Broadcast Mode (MAX only): Extends range with the Array Antenna and allows transmission to unlimited non-DFS receivers (requires re-pairing).
- Enable Fixed Frequency: Designate a specific non-DFS channel for a stronger connection.
- Bandwidth: Choose between 20MHz and 40MHz.
- Frequencies: Select the operating frequency.
- Video Quality: Adjust settings to balance range and reliability (Longer Distance, Better Quality, Low Power).
- Pair/Unpair: Manage pairing with receivers.
- Bluetooth Settings: Enable or disable Bluetooth communication.
- Display Settings: Adjust OLED display behavior.
- Reset All Settings: Restore factory defaults.
- Device Info/Firmware Versions: View model, serial number, and firmware versions.
Bolt App Features (Transmitter Status Display):
- Settings: Quick access to customize transmitter settings.
- Status: Displays input resolution, frequency, camera recording status, and temperature.
Bolt App Features (Receiver Status Display):
- Settings: Quick access to customize receiver settings (output format, audio, display, OSD).
- SNR (Signal to Noise Ratio): Compares signal power to noise power from antennas.
- Range (Quality/Range Analyzer): Shows transmission distance.
- Spectrum (Spectrum Analyzer): Detects congestion and available frequencies.
- Paired TX: Displays paired transmitter's name, link status, and input resolution.
- Status: Displays output resolution, frequency, camera recording status, and temperature.
Maintenance Features
Cable Management:
- SDI Adapter Recommendation: When mounting upright above a monitor, using a right-angle SDI adapter is recommended to relieve strain on the SDI output's internal connectors caused by cable weight.
- Custom Cable Polarity: When using custom or third-party power cables, it is crucial to test the power cable polarity with only the power cable connected to the Bolt device, without video cables. This prevents damage from reverse polarity or improperly constructed cables, which is not covered under warranty.
- Grounding and Shorts: Always check power cables for shorts and proper grounding.
Mounting Precautions:
- Avoid Overtightening: Do not overtighten screws inserted into the 1/4"-20 or 3/8"-16 threaded holes on the devices or the Array Antenna. Overtightening can damage the chassis and internal components, voiding the warranty.
Firmware Updates:
- Regular Updates: Teradek regularly releases new firmware versions to improve performance, add features, and fix vulnerabilities. Users should visit teradek.com/pages/downloads to access the latest firmware and software updates.
- Bolt Manager: The Bolt Manager software (available for Mac and Windows, or as a standalone device) allows users to configure, pair, and upgrade their Bolt devices. Note that available configuration settings may differ between Bolt models.
Support:
- Teradek Support: For tips, information, and to submit help requests, users can visit teradek.com/contact.