12
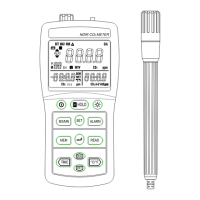
9. MEASUREMENT PROCEDURE
Sound level measurement
1. Press the button to turn on the instrument. The initial state depends on the
condition the instrument was in before it was last turned off.
2. Press the button to select the desired frequency weighting. For normal sound
level measurements, select the “A” setting.
3. Press the button to select the desired time weighting (dynamic
characteristics). Normally, the “FAST” setting should be used.
4. When performing measurement according to IEC or other standards, the frequency
weighting and time weighting setting required by the standard should be selected.
5. Press the buttons to select desired level range. Choose a setting in which the bar
graph indication registers approximately the middle of the range. If the
“
OVER ” indicator appear during measurement, the upper limit of the
selected range has been exceeded. Increase the range setting until the
symbol remains off during measurement. Similarly, if the “ UNDER ”
indicator appears, reduce the range setting until the symbol remains off
during measurement. Both indicators are non-latching and will clear
when the correct range is selected.
6. The numeric level indication shows the currently measured sound level. The
reading is updated once every second.
7. Press the
button to record the maximum time-weighted sound level
encountered during a measurement period; the “MAX” indicator will appear on the
display. Press this button again to exit this mode.
10. STORE/ERASE RECORDED DATA
The instrument incorporates a memory which can be used to store measurement data.
The maximum has a data capacity of 32000 readings which can be split into 255 blocks of
records.
1. To record data, press and hold the “RECORD” button for 3 seconds to enter data recording
mode. The “RECORD” indicator will appear on the display and will flash to indicate
recording is in progress. To exit data recording mode, press and hold for 3 seconds until the
instrument returns to normal mode and the “RECORD” indicator disappears.
2. When the memory is filled (32000 data or 255 blocks is full used), the “RECORD
FULL” symbol will appear on the display.
3. The recorded data can only be reviewed after it has been downloaded to a PC.
Recorded data cannot be displayed on the instrument.
4. To erase stored data, press the
button to turn the instrument off. Press and hold
down the “ ” button, then press the
button to turn the instrument on. “CLr
RECORD” will appear on the display and all stored data will be erased.