EasyManua.ls Logo

Texsport Montana Screen Arbor User Manual

Texsport Montana Screen Arbor
2 pages
To Next Page IconTo Next Page
Page #1 background imageLoading...
Page #1 background image
INSTRUCTIONS
I
tem 02853 • Montana Screen Arbor
Item 02855 • Wyoming Arbor (non-screen)
Thank you for purchasing this Texsport arbor. Please read and understand each step of the set-up instructions. We encourage you to set-up this
arbor at least once prior to your camping trip, ensuring that you have a satisfactory understanding of the set-up process. We hope you enjoy your
new arbor and that it will give you many years of camping pleasure.
Do not apply excessive force to this product.
A
C
E
STEP 1 - Spread out arbor skin.
STEP 2 - Assemble all your poles.
Select the 2 thickest fiberglass
roof poles (B) and push them
through the roof arbor sleeves di-
agonally across the top. Insert
into the center corner joint
STEP 3 - Once the arbor poles are
placed, tie the poles together
with the ties provided in the
center.
STEP 4 - Assemble the 4 thinner
frame poles (C). Push 1 pole
through side roof sleeves. Do this
with the other 3 remaining poles.
STEP 5 - Insert each end of the
side frame poles into the molded
4 joint sections.
STEP 6 - This is what your assem-
bled roof should look like.
STEP 7 - Assemble 2 sections of
the 3 section steel leg pole. Insert
the top of the assembled pole
section into the remaining bottom
hole of the molded joint. Repeat
this step with the remaining 3
corners.
STEP 8 - Insert the pin located at
the bottom of the arbor skin into
the bottom of the pole to secure
legs.
STEP 9 - Snap on the speed clips
to the steel legs to secure arbor
to frame.
D
PARTS LIST:
A
......4 Sets of Steel Leg Poles
B........2 Sets of Thick Fiberglass
R
oof Poles
C
........4 Sets of Thin Fiberglass
Frame Poles
D
......1 Arbor Skin
E........Arbor Stakes, Ropes and
C
lews
N
OTE:
T
he site should be flat and have no
depressions that could collect rain
w
ater.
B
STEP 11 - Stake down your arbor
through the rings at all 4 corners.
NOTE - IN HIGH WINDS, IT IS
NECESSARY TO GUY ROPE YOUR
ARBOR SO IT DOES NOT FLY
AWAY. PLEASE FOLLOW THESE IN-
STRUCTIONS TO GUY ROPE YOUR
ARBOR.
STEP 12 - Insert the guy rope into
the clew in this order pictured
above. Through the bottom hole.
Up through the back of the mid-
dle hole. Up through the top hole.
STEP 10 - Connect the last section
of the leg poles to raise arbor to
full height. This is what your
arbor should like now.
Question and Answer IconNeed help?

Do you have a question about the Texsport Montana Screen Arbor and is the answer not in the manual?
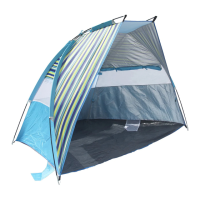
Texsport Montana Screen Arbor Specifications

General IconGeneral
BrandTexsport
ModelMontana Screen Arbor
CategoryTent
TypeScreen Arbor
MaterialPolyester
Weather ResistanceWater-resistant
VentilationMesh panels
Doors1
Poles IncludedYes
Stakes IncludedYes
Carry Bag IncludedYes
ScreenedYes
Frame MaterialSteel
ColorGreen

Summary

Arbor Setup Instructions

Step 1: Spread out arbor skin

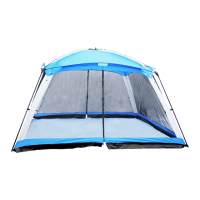
Lay out the arbor skin flat on the ground before assembly.

Step 2: Assemble roof poles

Assemble the two thickest fiberglass roof poles and insert them diagonally through the top sleeves.

Step 3: Tie roof poles together

Secure the assembled roof poles by tying them together in the center using provided ties.

Step 4: Assemble side frame poles

Assemble the four thinner fiberglass frame poles and thread them through the side roof sleeves.

Step 5: Insert side frame into joints

Insert each end of the side frame poles into the molded 4-joint sections.

Step 6: Assembled roof view

Illustration showing the correctly assembled roof structure.

Step 7: Assemble leg poles

Assemble two sections of the 3-section steel leg poles and insert into corner joints.

Step 8: Secure legs to arbor skin

Insert the pin at the bottom of the arbor skin into the pole bottom to secure the legs.

Step 9: Attach speed clips

Snap speed clips onto the steel legs to fasten the arbor to the frame.

Step 10: Raise arbor to height

Connect the last leg pole section to raise the arbor to its full height.

Step 11: Stake down arbor

Stake the arbor through the corner rings; use guy ropes in high winds.

Step 12: Thread guy rope into clew

Thread guy rope through clew: bottom hole, up middle hole, up top hole.

Step 13: Tie knot on guy rope

Tie a knot at the end of the guy rope to prevent it from slipping through.

Step 14: Tie guy rope to arbor

Secure the other end of the guy rope to the arbor.

Step 15: Adjust tension

Pull the bottom looped section out; the knot prevents slippage.

Step 16: Insert stake into ground

Loop the guy rope around the stake's head and push the stake into the ground.

Step 17: Adjust guy rope tension

Slide the clew up or down the guy rope to adjust tension.

Safety and Warnings

Open Flame Warning

Arbor fabrics are flame retardant, but avoid using open flames in or near the arbor.

Additional Information

Stake the arbor in windy conditions and keep it away from campfires to prevent damage.

Arbor Care and Maintenance

Waterproofing

Water-repellent fabrics may leak at seams; seam sealing is necessary for waterproofing.

Arbor Stakes

Use appropriate stakes for soil conditions; specialized stakes may be needed for sand or hard ground.

Zipper Care

Lubricate sticking zippers with silicone; avoid forcing zippers with caught material.

Storage Recommendations

Store arbors dry, loosely folded, away from heat, water, and mice.

Washing Instructions

Hand wash with mild soap; avoid detergents or washing machines to protect coating.

Nylon Arbor Lifespan

UV rays degrade nylon; avoid storing wet to prevent mildew and damage.

Repair Guide

Use adhesive-backed rip-stop nylon patches for small tears; repair kits are recommended.

Customer Support

Questions and Contact

Contact Customer Service via phone or email for questions, problems, or comments.

Related product manuals