EasyManua.ls Logo

ThermoPro TP-07 User Manual

ThermoPro TP-07
4 pages
To Next Page IconTo Next Page
Page #1 background imageLoading...
Page #1 background image
-1-
Remote Food Thermometer
Model No. TP-07
Introduction
Congratulations on your purchase of the Professional Remote Cooking Thermometer,
a programmable radio frequency food thermometer. You will now be able to remotely
monitor the time and temperature of food cooking on your grill, smoker or oven.
Components
1. 1 - receiver unit.
2. 1 - transmitter unit.
3. 1 - detachable stainless steel probe sensor.
4. 2 - 2*AAA batteries.
Receiver Features
Belt Clip/Stand – Battery compartment clip allows you to be mobile. Clip the
receiver unit to belt. Swings out and allow you to stand the receiver on tabletop
as well.
Battery compartment – Holds 2 AAA batteries.
EN
LCD dlsplay
Soft rubber sleeve
TASTE
MIN
START/STOP
MEAT
HR
MODE
Battery
Compartment
Belt Clip
ºF/ºC/
LCD (Liquid Crystal Display) – Displays all icons, temperature and timer. The
backlight will flash Blue once the temperature increases by 10 ºF from when
cooking starts, then it will change to Green when the temperature is within
15 ºF of the set temperature and then it will turn Red when it reaches the set
temperature. See LCD diagram for detailed information.
readings.
Do not expose the receiver or transmitter to direct heat or surface.
Do not use stainless steel probe in microwave oven.
-8-
Cleaning
Always wear heat resistant glove to touch the stainless steel probe sensor or
wire during or just after cooking. Do not touch with bare hands.
Keep the stainless steel probe sensor and wire away from children.
Wash the me tal pro be tip w ith hot so apy wat er and d ry thor ough ly. Do not
immerse the pro be in wate r while clean ing.
Wipe the transmitter and receiver with damp cloth. Do not immerse either in
water.
FCC Statement
1. This device complies with Part 15 of the FCC Rules. Operation is subject to
following two conditions:
the
(1) This device may not cause harmful interference.
(2) This device must accept any interference received, including interference
that may cause undesired operation.
2. Changes or modifications not expressly approved by the party responsible
for compliance could void the user's authority to operate the equipment.
LIMITED 90 DAYS WARRANTY
ThermoPro warrants this product to be free of defects in parts, materials and
workmanship for a period of 90 days, from date of purchase.
Should any repairs or servicing under this warranty be required, contact Customer
Service by phone or email for instructions on how to pack and ship the product
to ThermoPro.
CUSTOMER SERVICE
Telephone: 1-877-515-7797 (US&CA only)
Email: service@buythermopro.com
Hours: Weekdays 9:00 AM- 5:00 PM EST
This warranty gives you specific legal rights and you may also have other rights
which vary from state to state.
Question and Answer IconNeed help?

Do you have a question about the ThermoPro TP-07 and is the answer not in the manual?

ThermoPro TP-07 Specifications

General IconGeneral
BrandThermoPro
ModelTP-07
CategoryThermometer
LanguageEnglish

Summary

Introduction

Receiver Features

LCD Display

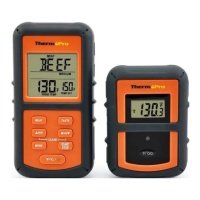
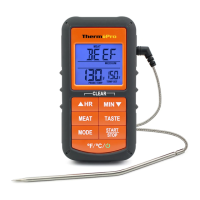
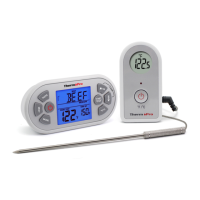
Displays icons, temperature, and timer with color-changing backlight based on temperature.

Belt Clip/Stand

Allows mobile use by clipping to a belt or standing on a tabletop.

Battery Compartment

Holds 2 AAA batteries.

Receiver Buttons

MODE Button

Selects thermometer or timer mode; press and hold for pairing.

HR / MIN Buttons

Adjusts hours/minutes or temperature values.

°F/°C/- Button

Turns receiver ON/OFF; selects temperature units (Celsius/Fahrenheit).

MEAT Button

Selects meat type or switches timer modes.

TASTE Button

Selects meat taste level (RARE, MEDIUM, etc.).

START/STOP Button

Starts or stops the timer.

Transmitter Features and Setup

Transmitter Features

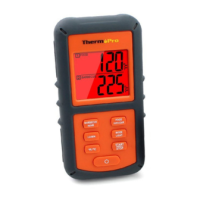
Details on wire stand, battery compartment, and sensor socket.

Transmitter Buttons

Control for turning transmitter ON/OFF and selecting temperature units.

Installing Batteries

Instructions for inserting AAA batteries into receiver and transmitter.

Turn On/Off Unit

How to power the receiver and transmitter ON or OFF.

Synchronize/Pair Transmitter and Receiver

Procedure to sync the transmitter and receiver for communication.

Synchronization Options

Option 1

Initial pairing method involving inserting batteries after probe connection.

Option 2

Alternative pairing method using buttons when batteries are already installed.

Auto Off Feature

Measuring Meat Temperature

USDA Doneness Temperature Range

Steps to select meat type and taste level for USDA recommended temperatures.

Measure to Your Specific Taste

Manually set desired temperature for meat doneness.

Procedure for Typical Use

Outdoor Grill Example

Step-by-step guide for cooking a steak to medium and setting a timer.

Using the Timer

Count Down Timer

Instructions for setting and operating the countdown timer.

Count Up Timer

Instructions for starting, stopping, and clearing the count up timer.

Helpful Hints and Cautions

Helpful Hints

Tips for probe temperature readings and troubleshooting LLL/HHH.

Cautions

Safety warnings regarding probe handling, water exposure, and unit usage.

Related product manuals