This document provides assembly instructions and product information for the Marvale 4 Door Media Stand, designed by Threshold and Studio McGee.
Function Description
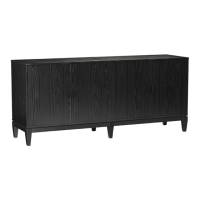
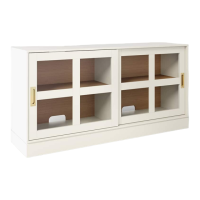
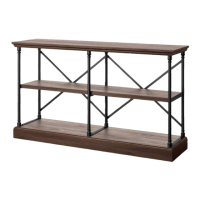
The Marvale 4 Door Media Stand is a furniture unit designed for media storage and display. It features four doors, suggesting multiple compartments for organizing various items such as electronics, media accessories, or other household goods. The design, being a "media stand," implies its primary use is to support a television and house related equipment, offering both functionality and aesthetic appeal. The inclusion of adjustable shelves further enhances its versatility, allowing users to customize storage space according to their needs. The unit is designed to be a stable and secure piece of furniture, with specific instructions for installing a tipping restraint hardware kit to prevent accidents, especially in households with children.
Important Technical Specifications
Dimensions and Weight Capacity:
- Overall Dimensions: The top panel (A) is 162.6 cm / 64 inches wide.
- Maximum Load (Top Panel): 40.8 kg / 90 lbs. This indicates the maximum weight the top surface can safely support, making it suitable for most flat-panel televisions.
- Maximum Load (Shelves): 22.7 kg / 50 lbs. This applies to the adjustable shelves (G), allowing for storage of various media devices, books, or decorative items.
- Material: The hardware components include cam locks, cam bolts, wood dowels, bolts, lock washers, flat washers, screws (M4 x 38 mm, M3.5 x 15 mm, M4 x 15 mm, M4 x 50 mm), shelf supports, door stoppers, door hinges, and handles. The tipping restraint kit includes a metal bracket, nylon strap, short screw, and long screw.
Components:
The unit consists of several panels and hardware items:
- Panels: Top panel (A), Bottom panel (B), Back panel (C), Side panels (D), Partition panel (E), Top reinforcement (F), Adjustable Shelf (G), Side / Middle right door (H), Middle left door (I), Leg assembly (J), and Bottom stretcher (K).
- Hardware (H1-H19):
- (H1) x 10 cam lock
- (H2) x 10 cam bolt
- (H3) x 12 M8 x 30 mm wood dowel
- (H4) x 16 1/4" x 15 mm bolt
- (H5) x 16 lock washer
- (H6) x 16 flat washer
- (H7) x 24 M3.5 x 15 mm washer head screw
- (H8) x 6 M4 x 38 mm screw
- (H9) x 8 shelf support
- (H10) x 2 door stopper
- (H11) x 4 M3 x 10 mm screw
- (H12) x 8 door hinge
- (H13) x 16 M4 x 15 mm screw (Nickel)
- (H14) x 4 handle
- (H15) x 8 M4 x 18 mm handle bolt
- (H16) x 10 cam lock cover
- (H17) x 2 M4 x 50 mm screw
- (H18) x 1 hex wrench
- (H19) x 2 tipping restraint hardware kit (inside plastic bag)
Usage Features
Assembly Process:
The assembly process is broken down into 14 steps, starting with the base and building up to the doors and shelves.
- Attach bottom stretchers to one leg assembly: Involves securing bottom stretchers (K) to a leg assembly (J) using bolts (H4), lock washers (H5), flat washers (H6), and the hex wrench (H18).
- Install the base: Repeats the process from step 1 to complete the base structure.
- Attach door stoppers to the top panel: Door stoppers (H10) are attached to the top panel (A) using M3 x 10 mm screws (H11) into pilot holes.
- Fasten the top reinforcement: The top reinforcement (F) is fastened to the top panel (A) using M4 x 38 mm screws (H8). The countersunk holes face upward.
- Prepare top and bottom panels assembly: Cam bolts (H2) are securely screwed into the designated small holes on the top (A) and bottom (B) panels.
- Attach the side panels and partition panel to the top panel: Wood dowels (H3) are inserted into the inner holes of side panels (D) and partition panel (E). These panels are then attached to the top panel (A) using cam locks (H1).
- Attach the bottom panel to the vertical panels: Wood dowels (H3) are inserted into the bottom inner holes of side panels (D) and partition panel (E). The bottom panel (B) is aligned and pressed together. M4 x 50 mm screws (H17) are used to secure the partition panel (E) to the bottom panel (B).
- Fasten the back panel: The back panel (C) is unfolded and laid onto the back edges of the assembled unit. It is then attached using M3.5 x 15 mm washer head screws (H7), with a recommendation to start at the corners.
- Attach the base: Twelve 1/4" x 15 mm bolts (H4), lock washers (H5), and flat washers (H6) are used to secure the assembled base to the bottom panel (B). Floor levelers are then set.
- Install the door handles and hinges: Hinges (H12) are extended and rested into the hinge cups on each door (H and I). M4 x 15 mm screws (H13) are used to fasten the hinges. Handles (H14) are attached to the front of each door using M4 x 18 mm handle bolts (H15).
- Attach the doors: This step requires assistance due to the weight. The assembled unit is lifted upright. Middle left door (I) and extended hinge bases are attached to the left side of the partition panel (E) using M4 x 15 mm nickel screws (H13). The same process is repeated for the other doors (H) into place. Adjustments are made to ensure doors are aligned and shut correctly.
- Install the adjustable shelves and put cam lock covers: Four shelf supports (H9) are inserted into holes at the desired height inside each compartment. Adjustable shelves (G) are then rested onto the shelf supports. Cam lock covers (H16) are placed onto the visible cam locks.
- Adjust the doors: Provides instructions for depth, horizontal, and vertical adjustments of the doors, along with floor leveler adjustments to correct tilting.
- Install the tipping restraint hardware kit: This crucial safety step involves attaching a metal bracket to the back panel of the unit and securing it to a wooden stud in the wall using a nylon strap, short screw, and long screw.
Safety Features:
- Tipping Restraint: A key safety feature designed to prevent furniture tipping, especially important for households with children. The manual includes a detailed warning about furniture tipping restraint and emphasizes its importance.
- Weight Limits: Clear maximum load specifications for the top panel and shelves help prevent overloading and potential structural failure.
- Assembly Notes: Warnings about not fully tightening bolts until assembly is complete, using power tools carefully, and seeking assistance for heavy steps.
Maintenance Features
Care and Maintenance:
- Cleaning: Use a soft, clean cloth that will not scratch the surface when dusting. Use furniture polish as necessary, choosing one that will not damage the finish.
- Liquid Spills: Immediately blot spills with a soft, clean cloth, avoiding rubbing.
- Heat Protection: Always use protective pads under hot dishes and plates to prevent damage.
- Stains and Marks: Address stains and marks from crayons or ink markers promptly.
- Loose Bolts/Screws: Periodically check and tighten all bolts/screws to ensure the unit remains sturdy.
Wood Furniture Care:
- Environmental Control: Maintain a climate-controlled environment to prevent extreme temperature and humidity changes that can cause fading, warping, shrinking, and splitting of wood. Avoid direct sunlight.
- Regular Cleaning: Proper care and cleaning will extend the life of the furniture and enhance its appearance.
Warranty:
The product comes with a quality guarantee. It is warranted against defects in workmanship or materials for one year from the date of purchase. Whalen Furniture product is designed to meet high expectations, and the company guarantees customer satisfaction.
Customer Service:
For parts and service, customers can contact 1-855-MYTGTHOME (855-698-4646) from 8:30 a.m. - 4:30 p.m., PST, Monday to Friday. The website www.whalenfurniture.com is also provided for further information.