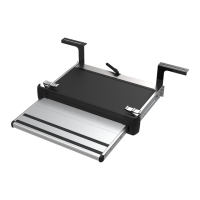
The Thule Rainblocker G2 Pack Minivan (model 301329) is an installation designed to provide additional shelter and privacy for minivans equipped with a Thule awning. This accessory pack extends the functionality of an existing awning by adding side and front panels, effectively creating an enclosed space.
Function Description
The primary function of the Thule Rainblocker G2 Pack Minivan is to expand the usable outdoor living space of a minivan by enclosing the area under an awning. It offers protection from various weather conditions, including sun, rain, and wind, and enhances privacy. The system consists of multiple panels that attach to the awning structure and the vehicle, creating a room-like enclosure. This allows users to enjoy their outdoor space more comfortably, regardless of the weather, and provides an additional area for relaxation, dining, or storage. The design emphasizes ease of installation and removal, making it a practical addition for campers and travelers.
Important Technical Specifications
The Thule Rainblocker G2 Pack Minivan is available in two main configurations, indicated by the "4900/4200" and "5102" labels, which likely correspond to different Thule awning models or sizes.
For the 4900/4200 configuration, the pack includes:
- Panels: Two side panels and one front panel, designed to fit specific awning lengths.
- Fasteners:
- 16 pieces of a mushroom-shaped fastener.
- 8 pieces of a hook-shaped fastener.
- 8 pieces of a long, thin rod.
- Mounting Hardware:
- 2 pieces of a bracket.
- 2 pieces of an M6 x 40 mm DIN 931 screw (A2 stainless steel).
- 2 pieces of an M6 DIN 985 nut (A2 stainless steel).
- 2 pieces of a 4.2 x 25 mm DIN 7981 - TX20 screw (A2 stainless steel).
- 8 pieces of an eyelet-shaped fastener.
- 8 pieces of a flat, slotted bar.
For the 5102 configuration, the pack includes:
- Panels: Two side panels and one front panel.
- Fasteners:
- 16 pieces of a mushroom-shaped fastener.
- 8 pieces of a hook-shaped fastener.
- 8 pieces of a long, thin rod.
- Mounting Hardware:
- 2 pieces of a bracket.
- 1 piece of a smaller bracket.
- 2 pieces of a screw.
- 1 piece of a smaller screw.
- 2 pieces of a 4.2 x 13 mm DIN 7981 - TX20 screw (A2 stainless steel).
- 8 pieces of an eyelet-shaped fastener.
- 8 pieces of a flat, slotted bar.
- TX20 screwdriver/bit
- N° 10 wrench
- Drill bits: Ø 3 mm and Ø 3.5 mm
- Degreaser/cleaning agent
The installation process involves attaching brackets to the vehicle and the awning, followed by securing the panels. The panels are designed to be easily attached and removed, allowing for flexible use. The system is engineered to withstand moderate wind (up to 6 Bft) and rain, providing a reliable shelter.
Usage Features
- Enhanced Outdoor Living Space: Transforms the area under the awning into a protected room, expanding the usable space of the minivan.
- Weather Protection: Offers shelter from sun, rain, and wind, making outdoor activities more comfortable in varying conditions.
- Privacy: The enclosed design provides increased privacy for occupants.
- Easy Installation and Removal: The panels are designed for quick and straightforward attachment and detachment, allowing users to adapt to changing needs or weather. The initial bracket installation is more permanent, but the panels themselves are temporary.
- Compatibility: Designed specifically for Thule awnings on minivans, ensuring a good fit and integration with the existing setup.
- Adjustable Tension: The system includes features to tension the panels, ensuring stability and a snug fit.
- Storage: The Thule Luxury Blocker Bag (301568) is available as an accessory for convenient storage of the panels when not in use.
Maintenance Features
- Regular Inspection: Users are advised to check the supplied product for correct type, height, and projection of the canopy.
- Surface Preparation: Before attaching brackets, the surface of the main housing of the awning should be thoroughly cleaned and degreased. This ensures proper adhesion and prevents damage.
- Drying: After use, especially in wet conditions, the panels should be completely dried before storage to prevent mold and mildew.
- Cleaning: The panels should be cleaned with pure water and a soft brush or cloth. Avoid using harsh chemicals or abrasive materials that could damage the fabric.
- Storage: When not in use, the panels should be stored in a dry place, preferably in a dedicated storage bag like the Thule Luxury Blocker Bag, to protect them from dirt and damage.
- Wind Conditions: In strong winds (above 6 Bft), it is recommended to remove the panels and close the awning to prevent damage.
- Heat Sources: Do not place heat sources near the walls or the roof of the enclosure to prevent damage.
- Avoid Hard Objects: Ensure that there are no hard objects on the window during folding to prevent impressions.
- Long-Term Storage: Let the panel dry thoroughly before long-term storage.
Adhering to these maintenance guidelines will help prolong the lifespan of the Thule Rainblocker G2 Pack Minivan and ensure its continued performance. In case of wrong installation, use, or repair, the warranty may be voided, and users should consult a dealer if repairs are needed.