11 12 13 14
15 16 17
10
18
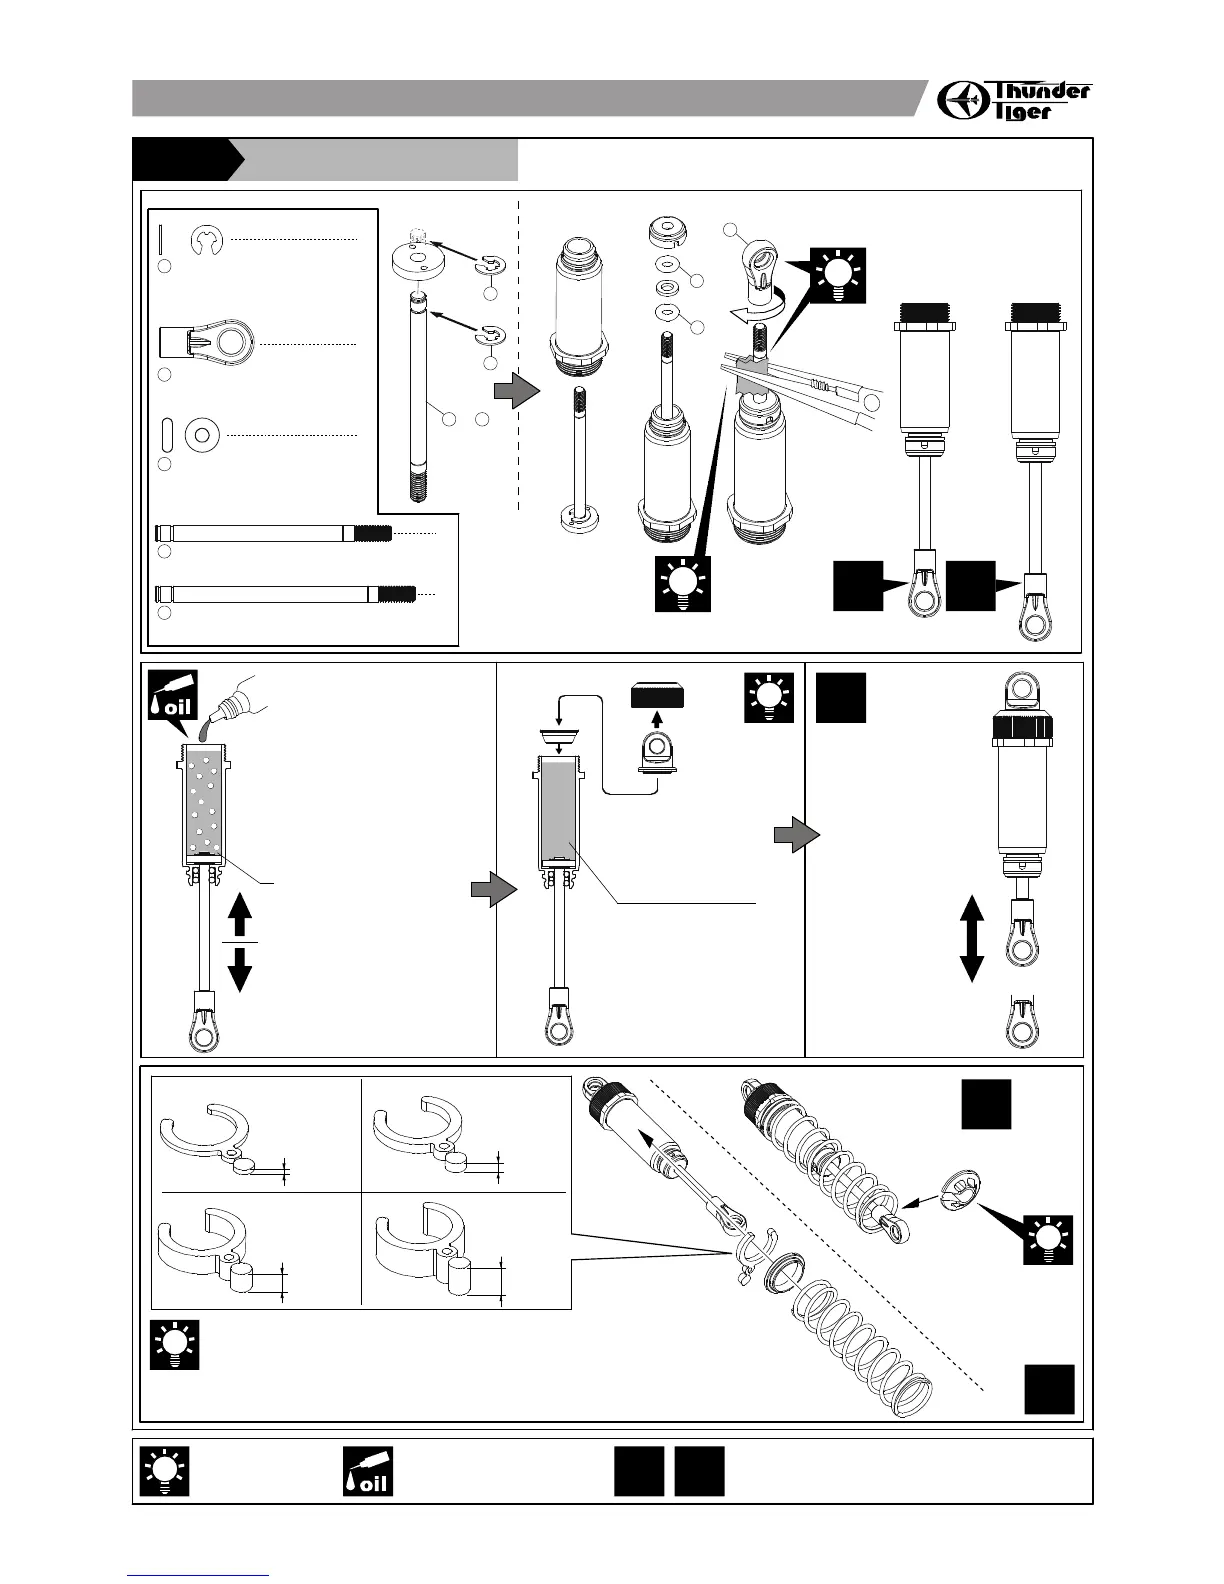
Shock Absorber 避震器組
STEP7
8
2.5mm
E-Clips
E字扣
1
4
Shock Eyelet
避震軸球頭
2
2.8x1.9 mm
O-Ring
O型環
3
8
Shock Shaft
避震器軸
4
2
2
Shock Shaft
避震器軸
5
1
1
4
5
or
Cover the shaft with cloth
before griping it with pliers.
組裝避震球頭時,可以用布
料包覆芯軸,以避免芯軸被
尖嘴鉗刮傷。
2
3
3
Attach the shock eyelet onto
the shock shaft until it
reaches the mark line on
the shaft.
將避震球器頭鎖附於芯軸直
到球頭上緣到達刻線。
X
2
X
2
Front x2
前2組
Rear x2
後2組
X
4
Ensure the piston moves
smoothly
最後再確認避震器活塞是
否移動順暢無阻。
Pull down the piston and
slowlly fill in the silicon oil.
The factory set-up of the
shock is #500 of silicon oil
for the front and rear shock
absorbers.
重新裝填矽油時,請先將活
塞及避震軸下拉,然後緩注
入避震器矽油于套筒內。原
廠避震器設定為前後避震器
皆使用#500號矽油。
Then gently move the shaft/piston
up and down to get rid of the
bubbles.
緩慢地將活塞及避震軸上下移動
使得套筒之氣泡能快點消失。
Add silicon oil one
more time up to the
brim.
等所有氣泡都消失後
再將液面補滿。
Put the shock bladder onto
the shock body, wipe off
excess oil and tighten the
shock cap.
將避震器封套置於套筒上端
並下壓結合,擦拭多餘之矽
油並鎖上避震器上蓋。
Use 6 mm preload spacer for front. Use 8 mm preloadd spacer for rear.
使用6mm避震器套筒調整夾片來調整避震器彈簧之鬆緊度。
X
2
Front x2
前2組
Rear x2
後2組
Compress the spring
an d install spring cup.
將下定位套固定于彈
簧下緣。
X
4
Hint
組裝提示
X
2
X
4
Apply silicon oil
使用模型專用矽油
Shock Absorber 避震器組
STEP7
〈Front Shock Absorbers〉
〈將前避震器與前擺臂懸吊結合〉
〈Rear Shock Absorbers〉
〈將後避震器與後擺臂懸吊結合〉
Steering Bellcrank 轉向曲柄組
STEP8
Top View
上視圖
Rear
此面朝後
Side View
側視圖
Steering Bellcrank 轉向曲柄組
STEP8
Apply grease
使用潤滑油膏(黃油)
Installation of Rear End 結合後擺臂懸吊組
STEP9
3
3x10mm
F/H Philip Machine Screw
平頭十字螺絲
3x8mm
BT Philip Machine Screw
圓頭十字螺絲
1
M3 Lock Nut
止鬆螺帽
2
〈Rear Suspensison〉
〈將後擺臂懸吊組結合於底板上〉
Installation of Front End 結合前擺臂懸吊組
STEP10
1
1
M3 Lock Nut
止鬆螺帽
3x10mm
F/H Philip Machine Screw
平頭十字螺絲
Steering Servo 轉向伺服機
STEP11
1
3x10mm
F/H Self-Tapping Screw
平頭十字螺絲
1
6mm(S)
Ball Stud
球頭座
Marked "T" for Thunder Tiger stock servo. Find the appropriate servo horn
mount for your servo from the chart. Install the servo horn arm with the stock
mounting screw. See the graphic for the correct neutral angle.
標示"T"搭配原廠伺服機使用。請參考列表找尋適合各家廠牌伺服機所使用之
拉桿座,然後配合拉桿鎖附於伺服機上。
拉桿角度請依圖示調整於中立位置(約90度)。
Steering Servo 轉向伺服機
STEP11
2
3x10mm
F/H Philip Machine Screw
平頭十字螺絲
2
2.5x6mm
F/H Self-Tapping Screw
平頭十字螺絲
4x10mm
Socket Hex Machine Screw
內六角固定螺絲
1
2
3x4mm
BT Philip Machine Screw
平頭十字螺絲
3x4mm
Set Screw
無頭內六角螺絲
1
3x6mm
Washer
墊圈
1
Motor Pinion Gear 馬達驅動齒
STEP12
Gear Ratio Formula
齒輪比計算公式
Note: insert a washer into the gap to avoid breakage of motor
mount caused by overtightening the screw.
注意確實裝入墊圈,以保護馬達固定座不因固定螺絲鎖附過緊
而造成斷裂。
Installation of Motor Mount 結合馬達組
STEP13
STEP14
STEP15
Installation of Battery Pack 安裝電池
2
3x23mm
BT Philip Machine Screw
圓頭十字螺絲
2
3x18mm
BT Philip Machine Screw
圓頭十字螺絲
3x10mm
BT Philip Machine Screw
圓頭十字螺絲
4
3x8mm
BT Philip Machine Screw
圓頭十字螺絲
1
2
3x12mm
Socket Hex Machine Screw
內六角固定螺絲
2
Body Clip
車殼R型插銷
STEP16
Tire insert foam
輪胎海綿內襯
Install the tire onto the wheel. Glue the tire to the wheel with instant glue in four spots around the tire on both sides.
將輪胎(含內襯)與輪轂結合並在胎緣內側點上快乾膠黏合。
Warning: Follow the adhesive instructions for proper use and safety. Wear eye and hand protection.
注意!!!使用快乾膠時請注意安全,最好戴上手套及護目鏡以避免危險。
STEP17
Tire/Wheels 輪胎及輪轂
4
4x12mm
Socket Hex Machine Screw
內六角固定螺絲
STEP17
Tire/Wheels 輪胎及輪轂
4mm
Washer
墊圈
STEP18
Body Shell 車殼
4
Hint
組裝提示
Hint
組裝提示
Installation of Top Plate 結合二樓板
Receiver & E.S.C. 接收機與速控器
Hint
組裝提示
Fast 快
Bad 差
Short 短
Spur Gear 大齒盤齒數
Pinion Gear 馬達驅動齒數
Final Gear Ratio
最終傳動齒比
Max. Speed 極速
Acceleration 加速
Running Tine 行駛時間
Slow 慢
Good 佳
Long 長
72(48 Pitch 齒距) 70(48 Pitch 齒距)
19
12.83
20
12.18
21
11.60
22
12.08
23
10.60
25
9.75
26
9.37
21
11.28
22
10.77
23
10.30
24
9.87
25
9.48
26
9.11
24
10.15
〈Front Suspensison〉
〈將前擺臂懸吊組結合於底板上〉
Apply C.A Glue
使用快乾膠黏合
3x8mm
F/H Philip Machine Screw
平頭十字螺絲
3x6mm
BT Philip Machine Screw
圓頭十字螺絲
1
1
Tighten the motor mount
screw last.
調整完成後再鎖附螺絲
Turn the motor to find proper gear mesh, the
spur gear should spin smoothly after adjusting.
轉動馬達調整最佳齒隙
3.38461
 Loading...