Thunder Tiger Corporation guarantees this model kit to be free from defects in both material and workmanship. The total monetary value under
warranty will in no case exceed the cost of the original kit purchased. This warranty does not cover any components damaged by use or modification.
Part or parts missing from this kit must be reported within 60 days of purchase. No part or parts will be sent under warranty without proof of
purchase. To receive part or parts under warranty, the service center must receive a proof of purchase and/or the defective part or parts. Should
you find a defective or missing part, contact the authorized Thunder Tiger Service/Distributor nearest you. Under no circumstances can a dealer
or distributor accept return of a kit if assembly has started.
WARRANTY
品質保證事項
本公司對於製造過程中產生之瑕疵,負完全品質保證責任。
保證事項僅限於產品本身與隨產品所附之零配件。
品質保證不包含下列事項
因使用、組裝或調整本產品所發生之損壞。
其他所有非產品本身品質所造成之損壞。
ENGINE BREAK-IN 引擎磨合
For a new engine (break-in setting), the high speed needle needs to be set as rich as possible. Turn the high speed needle 1/4
turn counterclockwise from initial setting (2 1/2~3 turns from fully closed). Repeat step 15b. Keep doing this until the engine stalls
at full throttle, then turn the high speed needle 1/4 turn clockwise. Run the car in an open parking lot with this rich engine setting
for at least 5 tanks of fuel to complete the break-in process. It is normal for new engines to stall many times during this time due to
the rich setting. When it does, just restart the engine. After break-in, follow the engine setting procedure to set the carburetor for
normal operations.
磨合新引擎時,需將高速油針盡可能設定在富油的狀態。從原廠設定好之高速油針位置(約2 1/2~3圈),每次逆時針退出1/4圈(全油
門狀態下),直到引擎因富油而熄火;再將高速油針順時針轉進1/4圈。重新發動引擎,並保持此設定下(富油、全油門狀態下),磨合
引擎約5桶油(車上之油箱),完成引擎磨合工作(引擎進行磨合時,因油針設定較為富油,常常會發生引擎熄火的正常現象,重新
發動引擎即可)。
完成引擎磨合工作後,請參照下述引擎設定步驟,設定您愛車的引擎。
ENGINE SETTING 引擎設定
Due to different fuel formula, operating elevation, humidity . . . etc. The engine may / may not operate properly at initial setting.
Please follow the following procedure to achieve proper carburetor setting. Do not perform this procedure until the engine has been
properly broken in.
a. Start the engine.
b. With a running engine, run the car back and foreth in a straight line (full throttle achieved during each passage) in an open parking
lot. Repeat, and note the sound of the exhaust. Do not hold the throttle open with car off the ground or the engine connect rod
may break.
c. If the exhaust does not reach a high pitch note, turn the high speed needle (long needle, extending from carburetor, pointing up)
1/4 turn clockwise, and repeat step 15b.
If the exhaust reaches a high pitch note immediately, turn the high speed needle 1/4 turn counterclockwise, and repeat step 15b.
d. Repeat step 15c until the engine reaches optimum setting (turning in the high speed needle will no longer have an effect at full
throttle and turning out the needle will cause the engine's full throttle rpm to drop a little).
For normal operations, turn the high speed needle 1/4 turn counterclockwise from the optimum high speed needle setting.
e. To set the idle, turn the idle screw in (higher rpm) or out (lower rpm).
Basically, the idle needs to be set at the lowest possible point before the engine stalls.
f. To set the low speed needle (larger needle on the side of carburetor body), the engine needs to be broken-in and high speed
needle needs to be set first.
g. Repeating step 15b every 10 seconds (1 second of full throttle and 10 seconds of idle). If the engine rpm at idle drops after a
few seconds and stalls, then turn in the low speed needle (clockwise) 1/4 turn. If the engine rpm stays the same or goes up at
idle, then turn out the low speed needle (counterclockwise) 1/4 turn.
h. Keep repeating step 15g until the engine rpm drops (goes to idle rpm, then drops a few more rpm after a few seconds) but does
not stall at idle.
引擎因使用之燃油配方不同、操作習慣、氣候等影響,必須適時調整設定化油器,以保持引擎正常運作。
注意:引擎設定工作開始前,必需完成引擎磨合工作。
a. 發動引擎
b. 於空曠安全的場地,重複進行直線來回的動作(適時將油門全開),調整高速(主)油針,並注意排氣管聲浪的變化。當車子在瞬間
離地的狀態時,油門需放開,否則容易損傷活塞連桿。
c. 若無法達到高速行走,請每次順時針轉進高速(主)油針1/8~1/4圈,再重複15b步驟。若引擎已達到高速行走,而產生吸不到油汽
的間斷現象,請每次逆時針退出高速(主)油針1/8~1/4圈,再重複15b步驟。
d. 重複步驟15b、15c完成高速(主)油針最佳設定(順時針旋轉主油針,引擎轉速反應會提高,逆時針旋轉主油針,引擎轉速少許降
低)。在一般情況下使用引擎,請將高速(主)油針從最佳設定點退出1/4圈,可提高引擎使用壽命。
e. 設定怠速時,請利用怠速螺絲設定,順時針轉進為提高怠速,逆時針轉出為降低怠速。在引擎不熄火狀態下,儘可能將引擎怠速
設定在最低點(不熄火)。
f. 設定低速(副)油針時,需完成引擎磨合以及高速油針設定後進行。
g. 重複步驟15b每十秒鐘一個循環(一秒全油門、10秒怠速)。若引擎於怠速時轉速下降並熄火,順時針旋轉低速油針1/8圈;若引
擎於怠速時轉速上升且偏高,逆時針旋轉低速油針1/8圈。
h. 重複步驟15g,設定低速(副)油針及引擎正常怠速運作時之最低轉速(不熄火)。
16
Instruction Manual
The contents are subject to change without prior notice due to product improvements and specificatrion changes.
操作說明書
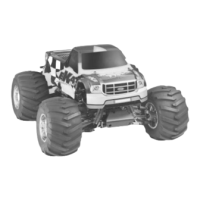
1/8 SCALE NITRO POWERED 4WD MONSTER TRUCK
1:8
引擎動力四驅大腳卡車
本套件所附之零件可能跟圖示有所差異。因產品後續之設計研發或功能不斷改善之原因,我們將保留產品規格變更權力,不再另行通知使用者。
This radio control model car is not a toy! Before beginning operation, please read this manual thoroughly.
本產品為高性能模型非一般玩具,操作前請詳閱本產品說明書。
No.6225-F
JD6754.V2
Fuel Bottle
加油壺
Hex Wrench Set, 2.0mm / 2.5mm / 3.0mm / 5.0mm
六角扳手, 2.0mm / 2.5mm / 3.0mm / 5.0mm
5-Way Wrench
六角螺帽套筒扳手
Screw Drivers, Lexan Body Reamer, Hobby Knife,
Lexan Scissors.
十字起子、一字起子、挖孔器、車殼剪、美工刀
Glow Fuel, Methanol 10% to 30%
Nitro 5% to 18% Caster / Synthetic Oil
模型專用燃料
(含10%~30%硝
基甲烷、5%~18%潤滑油)
AA Alkaline dry batteries 8
pieces for transmitter
發射機用電池
ITEMS REQUIRED FOR OPERATION
周邊配件
Note:
Battery life is short when using Alkaline batteries. For safety, we recommend using Alkaline batteries for only 30 minutes
before testing; mostly changing. Battery strength affects braking power and radio range. If voltage drops while running the
car, you will loose control and destroy your car! This is NOT covered under warranty. To increase run time, upgrade receiver
battery to a 5-cell flat /hump pack (TT#2932 Hump). But, the most important step you can make, “is to always use fully charged
or fresh batteries when running your car”.
註:
一般碳鋅或鹼性乾 電池的使用壽命有限,為了安全 起見,我們建議玩家能使用電池蓄 電力較佳及具有較高電流輸出特性 之鎳
氫充電電池,可有 效延長產品操作時間並大幅增加 煞車制動力以及增強遙控操作距離 來確保產品操作之安全性。請注意 !玩
家操控本模型前請先確認安裝符合本產品需求且充電完全之電池。如玩家因為使用充電量不足之電池操作本產品而導致失
控,造成任何財產 及人身之損害並不在本公司之保 固及賠償範圍之內!如欲選購高容 量之鎳氫充電電池包,請參考雷虎 網站
之產品資訊或依需求選購TT#2932 5-Cell 6V Hump鎳氫充電電池包。
*AA Rechargeable Ni-MH
battery 4 pieces for receiver
接收機用電池
No.2932 Ni-MH battery
Pack/Hump, 6V/1200mAh 2/3A
鎳氫充電電池包
TOOL INCLUDED
Thank you for your purchase of this Thunder Tiger product. You should enjoy many hours of fun and excitement from this advanced
R/C model. Thunder Tiger strives to bring you the highest level of quality and service we can provide. We race and test our cars around
the world to bring you state-of-the-art products.
We offer on-line help on our www.acehobby.com or www.thundertiger.com forum and our product specialists are ready to take your
call if you have any technical questions. Please read all instructions and familiarize yourself with the systems and controls of this model
before running. Have fun and enjoy the exciting world of R/C!
感謝您購買雷虎科技SLEDGE HAMMER S50引擎四驅大腳卡車。雷虎科技以提供最高品質的產品及服務作為持續努力的目標。並藉由參
與競賽及重覆測試產品,不斷累積經驗,進而提昇設計及製造品質,期望能呈現給您最頂級之工藝產品。本使用說明書包含了操作本產
品前所需注意的重要事項,建議您在開始準備及操作本產品之前,能詳閱此說明書,並熟悉本產品之操控系統。若是您在產品的操作及
使用上有任何的疑問,歡迎多加利用我們所提供的24小時諮詢留言版或洽詢雷虎科技授權經銷商。雷虎科技的全球英文網址為www .
thundertiger.com中文網址為www.tiger.com.tw,我們將竭誠為您服務!
Thank you for purchasing a Thunder Tiger Product.
Please read all instructions and familiarize yourself with the products and controls before operation.
1. This product is not a toy. It is a high performance model product. It is important to familiarize yourself with the model, its manual,
and its construction before assembly or operation. A child operating under the supervision of the adults is necessary.
2. Always keep this instruction manual ready at your hand for your assembling and operating reference, even after completing the
assembly.
3. Make sure all the screws are properly tightened and all the parts are checked after running the car for a long period of time.
4. For the best performance, it is important to make sure all the moveable parts work free without binding.
5. Do not operate model products in rain, on public roads, near crowds, near airport, or near areas with restricted radio operation.
6. Always keep fuel away from heat and open flame. Only operate in open, well-ventilated area. Store fuel in cool, dry area. Keep the
fuel bottle cap tightly closed. Clean up any leak or excess fuel before starting the engine.
7. This product, its parts, and its construction tools can be harmful to your health. Always exercise extreme caution when assembling
and/or operating this product. Do not touch any part of the model that rotates.
8. Check your radio frequency with the proper operating frequency of the area or country. Always check to see if there are any modelers
operating on the same frequency as yours. Also, check your radio for proper operation before operating a model.
感謝您購買雷虎科技產品,在您開始操作本產品前,請詳閱本產品說明書。
1.
本產品為高性能模型產品非一般玩具,組裝與操作過程皆須由成人陪同。請詳讀此本使用說明書,避免因組裝錯誤與操作不當造成損壞。
2.
請妥善保管此說明書,對於後續維修、操控說明將可提供您協助。
3.
請定時巡檢車輛上之所有螺絲是否鎖緊,零件是否鬆動。
4.
請檢視所有活動部位零件是否不受干涉,可靈活作動,以達到車輛最佳性能。
5.
請勿於雨天、公眾空間、道路、機場附近與其他限制遙控模型活動區域,操控本項產品。
6.
遙控模型專用燃料,具相當高的揮發性與低燃點特性,請您於使用或儲存時遵照使用燃油之相關規定;使用時必須遠離火源,儲藏時必
須避免日曬並放置於乾燥陰涼處,以及兒童無法取得處。
7.
此項產品具有相當之危險性,於組裝、調整、操控上的不熟悉都可能造成自身或他人的傷害,當發生這些傷害事件時製造商是可以免除
責任的,建議您於初次使用本產品前,先行請教具有相當程度經驗同好或是專業雷虎經銷商與模型專賣店。
8.
請您確認您所在地區對於頻率規定之相關法規,來選用適當的頻率。避免與其他同好使用相同頻率造成失控事件。
CAUTION
注意事項
INDEX
索引
INTRODUCTION 前言 1
CAUTION 注意事項 1
IMPORTANT NOTES & WARNING 重要注意事項 2
ITEMS REQUIRED FOR OPERATION 周邊配件 3
UNRAPPING THE TRUCK FROM BOX AND INSTALLING THE
TIRE & FLAG 將車輛從包裝盒中取出,並安裝輪胎與旗幟 4
CHARGING THE GLOW PLUG IGNITER 電夾充電方式 4
RADIO BATTERY INSTALLATION 遙控器電池包安裝與充電 5
PREPARING THE RADIO 遙控器使用準備 5
RADIO OPERATION 遙控器操作 5
OPERATING RADIO STEERING FUNCTION 遙控器設定-轉向 6
OPERATING RADIO THROTTLE/BRAKE AND REVERSE
FUNCTION 遙控器設定-油門、煞車、後退 6
INTRODUCTION
前言
ADJUSTING THE THROTTLE LINKAGE 油門及煞車連桿調整 7
ADJUSTING FORWARD / REVERSE LINKAGE
倒退行走連桿調整 7
ADJUSTING CARBURETOR 化油器調整 8
FUELLING 燃油的添加 9
PREPARING THE ENGINE FOR STARTING 引擎整備工作 9
STARTING THE ENGINE 發動引擎 10
STOPPING ENGINE 停止引擎 10
ENGINE BREAK-IN & ENGINE SETTING 引擎磨合&設定 11
STORING YOUR CAR 保養建議 12
SET UP 設定 13
TROUBLESHOOTING 常見問題與解決辦法 16
STARTING THE ENGINE 發動引擎
Start the engine using shaft hex start
(corddless drill required)
使用六角啟動棒啟動引擎
a. Turn on the radio (transmitter first, then receiver).
b. Clip the glow plug igniter onto engine's glow plug.
c. Hex Start -Make sure that your drill is set to the clockwise or forward position. Insert the Hex Starting Shaft to the drill and tighten
the drill chuck with the ball end facing away from the drill. BEFORE inserting the Hex Starting Shaft into the dual start output,
squeeze the trigger and verify that the drill is turning clockwise.
If the engine becomes flooded: Turn off your truck, and then the radio. Remove the glow plug using a glow plug wrench and
then remove the air filter. Turn the truck over to allow any excess fuel in the engine to run out. Turn the truck right side up. Reinstall
the air cleaner. Squeeze the trigger 3 to 4 times. Reinstall the glow plug with the glow plug wrench. Return to step 16b.
C AUTION: Attempting to start the motor by using a counter-clockwise direction could damage the Hex Start mechanism or
possibly the engine internal components. Insert the ball end of the Hex Start Shaft into the Hex Start output. Grasp the drill tightly
and squeeze the trigger.
a. 打開遙控器(先打開發射機電源,再開接收機電源)。
b. 將電夾與火星塞連接。
c. 使用啟動棒啟動引擎:先確認啟動器轉動方向為順時針旋轉。將啟動棒裝入啟動器內,將啟動棒另一端置入引擎起動裝置,啟動引擎。
引擎積油排除:
引擎於發動過程中,若發現阻力過大,有可能引擎發積油狀況,此時必須先將引擎積油排除。
將遙控器與接收機電源關閉,將火星塞與空氣濾清器卸下,將車輛以倒置或其他各種可能角度將積油排出。再將車輛擺正,將空
氣濾清器裝回,啟動引擎,重複5到7次,再將火星塞重新裝回。
注意事項:若啟動器轉動方向為逆時針旋轉,將會導致引擎啟動裝置與引擎內部構造損壞。
14
STOPPING THE ENGINE 停止引擎
a. Bring your truck to a complete stop and idle. Then, Remove the body clips and body.
b. Using needle-nose pliers or a clothespin, pinch off the fuel line just before the carburetor until the engine stops (1-2 seconds).
DO NOT ATTEMPT TO STOP THE MOTOR BY TOUCHING OR GRABBING THE FLYWHEEL! These motors have a lot of
torque and serious injury could occur from stopping the engine in this manner.
The exhaust gasses can be very hot, stopping the motor by plugging the exhaust with your finger could result in a serious burn.
c. Turn off your truck and then the radio
a. 將車輛保持於靜止怠速狀態,將車殼移開。
b. 使用尖嘴鉗夾住油器前端油管夾住約1至2秒,直到引擎熄火。
注意:不可徒手強制停止飛輪運轉,避免造成傷害;不可用手指塞住排氣管,達到停止引擎的目的,因為排氣管工作溫度與排出
之廢氣溫度皆相當高,將會造成相當大的傷害。
c. 將接收機與發射機電源依序關閉。
15
Glow Plug Problems. 火星塞問題
The glow plug in your engine must
be replaced periodically to maintain
peak performance and easy
starting. Most starting problems
or erratic performance can be
traced back to the glow plug. The
easiest way to check for a faulty
glow plug is to simply install a new one and see if the problem
is corrected. However, to test the glow plug, remove the glow
plug form the cylinder
head with a 8mm nut driver (make sure there is no dirt
on top of the head which could fall into the engine. Do not lose
the copper gasket which seals the glow plug.)
Connect the glow plug to the glow igniter. All of the coils should
glow bright white. Sometimes, the first few coils will not glow,
while the rest are bright orange. This indicates a bad glow
plug or low igniter battery. Try recharging the igniter, or replacing
the glow plug.
為維持引擎的性能及易於啟動,火星塞需定期更換。啟動困
難及影響引擎性能的原因,大部分都是火星塞故障,最簡單
的測試方法,就是更換新的火星塞試試看。火星塞的拆裝請
使用8mm的套筒扳手(拆裝前請先確認火星塞孔周圍是乾淨的,
火星塞墊片勿弄丟)。將火星塞接上電夾,所有的電熱絲應該
呈現炙熱的狀態。若剛夾上電夾,前幾圈電熱絲未立刻呈現
炙熱狀態,過一下子才呈現橘色亮光,這表示火星塞已故障
了或電夾沒電了,請更換火星塞或將電夾充電。
Flooding 引擎積油
Symptoms of a flooded engine include difficulty in starting,
muffled sounds coming from the exhaust, hex start backphte
won't operate, and excess fuel draining from the exhaust outlet.
Remove the glow plug with a 8mm nut driver and also remove
the air cleaner. Turn the car upside down and operate the
power drill a couple of times to drain the excess fuel out of
the engine and carburetor. Re-install the glow plug and try
starting again.
如果出現以下狀況,表示引擎積油了:啟動困難、無排氣聲
音、啟動後蓋無法作動、多餘未燃燒的燃油自排氣管排出。
這時候需進行排油步驟,拆下火星塞及空氣濾清器,將車子
側傾一邊,用啟動器旋轉啟動後蓋幾下,將積油排出。最後,
裝回火星塞及空氣濾清器,重新啟動。
Fuel Mixture 燃油混合比
The fuel mixture is controlled by three different adjustments
on the carburetor, and should come preset from the factory
(see photos below). Your engine should
start and run slightly rich with these settings (rich is good
for break-in). Tuning Tip: Always make sure you can see
some exhaust smoke coming out of the exhaust outlet
during operation. This is a good sign that enough fuel is
getting to the engine.
燃油混合比的調整,由化油器的三個部分所控制,原廠設
定值請參考右圖所示。建議您的引擎設定值,可以此為基
準再稍微富油一些,以維持引擎壽命。引擎調整小秘訣:
永遠保持排氣管可看到白煙排出,這表示引擎是處於正常
運轉的狀態,引擎可發揮其性能又可延長壽命。
Factory Carburetor Settings. 原廠設定值
1. Choose a fuel from a reputable, brand name company that is approved for car/truck use. Do not use airplane or boat fuels in
your car/truck. Never use gasoline in a glow model engine.
2. Fuel color is for identification purpose only and is not important to performance or durability of your engine.
3. Always store fuel in a well ventilated place, away from heating devices, open flames, direct sunlight, or batteries. Keep glow
fuel away from children. Always keep your fuel bottle closed when not in use.
4. Do not dispose of fuel or empty fuel containers in a fire. It may possibly cause fire or explosion.
1.
請選擇具品牌知名度且經過認可、標準的遙控車專用燃油。模型專用燃油以甲醇為主,內含硝基甲烷10%~30%,合成或半合成
潤滑油約5%~18%,一般車用燃油建議以含20%硝基甲烷比例的燃油,較為適中。請勿使用一般汽車用燃油於模型專用引擎上。
2.
燃油的顏色主要是辨識用,對於引擎的性能及耐久性並無影響。
3.
儲存燃油時請置放於通風良好的地方,遠離熱源、高溫電器用品或蓄電池,並儘量避免陽光直射。燃油不用時請儲藏於幼兒無法
接觸之處並請隨時關緊瓶蓋。
4.
勿將燃油及燃油空瓶接近火源,高溫可能會引起爆炸起火的危險。
1. For proper engine break-in procedure, please refer to the manual of your engine.
2. Never run your vehicle without the air filter .If the vehicle will be operated in an area with fine dust, use filter oil or caster oil on
the air filter element. It is important that the foam is only moist to trap dirt and allow air passage. With the foam too wet, limited
air can pass through; therefore, limiting engine performance.
3. The parts around engine could be dangerously hot after operation. Do not touch it without any protection!
1.
引擎的磨合步驟,請參考引擎手冊。
2.
引擎沒裝空氣濾清器,請勿發動引擎。在有粉塵的場地操作車輛時,空氣濾清器棉需加入空氣濾清器油或篦麻油,用以吸附粉
塵。空濾油加入空濾棉中需適量。太多,會影響引擎進氣效率,引擎性能會受到限制。太少,粉塵容易進入引擎內部,造成損壞。
3.
車輛操作過後,引擎及排氣管的溫度很高,請勿接觸這些危險部位。
1. Choose the right place to operate your R/C model. Do not run on public streets or highways. This could cause serious accidents,
personal injuries, and/or property damage. Never run R/C models near people or animals. To avoid injury, do not run in confined
spaces. Do not run where loud noises can disturb others, such as hospitals and residential areas. Never run indoors. There is
a high risk of fire and/or damage.
2. Inspect your model before operation. Make sure all the screws are properly tightened and all the parts are checked after running
the car for a long period of time. Always use fresh batteries for your transmitter and for your receiver to avoid losing control of
the model. Always test the brakes and the throttle before starting your engine to avoid losing control of the model.
3. Check your radio frequency with the proper operating frequency of the area or country. Always check to see if there are any
modelers operating on the same frequency as yours. Also, check your radio for proper operation before operating a model.
4. Do not touch any part of the model that rotates.
1.
請勿於雨天、公眾空間、道路、機場附近與其他限制遙控模型活動區域,操控本項產品。
2.
車輛操作前,請檢查電池電量是否充足,巡檢車輛上之所有螺絲是否鎖緊,零件是否鬆動,並測試煞車及油門裝置是否正常以免
發生失控情形。
3.
請您確認您所在地區對於頻率規定之相關法規,來選用適當的頻率。避免與其他同好使用相同頻率造成失控事件。
4.
請勿將手指或任何物品接觸正在轉動的裝置。
1. If you drink nitro fuel by accident, immediately drink large quantities of water and try to induce vomiting. Consult with physician
right after then.
2. If the nitro fuel gets into your eyes, rinse them well with water. Consult with physician right after then.
3. If the fuel gets onto your skin, wash it well with soap and water.
1.
如果您誤食燃油,請立即喝下大量的水稀釋且立即催吐,並立即送醫檢查。
2.
如果眼睛不慎接觸到燃油,請立即以清水沖洗,並送醫檢查。
3.
如果燃油接觸到皮膚,請以肥皂及清水洗淨。
1. Improper operations may cause personal and/or property damage. Thunder Tiger and its distributor have no control over damage
resulting from shipping, improper construction, or improper usage.
2. Thunder Tiger assumes and accepts no responsibility for personal and/or property damages resulting from the use of improper
building materials, equipment and operations. By the act of assembling or operating this product, the user accepts all resulting
liability. If the buyer is not prepared to accept this liability, then he/she should return this kit in new, unassembled, and unused
condition to the place of purchase.
1.
本產品為高性能模型產品非一般玩具,組裝與操作過程皆須由成人陪同。請詳讀此本使用說明書,避免因組裝錯誤與操作不當造
成損壞。
2.
此項產品具有相當之危險性,於組裝、調整、操控上的不熟悉都可能造成自身或他人的傷害,當發生這些傷害事件時,製造商及
其經銷商是可以免除責任的。建議您於初次使用本產品前,先行請教具有相當程度經驗同好或是專業雷虎經銷商與模型專賣店。
FUEL
燃油
ENGINE
引擎
OPERATION
遙控系統
FIRST AID
安全注意事項
WARNING
警告
IMPORTANT NOTES & WARNING
重要注意事項
UNRAPPING THE TRUCK FROM BOX AND INSTALLING
THE TIRE & FLAG 從包裝盒中取出車輛,安裝輪胎與旗幟
1
Problem 可能原因 Solution 解決方法
Out of fuel 油箱沒油 .................................................... Fill fuel tank 加油
Contaminated fuel 燃油過期 ....................................... Replace fuel 更換新油
Glow plug igniter not charged 電夾沒電 ...................... Charge glow igniter 請將電夾充電
Glow plug bad 火星塞故障 .......................................... Replace glow plug, see "Glow Plug Problems"
section below. 更換火星塞
Fuel not getting to carburetor 燃油未進入化油器 ........ Open and close fuel tank lid twice. 塞住油箱回壓管,
拉開並瞬間放開油箱上蓋幾次,將燃油壓進化油器
Engine flooded 引擎積油 ............................................ See "Flooding" section below. 將火星塞拆開,進行排
油步驟後,再裝回引擎,重新發動
Engine overheating 引擎過熱...................................... Allow engine to cool, richen fuel mixture, see "Fuel
Mixture" section below
待引擎冷卻後,重新調整引擎至富油狀態
Carburetor incorrectly adjusted 化油器調整不當......... Re-adjust carburetor, see "Fuel Mixture" or "Factory
Carburetor Settings" section below.
重新調整引擎,參考引擎調整步驟
Exhaust blocked 排氣不順暢 ...................................... Check exhaust, remove blockage.
檢查排氣系統,將阻塞物移除
Air cleaner blocked 空氣濾清器阻塞 ........................... Check air cleaner, remove blockage.
清洗或更換空氣濾棉
Idle speed set to low 怠速太低..................................... Adjust idle speed screw, see "Fuel Mixture" section
below. 將怠速調高
Air bubbles in fuel line 油管有空氣跑入........................ Check for leaks in fuel line 檢查漏氣部位予以更換
Glow plug is fouled 火星塞效率不佳............................. Replace glow plug, see "Glow Plug Problems" Section
below. 更換火星塞
Engine is flooded 引擎積油.......................................... See "Flooding" section below. 將火星塞拆開,進行排
油步驟後,再裝回引擎,重新發動
Engine is seized 引擎卡死............................................ Examine engine for damage 詳細檢查引擎是否損壞
TROUBLESHOOTING 常 見 問 題 與 解 決 辦 法
If you have trouble starting or keeping your SLEDGE HAMMER S50 running, here's a quick checklist of what to look for
first.
如果您的
SLEDGE HAMMER S50
有引擎及行駛上的問題,您可以參考下表的說明。如果問題無法解決,請與原
購買經銷商聯絡。
Description 問題
Engine will not
start
引擎無法啟動
Engine starts,
then stalls
引擎容易熄火
Hex-Start
backplate will
not rotate
啟動後蓋
無法轉動
a b c
a. To set the high speed needle (large needle sticking out from the carburetor body), turn the screw as pictured. Initial high speed
needle setting should be 3 turns (close the needle completely, then back out 3 turns). Clockwise turn will provide leaner setting
(lower fuel to air mixture), and counterclockwise turn will provide richer setting (higher fuel to air mixture).
b. To set the carburetor idle (small needle sticking out from the carburetor body), turn the screw as pictured. Initial idle setting should
leave 1mm carburetor gap. Clockwise turn will provide higher idle (larger carburetor opening), and counterclockwise turn will
provide lower idle (smaller carburetor opening). For more details about the engine setting, please refer to ENGINE BREAK-
IN/SETTING procedures to properly set the engine.
c. To set the low speed needle (The low-speed mixture screw is located in the end of the carburetor). turn the screw as pictured.
Initial low speed needle setting should be 6 1/2 turns (close the needle completely, then back out 6.5 turns). This screw controls
how much fuel enters the engine at idle and low throttle. This adjustment will smooth the idle and improve the acceleration to
mid speed. Make this adjustment with the throttle closed, after setting the idle. Turn the screw clockwise gently until it stops. DO
NOT over tighten.
d. Remove the outer foam from filter and make it moist evenly with a few drops of fuel. Put the filter in a plastic bag and knead it
until the foam is saturated, but not soaked.
e. Finally, make sure the air cleaner boot is securely fastened with a zip-tie.
Never run your vehicle without the air filter .If the vehicle will be operated in an area with fine dust, use filter oil or caster oil instead
of fuel. It is important that the foam is only moist to trap dirt and allow air passage. With the foam too wet, limited air can pass
through; therefore, limiting engine performance.
a. 高速油針調整:調整高速油針(突出於化油器本體之較大螺絲),如圖示。於調整前應先保持油針於開啟3圈的位置(油針完全鎖
緊後再鬆開3圈)。高速油針順時針旋轉,化油器將會呈現較為貧油設定;逆時針旋轉將會呈現較為富油設定。請參考引擎使用手
冊來設定您愛車的引擎。
b. 怠速設定:設定引擎怠速轉速用螺絲,突出於化油器本體之較小螺絲(如圖示),於調整前注意化油器應保持1mm的開口。怠速
螺絲順時針旋轉,怠速轉速提高;逆時針旋轉,怠速轉速降低。請參考引擎磨合建議來設定您愛車的引擎。
c. 低速油針調整:調整低速油針時需卸下車殼(低速油針位於化油器本體末端如圖示)。於調整前應先保持油針於開啟6.5圈的位置
(油針完全鎖緊後再鬆開6.5圈)。正確調整此油針可讓怠速與中低速更加順暢,調整此油針時需將油門關閉,以及怠速設定完成後。
d. 空氣濾清器:本車原廠即搭配高性能空氣濾清器,建議您於使用前於濾清器上塗抹適量濾清器專用油,可加強過濾粉塵,避免進
入化油器造成引擎損壞。
e. 最後確認固定濾清器之束帶是否確實綁緊引擎請勿於未安裝空氣濾清器情況下運轉,並且注意濾清器的清潔工作以避免造成引擎
的損壞與壽命簡短。
建議使用適當的濾清器專用油,強化過濾的功能。
d ed
ADJUSTING CARBURETOR 化油器調整
11
17
ADJUSTING FORWARD / REVERSE LINKAGE
倒退行走連桿調整
10
ADJUSTING THROTTLE / BRAKE LINKAGE
油門及煞車連桿調整
9
a. To set the throttle/brake linkage, first the radio should be on and neutral; thus, the servo is at neutral position.
b. With the servo at neutral, turn and adjust plastic brake adjustment nut at the end of the linkage until there is a 1/16"(1.5mm) gap
between the spring and the brake lever when the spring is not compressed. ( The brake lever should almost engages the brake
system, but not yet.)
c. With the servo at neutral, using a 1.5mm Allen wrench driver to loosen the throttle collars. Then, manually close the carburetor,
and set the forward collar (next to the spring) with the spring slightly compressed. Then, set the other collar (rearward) next to
the linkage pivot.
a. 設定油門與煞車連桿,第一步驟應確認發射機與接收機電源開啟,伺服機與所有撥桿應位於中立點。
b. 保持油門伺服機位於中立點狀態,調整煞車連桿至彈簧與煞車撥桿保持1.5mm間隙(彈簧處於不受壓縮狀態),並且煞車幾乎咬
合的狀態加以固定。
c. 保持油門伺服機位於中立點狀態,轉鬆油門拉桿固定螺絲,手動關閉化油器,固定拉桿上之螺絲(保持彈簧為輕度壓縮狀態),
再固定另一側螺絲。
a. Loosen the setscrews of the collars on the wire linkages using a 1.5mm Allen driver.
b. Turn on the radio and the truck, but do not start the engine.
c. The servo will move automatically to the position for forward driving.
d. Move the rearward collar toward the linkage pivot collar on the servo horn until the spring is fully compressed. Uncompress the
spring about 3/16"(4.5mm) by sliding the collar back and then tighten the setscrew.
e. Press the FWD/REV button on the radio.
f. Repeat step 9d with the forward collar.
a. 鬆脫連桿上之螺絲(1.5mm)。
b. 將發射機與接收機電源打開(注意:引擎保持未發動狀態)。
c. 伺服機將自動朝車輛前進方向位置擺動。
d. 移動連桿上後側之調整螺絲(如圖示),將彈簧完全壓縮之後再退出約4.5mm的距離,將螺絲固定。
e. 壓下遙控器上倒退切換鈕(如圖示)。
f. 參照步驟d,調整連桿上前端之調整螺絲。
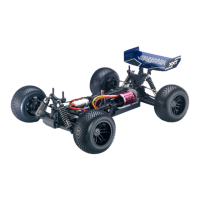
a.
Install the antenna into transmitter.
b.
Check the frequency printed on the transmitter crystal.
c.
Check the frequency printed on the receiver crystal, and make sure it matches with the transmitter crystal. Make sure no one will
operate on the same frequency when you are. When there is a radio glitch, it will most likely be caused by improper crystal, damaged
crystal, or people operating on the same frequency.
a.
將天線裝入發射機內。
b.
檢查發射機晶體頻率(標示於晶體貼紙)。
c.
檢查接收機上頻率是否與發射機一致;並應確認現場無人您使用相同的頻率,避免發生失控造成危險與產品損毀意外。
PREPARING THE RADIO
遙控器準備工作
5
a. Plug the charger into an AC outlet, and then pull on the igniter lever to accept the charging adapter.
b. At this point, the small red LED indicator on the charger should light up indicating the charging sequence is in progress.
c. When the charging complete, pull on the glow plug igniter lever to unplug the glow igniter. Charge the new glow plug igniter for
16 to 24 hours on the first charge. For subsequent charges, charge it about 12 hours before next use.
NOTE: If the igniter gets warm or hot during the charge, unplug the igniter from charger immediately. A warm / hot igniter means
the igniter is overcharged. Overcharging can damage the internal battery in the igniter; thus, shortening its life.
a. 將充電器插入家用110V插座中,再接上電夾。
b. 充電過程中,紅色LED燈會保持亮的狀態,如不亮表示為短路,電池無法充電。
c. 充電完成,將充電器自插座拔下,再分開電夾;新電夾首次充電時間需16到20小時,之後只需充大約12小時即可。
注意:充電過程中,電夾電池如出現高溫現象(40~45°C),表示已過度充電,需立即停止充電。過度充電容易造成電池損壞,更可能
產生爆炸起火,請謹慎使用。
CHARGING THE GLOW PLUG IGNITER 電夾充電方式
Glow plug igniter has to be purchased separately. 充電電夾需另外選購。
a b c
3
a. Remove the truck, radio, and accessories from box.
b. To unlock zip-tie, press on the small lever. Pull on the zip-tie while keeping the small lever pressed. Pull the zip-tie out completely.
c. Insert the wheel hex driver into both sides of the front/ rear wheel.
d. Install the wheel assembly, lining up the roll pin with the slot in the wheel. Thread on the locknut and washer using nut wrench
supplied.
e. Install the flag onto the mount with the attached screw in the bag.
a. 將車體、發射機與隨機配件取出。
b. 束帶為可活動拆卸式,操作方式如圖示。
c. 將六角輪轂轉換器,安裝至前後輪內側。
d. 將輪轂固定銷裝至轉向座外端(如圖示),利用隨車所附版手與固定螺帽將輪胎安裝於車身上。
e. 將旗幟安裝於車身上之預留孔位。
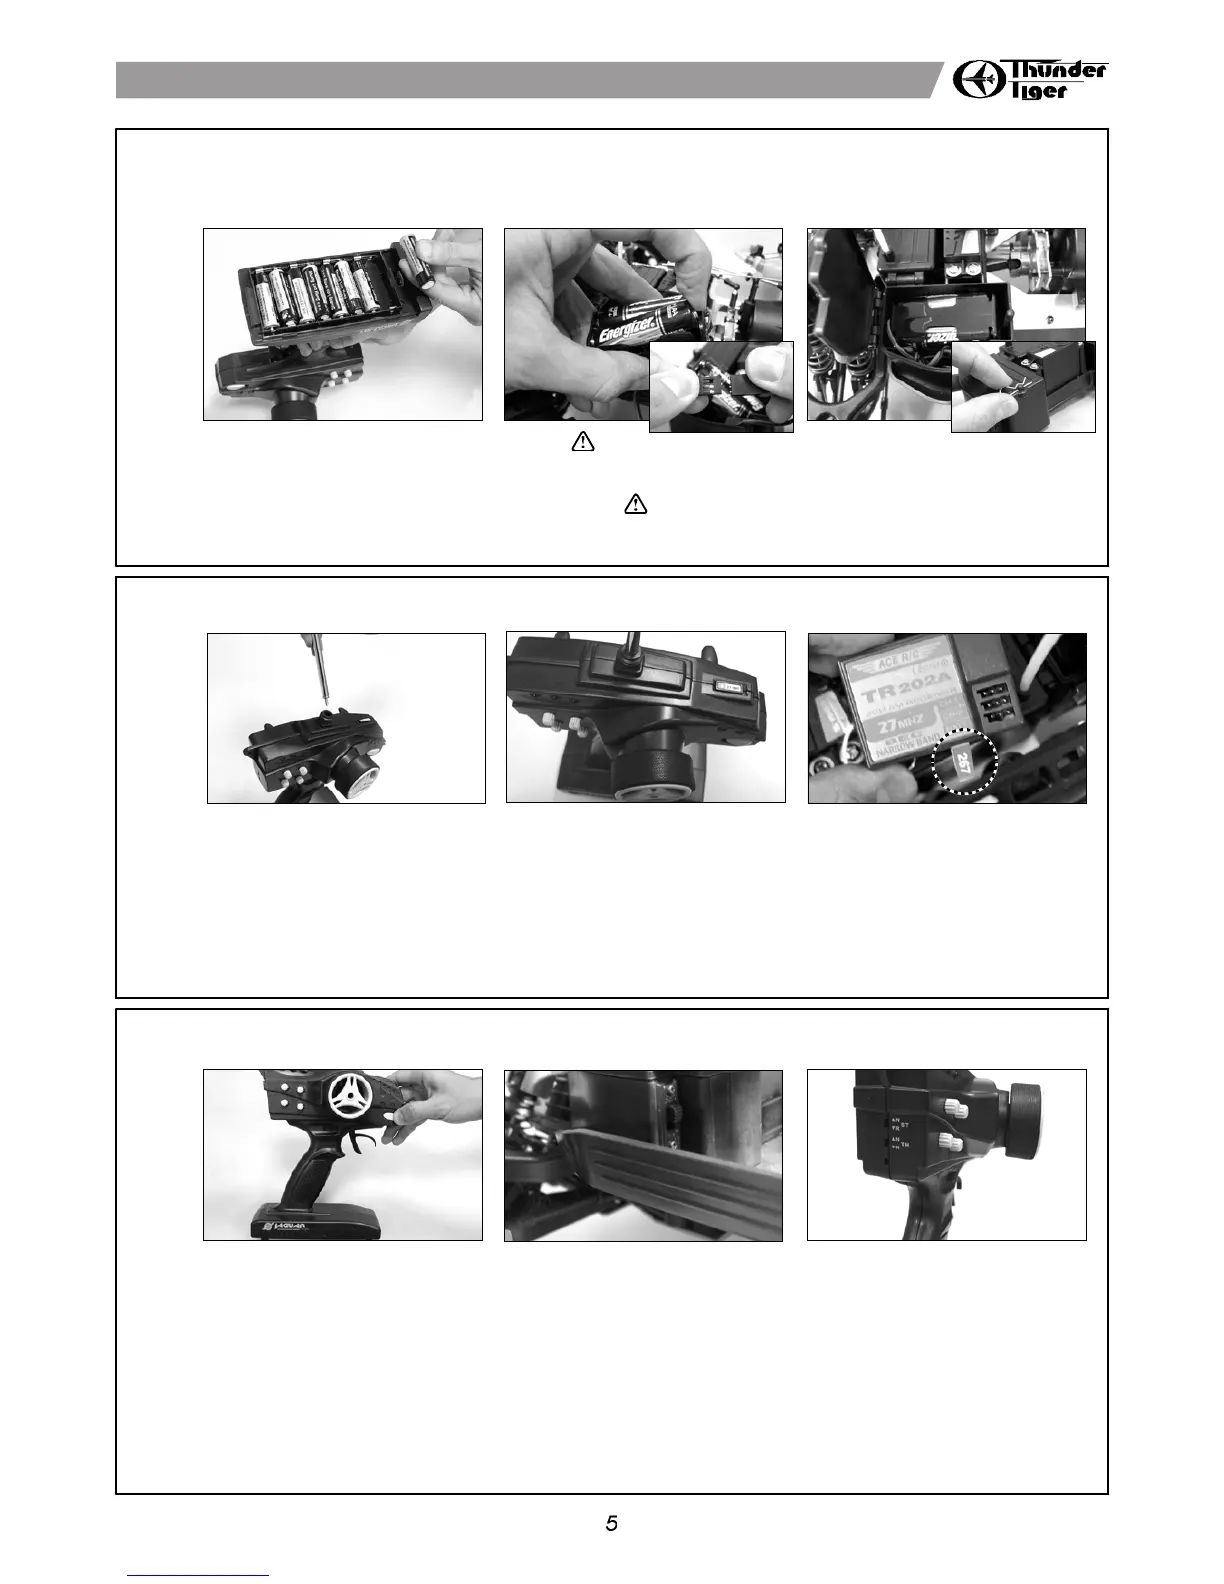
a.
When turning radio on, first turn on the transmitter and extend the transmitter antenna.
b.
Then, turn on the receiver. When turning off, first turn the receiver off, then the transmitter off.
c.
To reverse the functions of servos, use the small, white servo reverse switches located on side of the pistol transmitter (or the
inset servo reverse switches located at the bottom of the stick transmitter). To trim the servos on pistol transmitter, use the trim
switches on side of the steering wheel (the ST. trims steering, and the TH trims throttle/brake). On a stick transmitter, the trim
levers are located accordingly around the sticks.
d.
For more details, please check the transmitter instruction manual.
a.
先打開發射機電源,並將天線完全拉出。
b.
再將接收機電源打開;關機時先將接收機電源關閉、再關發射機。
c.
調整正逆轉時,請利用位於發射機機身側邊的調整鈕;欲微調轉向伺服機與油門伺服機時請利用遙控器正面上之白色旋鈕。
d.
更加詳細之操作注意事項,請參照遙控器說明書。
RADIO OPERATION 遙控器操作
OPERATING RADIO STEERING FUNCTION
遙控器設定-轉向
7
a. Check the radio steering functions. With the radio transmitter and receiver on, turn the steering wheel/stick to the left. The front
tires/wheels should turn left accordingly. If not, flip the steering servo reverse switch.
b. Return the steering wheel/stick to neutral. The front tires/wheels should point straight forward. If not, use the steering trim lever
to correct it.
c. Turn the steering wheel/stick to the right. The front tires/wheels should turn right accordingly.
a. 將發射機與接收機電源開關打開,以確認遙控器功能是否正常。方向舵向左邊旋轉時,前輪應向左偏擺(如圖示),若方向不一
致,請調整方向舵正逆轉開關。
b. 方向舵轉回中立點時,前輪應筆直向前,若有偏差,請調整方向舵微調旋鈕。
c. 方向舵轉向右邊時,前輪應轉向右邊。
a cb
d e
6
b
b
a
c
a b c
a. Remove the cap from fuel bottle nozzle.
b. Squeeze the fuel bottle, insert into fuel, and draw fuel into the fuel bottle.
c. Lift up the lid on the fuel tan and fill car's fuel tank with glow fuel slowly.
Be careful. If the tank overflows it might get on your radio gear or on your brakes and you may create an unsafe driving situation.
Always keep your fuel bottle closed when not in use.
Fuel Selection
Choose a fuel from a reputable, brand name company that is approved for car/truck use. Do not use airplane or boat fuels in
your truck. Choose methanol based model engine glow fuel that has a nitro content in the range 10%-30% and 5% to 18%
caster/synthetic oil content for lubrication. Lower nitro percentages will generally result in a cooler engine running temperature
and therefore last longer before needing a rebuild; cooler-running engines also generally produce less power.
20% nitro is the most widely used fuel in these engines. Fuel color is for identification purpose only and is not important to
performance or durability of your engine.
a. 移開注油器上之封蓋
b. 擠壓注油器將桶裝燃油吸入注油器內。
c. 打開油箱上蓋,將燃油注入油箱內。
請小心將燃油注入油箱,避免油箱內之燃油溢出,以免影響車輛性能,造成危險。
燃油使用完畢,請注意將油桶蓋確實緊閉。
燃油選擇:
1.請選購專業模型引擎用油廠商所生產之燃油(例如OMEGA)。
2.必須使用車類專用油,不可使用飛機或船類用油。
3.建議使用10%-30%全合成車類用油,達到引擎最佳工作條件。
4.避免油箱內之燃油溢出,以免影響車輛性能,造成危險。
5.勿將燃油或空油箱靠近火源,以免引起火災。
FUELLING 燃油的添加
PREPARING THE ENGINE FOR STARTING 引擎整備工作
a. To start an engine, first remove the glow plug.
b. Prime the carburetor by squeezing the primer bulb while watching the fuel come through the line and just reach the carburetor
inlet. Then, give the bulb another 1/4 squeeze(1/8").
BE CAREFUL NOT TO SQUEEZE TOO MUCH or the engine will become flooded. Attempting to start a grossly flooded (or hydro-
locked) engine (full of fuel) can cause serious damage to internal engine parts.
c. Check the glow plug by plugging it into the glow plug igniter. The glow plug element should light up brightly. If it lights up dimly,
then the glow plug igniter is low (and it needs recharging). If it does not light up or the plug element looks distorted, then the
glow plug is bad (replace with new one). After checking, reinstall the glow plug.
The glow plug used for this engine can be: Thunder Tiger 9281, McCoy #9 / #59, Novarossi C4S / C5S / C6S,OS #8 / #A3 /
#A5, and Picco P6S / P7S.
a. 首次啟動引擎前,請使用扳手將火星塞卸下。
b. 利用送油裝置將燃油送至化油器前端,再多擠壓約1/4送油器容積量即可。
注意:不可送油過量,以免造成引擎積油。
c. 將火星塞塞入電夾內檢查,若火星塞呈現明亮、紅熱的現象表示正常,若火星塞無法正常點火,請將電夾充飽電再檢查一次;若
能無法正常點火,請更換電夾或火星塞。確認無誤後,將火星塞裝回引擎。
12
13
8
a. Check the radio throttle/brake functions. With the radio transmitter and receiver on, pull the trigger/push the stick forward. The
carburetor should be fully opened and the brake disengaged. To reverse this function, flip the throttle/brake servo reverse switch.
b. Return the trigger/stick to neutral. The carburetor should be closed to a point where the idle has been set (see step for ADJUSTING
THROTTLE/BRAKE LINKAGE), and the brake still disengaged. If not, use the throttle/brake trim lever to correct it.
c. Push the trigger/pull the stick backward. The carburetor opening should still be the same at neutral, throttle spring compressed
slightly, and the brake engaged.
d. Press the Forward/Reverse Button. This will shift the truck into Reverse. Press the Forward/Reverse Button again to shift the
truck into Forward.
a. 請先將發射機與接收機電源開關打開,以檢查油門、煞車作動是否正常作動。將油門板手向內拉到底時,化油器應完全開啟,煞
車脫離(可輕輕轉動後輪,確認煞車是否完全脫離)。
b. 將油門拉桿推回中立點時,化油器應關閉至定點,煞車仍為脫離狀態;若狀態有所偏差,請調整油門微調鈕。
c. 油門拉桿向外推時,化油器應關閉至定點,且煞車須為鎖死狀態。
d. 壓下倒退鈕(位置如圖示)。車輛行進方向將變為倒退;再壓一下倒退鈕,車輛行進方向將變回前進。
OPERATING RADIO THROTTLE/ BRAKE AND
REVERSE FUNCTION 遙控器設定-油門、煞車、後退
a b
c
a b
c
cba
a
c
c
a b
c
b
a b c
c
d d
a
b
c
d
STORING YOUR CAR 保養建議
To keep your truck in good working condition, there are a few steps that need to be followed:
a.
Remove the fuel from the tank. Both your truck and squeeze bottle should always be stored free of fuel.
• Empty any fuel remaining in your squeeze bottle back into the fuel container.
• Draw the fuel in the fuel tank into the squeeze bottle and squeeze it back into the fuel container.
• Repeat the above step as necessary until the tank is as empty as is possible.
• Make sure to store your fuel container out of the reach of children in a cool, dark location and make sure that the lid is securely
tightened.
b. Put the glow plug igniter on the glow plug, hold the carburetor all the way open and bump the engine by using a starter a few
times. This will make sure that there is no unused fuel in the engine or fuel lines.
c. Use after run oil.
• Start out by taking an old toothbrush and cleaning off the dirt around the base of the filter. This will help to keep grit out of
your engine.
• Remove the filter from the carburetor.
• Place 2-6 drops (as recommended by after run oil manufacturer) directly into the carburetor.
• Slowly bump the engine to distribute the oil evenly throughout the engine.
• Reinstall the air cleaner.
d. Clean your truck -storing it dirty can lead to a gummy build up and poor performance.
• Use nitro car cleaner, WD-40 or equivalent to clean up the dirt and oil.
• Use an old toothbrush or a small paintbrush to get to the hard to reach areas.
• A damp cloth works well for cleaning the body. Stubborn dirt and oil on the body is best removed with any diluted organic solvents
(Simple Green, etc).
e. Lubricate the wheel bearings, drive axle joints, clutch bell bearings and suspension pivots using thin oil.
f. IMPPORTANT! Verify that BOTH the radio and receiver switches are turned off. It is very disappointing to have dead
batteries next time you want to run your truck.
為確保您的愛車狀態處於良好情況,請依照下列步驟保養您的愛車
a. 將油管、注油器與油箱內之燃油完全洩除。
• 利用注油器將油箱內燃油洩下,儲存於油桶內。
• 再將注油器內殘油洩下,儲存於油桶內。
• 重複上述步驟將燃油清理乾淨為止。
• 遙控模型專用燃料,具相當高的揮發性與低燃點特性,請您於使用或儲存時遵照使用燃油之相關規定;使用時必須遠離火源,儲
藏時必須避免日曬並放置於乾燥陰涼處,以及兒童無法取得處。
b. 將電夾夾住火星塞,啟動引擎數次,可協助清理引擎室內之殘油。
c. 使用引擎專用保養油保護引擎
• 建議使用牙刷將引擎外圍與空氣濾清器上灰塵清理乾淨。
• 將空氣濾清器拆下
• 滴2至6滴專用保養油至化油器內
• 使用啟動器轉動引擎,將保養油塗佈均勻
• 將空氣濾清器裝回
d. 清理您的愛車
• 使用引擎模型車專用清潔劑、WD-40或是其他清潔劑,將車身上之油漬、塵土..等清理乾淨。
• 建議使用牙刷將死角清理乾淨。
• 將車殼使用清潔劑清理乾淨。
e. 建議將輪胎軸承、傳動結構、驅動齒輪..等上油保養。
f. 重要!收藏您的愛車前記得將發射機與接收機電源關閉。
PRO-START Engine Starter
引擎啟動器
Glow Starter w/ Charger
電夾及充電器
a b c
4
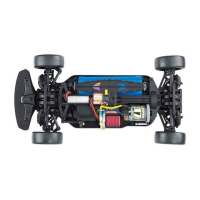
a.
Install 8 AA-size alkaline batteries into transmitter. ( If the batteries are loaded incorrectly, the transmitter may be damaged)
b.
Take out the large body clip on the battery box, and remove its top plate. Install 4 AA-size alkaline batteries into battery holder.
c.
And then mount the battery holder into the enclosed battery box with the large body clip.
a.
將電池包安裝餘發射機上,請注意正負極正確安裝方向。(正負極反裝,可能造成發射機損壞)
b.
接上接收電源。
c.
將接收機電池盒安裝於接收盒固定座,並使用大型R型插銷固定上蓋。
RADIO BATTERY INSTALLATION
遙控器電池包安裝與充電
b ca
18
SET UP 設定
Two-Speed Adjustment 兩段變速器調整
a. Your truck's two-speed shift point is preset from the factory. It s hould shift into 2nd gear within 12-15 feet on a full-throttle,
standing-start acceleration.
b. If you wish to adjust the shift point, first shut dow n the engine then open the two-speed access cover on the transmission
case. Align the BLACK adjustment set screw with the opening on the 2nd gear as shown on the diagram.
c. Using a 2mm Allen wrench, turn the black adjustment set screw clockwise to make the two-speed shift later; turn it counter-
clockwise to make the two-speed shift earlier. Only use 1/8 turn increments whenever you adjust your two-speed.
d. Close the two-speed access cover on the transmission case.
e. If it is screwed in or out too much, reset the black set screw as following. First, screw in the black set screw clockwise gently
until it is fully compressed. And then turn the black set screw counter-clockwise about 3 turns. Re-attach the main gear shell
protector.
f. Be careful not to touch any hot engine components in the area.
a. 您的愛車原廠即已設定最佳變速點,從完全靜止狀況下,全油門速度下大約行走5公尺至8公尺之間即會跳上第二段速度。
b. 若您欲設定新的變速點,請先關閉引擎。將變速箱外殼上之覆蓋片開啟,使用六角扳手調整設定螺絲(如圖示)。
c. 使用2mm六角扳手調整設定螺絲,順時針旋轉將延後變速點;逆時針旋轉將提前變速點。注意:每次調整以1/8圈為單位。
d. 將變速箱外殼上之覆蓋片關閉。
e. 重新安裝調整螺絲及彈簧回復原廠設定值:首 先,順時鐘方向慢 慢的將調整螺絲鎖 入直到完全鎖緊。 然後逆時鐘方向將 黑色調
整螺絲轉約3圈。重新裝上齒輪保護罩。
f. 注意調整時不可碰觸引擎部位,避免受傷。
請注意固定螺絲與調整螺絲的分辨,以防轉錯螺絲造成變速箱故障。
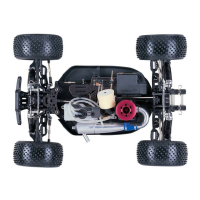
Additional gearing is available for your SLEDGE HAMMER S50 Monster Truck. Additional gearing allows you to match your engine
and transmission to your driving situation. Bigger gears on the clutch bell (or smaller slipper gears) will result in greater top speed,
but will have slower acceleration from a stop (see chart below). If you change the gearing you will need to reset the gear mesh:
1. Loosen (or tighten if engine was removed) the four engine mounting bolts located on the underside of the truck until you can
just slide the engine forward and backward.
2. Slide the engine up to the spur gear until the teeth on the clutch bell are meshed tightly with the teeth on the slipper gear.
3. Move the engine back a little bit (1/32" or 0.8mm). Check the mesh by holding the smaller gear with one hand and rocking the
bigger gear back and forth with the other. The big gear should rock back and forth slightly with little effort. A gear mesh that is
too tight will be noisy, have lower performance and could ruin the gears.
SLEDGE HAMMER S50 大腳車齒輪比可以依照您的需求選擇搭配。較大的離合器罩齒輪(或是搭配較小的大主齒輪),將會提高
您愛車的尾速,但是加速度卻會變弱(可參考下列附表)。若您有變更齒比的需求,您可參照附表建議重新搭配。
1. 將車底板上之引擎固定螺絲鬆脫,直到您可自主移動引擎即可。
2. 將引擎向上移動,直到離合器罩齒與大主齒齒輪緊密接合。
將引擎向下方移動一點間隙(約0.8mm),並徒手轉動兩個齒輪是否順暢轉動,來調整間隙。若是轉動時齒輪噪音過大表示,
齒輪搭配過緊,將會降低引擎性能表現
Optional Gearing 齒比搭配
Front & Rear Toe-In / Toe-Out 前後輪束角調整
a. Use a 1.5mm Allen wrench as shown to adjust the front & rear toe-in.
b. Lengthening the Turnbuckles will increase the amount of toe-in, shortening
them will increase the amount of toe-out.
c. The notch on the turnbuckle indicates the side that has the right-hand
thread.
Use it as a guide to determine which way to turn the turnbuckle when adjusting
its length.
a. 使用1.5mm六角扳手調整前、後輪束角。
b. 增長螺距將會增加內束角角度;縮短螺距將會增加外束角角度。
請參照本說明調整您愛車前、後輪的傾角。
Front & Rear Camber 前後輪傾斜角調整
a. Use a 2.5mm Allen wrench as shown to adjust the front & rear camber.
b. Turning the upper pivot ball clockwise increases camber towards the negative
side; turning it counter-clockwise increases camber towards the positive
side.
a. 使用2.5mm六角扳手調整前、後輪傾斜角(如圖示)。
b. 調整上輪軸球頭順時針旋轉將增加負傾斜角;反之,將增加正傾斜角。
請參照本說明調整您愛車前、後輪的傾角。
Ride Height 調整車身高度
a. The truck ride height can be increased by adding preload clips to the shocks.
Removing preload clips will decrease the ride height.
b. Compress the spring and insert the preload clips between the spring collar
and the shock body flange.
a. 車身高度可利用避震器調整墊片改變。增加調整墊片可增加車高;反之則降
低車高。
b. 安裝或拆卸墊片時,請壓縮避震器彈簧再置入或取出墊片即可。
Slipper Clutch 扭力限制器調整
a. Use a 7mm nut driver to adjust the slipper clutch.
b. Tighten the slipper nut until the spring is fully compressed.
c. Once you've reached the point where the spring is fully compressed, loosen
the slipper nut 1/8turn.
d. Do not run you truck with the slipper nut any looser than 1/8turn from full
spring compression. Setting the slipper too loose may result in a damaged
spur gear.
a. 使用7mm扳手調整扭力限制器。
b. 將螺絲上緊至彈簧完全壓縮。
c. 彈簧完全壓縮後,再將螺帽轉鬆1/8圈。
d. 請勿將固定螺帽鬆脫超過1/8圈,避免造成大主齒損壞。
Shock Springs 避震器彈簧搭配
Stiffer springs will give you better handling and higher cornering speed on smooth surfaces such as asphalt, concrete, and hard
pack dirt. Soft springs are better for rougher terrain, rock crawling and jumping. Softer springs will increase the rollover tendency
of the truck at higher speeds.
較硬的避震器在平坦堅硬的跑道上( 例如柏油路面),將可 提供較好的操控性與過 彎速度。較軟的避震器 適合於崎嶇不平的路面
(例如碎石地)以及跳躍動作,並且可以降低翻車的機率。
Notch
刻槽向內
INSTALLING THE REAR BUMPER 組裝後防撞板於車體上
2
a b
a. Remove the rear bumper assembly from accessories box.
b. Secure the rear bumper on the chassis with the attached screw.
a. 將後防撞板從附件盒中取出。
b. 將後防撞板組件裝於車體上,鎖上固定螺絲,組裝方式如圖示。
MTA-4 Nut Wrench
Clutch bell gear size
離合器罩齒輪規格
Slipper Gear size
大主齒規格
Final Reduction
1st Gear
第一段齒輪終傳齒比
Final Reduction
2nd gear
第二段齒輪終傳齒比
Better
Acceleration
加速性能較強
Higher Top
Speed
尾速較快
20T (Std.) 49T(TT-Std)
PN1805 PD7215 19.924 13.78
23T 49T(TT-Std)
PN1808 PD7215 17.325 11.98
Add Pos.
Camber
正傾角
Add Neg.
Camber
負傾角
Loosen
Slipper
Clutch
鬆
Tighten
Slipper
Clutch
緊
黑色調整螺絲
MTA-4 Hex Drive
Starting Shaft
六角引擎啟動棒
b
Low speed mixture
1
1/4
turns out
Clockwise=Leaner
Counterclockwise-Richer
中低速混合比:
1
1/4
圈(鎖到底退回)
順時針=貧油
逆時針=富油
Idle speed:
0.5~1mm)
Adjust Idle Screw until
0.5~1mm is obtained.
怠速:
開口調整為0.5~1mm
High speed mixture:
2
1/2
~3
turns out
Clockwise = Leaner
Counterclockwise-Richer
高速混合比:
2
1/2
~3圈(鎖到底退回)
順時針=貧油
逆時針=富油
Low speed mixture
5
1/2
turns out
Clockwise=Leaner
Counterclockwise-Richer
中低速混合比:
5
1/2
圈(鎖到底退回)
順時針=貧油
逆時針=富油
Low speed mixture
1
1/4
turns out
Clockwise=Leaner
Counterclockwise-
Richer
中低速混合比:
1
1/4
圈(鎖到底退回)
順時針=貧油
逆時針=富油
High speed mixture:
2
1/2
~3
turns out
Clockwise = Leaner
Counterclockwise-
Richer
高速混合比:
2
1/2
~3圈(鎖到底退回)
順時針=貧油
逆時針=富油
Idle speed:
1mm
Adjust Idle
Screw
until 1mm is
obtained.
怠速:
開口調整為
1mm
Factory Carburetor Settings. 原廠設定值
Low speed mixture
5
1/2
turns out
Clockwise=Leaner
Counterclockwise-
Richer
中低速混合比:
5
1/2
圈(鎖到底退回)
順時針=貧油
逆時針=富油

 Loading...