5 6 7 8 9 10 11 12 13 14
You may also use silicone oil to replace grease for the differentials. Fill up to 80%. We
recommend using #7000 silicone oil for the front differential and # 10000 silicone oil for
the rear differential. Change the viscosity of the silicone oil according to track conditions
and your driving style.
玩家可依需求選購不同番號之差速矽油來取代原廠組裝使用之黃油。裝填時液面請勿超過
差速本體上緣(約八分滿即可)。進階玩家建議于前差速組使用#7000號之差速矽油,後差
速組使用#10000號之差速矽油。差速矽油需另外採購。玩家可依操作習慣及操作路面情況
選擇適合濃度之矽油來調整差速反應。
STEP1
Front Differential 前差速組 / Rear Differential 後差速組
STEP2
8x14x4mm
Ball Bearing
軸承
5x8mm
Washer
墊圈
3x19mm
Pin
銷
3x5mm
Washer
墊圈
4.4x0.8mm
O-Ring
O型環
2.5x12mm
F/H Philip Machine Screw
平頭十字螺絲
8
4
4
4
4
2
2
2
4
5
6
3
3
4
4
5
5
5
1
1
1
1
2
Hint
組裝提示
Apply grease
使用潤滑油膏(黃油)
3x25mm
BT Philip Machine Screw
圓頭十字螺絲
Brake Cam
煞車凸輪
Brake Pad
煞車夾片
Brake Screw
煞車夾片固定螺絲
Top View
上視圖
4
2
2
1
Brake Disc
煞車片
3x6mm
BT Philip Machme Screw
圓頭十字螺絲
Note Direction
This side face forward.
此面朝前
STEP2
Center Unit 中央驅動組
3x12mm
BT Philip Machine Screw
圓頭十字螺絲
6mm(L)
Ball Stud
球頭座
2
4
Adjust the backlash
with the shims.
用來調整差速器本體
與齒輪箱之間距,減
少共振。
STEP3
Front Differential Unit前差速箱
STEP4
Front Suspension 前擺臂懸吊組
6mm(S)
Ball Stud
球頭座
3x10mm
F/H Philip Machine Screw
平頭十字螺絲
3x56mm
Inner Hinge Pin
擺臂軸
2
2
2
3
Factory Set-up
原廠設定
Hint
組裝提示
Apply grease
使用潤滑油膏(黃油)
STEP4
Front Suspension 前擺臂懸吊組
6mm(L)
Ball Stud
球頭座
10x15x4mm
Ball Bearing
軸承
3x12mm
BT Machine Screw
圓頭十字螺絲
Caster Block Bushing
C型輪座
4
2
4
4
In the chas si s set,
these dog bones have
be en as se mbled in
one-piece unit.
原廠已組配完成
Marked "L"
標示 "L"
〈For Left〉
〈左側組件〉
Marked "R"
標示 "R"
6mm(L)
Ball Stud
球頭座
2x4mm
BT Self-Tapping Screw
圓頭十字墊圈螺絲
2.5x20mm
Outer Hinge Pin (Front)
輪座固定軸
2
2
2
3
1
STEP4
Front Suspension 前擺臂懸吊組
〈For Right〉
〈右側組件〉
1
Marked "B-CM-Front"
標示 "B-CM-Front"
6mm(S)
Ball Stud
球頭座
3x10mm
F/H Philip Machine Screw
平頭十字螺絲
3x56mm
Inner Hinge Pin
擺臂軸
2
2
2
STEP6
Rear Suspension 後擺臂懸吊組
〈Rear Shock Tower〉
〈後避震器支架〉
3x8mm
BT Philip Machine Screw
圓頭十字螺絲
6mm(L)
Ball Stud
球頭座
2.5x22mm
Outer Hinge Pin (Rear)
擺臂軸
2x4mm
BT Self-Tapping Screw w/washer
圓頭十字墊圈螺絲
2
4
2
2
1
STEP6
Rear Suspension 後擺臂懸吊組
In the chassis set, these
dog bones have been
assembled in one-piece
unit.
原廠已組配完成
6mm(L)
Ball Stud
球頭座
10x15x4mm
Ball Bearing
軸承
4
2
2
1
Cover the shaft with cloth before
griping it with pliers.
組裝避震球頭時,可以用布料包
覆芯軸,以避免芯軸被尖嘴鉗刮
傷。
Rear Shock Shaft
後避震器軸
2.5mm
E-Clips
E字扣
Shock Eyelet
避震軸球頭
2.8x1.9mm
O-Ring
O型環
2
8
4
8
STEP7
Shock Absorber 避震器組
Attach the shock eyelet onto
the shock shaft until it
reaches the mark line on
the shaft
將避震球器頭鎖附於芯軸直
到球頭上緣到達刻線。
Ensure the piston move
smoothly.
最後再確認避震器活塞
是否移動順暢無阻
Add silico n oil one more
time up to the brim.
等所有氣泡都消失後再將液
面補滿
Put the shock bladder onto
the shock body, wipe off
excess oil and tighten the
shock cap.
將避震器封套置於套筒上
端並下壓結合,擦拭多餘
之矽油並鎖上避震器上蓋
Pull down the piston and
slowly fill in the silicon oil.
The factory set-up of the
shock is #500 of silicon oil
for the front and rear shock
absorbers.
重新裝填矽油時,請先將活
塞及避震軸下拉,然後緩注
入避震器矽油于套筒內。
原廠避震器設定為前後避震
器皆使用#500號矽油。
Then gently move the shaft/piston
up and down to get rid of the
bubbles.
緩慢的將活塞及避震軸上下移動
使得套筒之氣泡能快點消失。
Silicon oil
矽油
Piston 活塞
Use 2 mm preload spacer for front. Use 2 mm preload spacer for rear.
使用2mm避震器套筒調整夾片來調整避震器彈簧之鬆緊度
Compress the spring
and install spring cup.
將下定位套固定于彈
簧下緣。
1mm
2mm
4mm
6mm
Hint
組裝提示
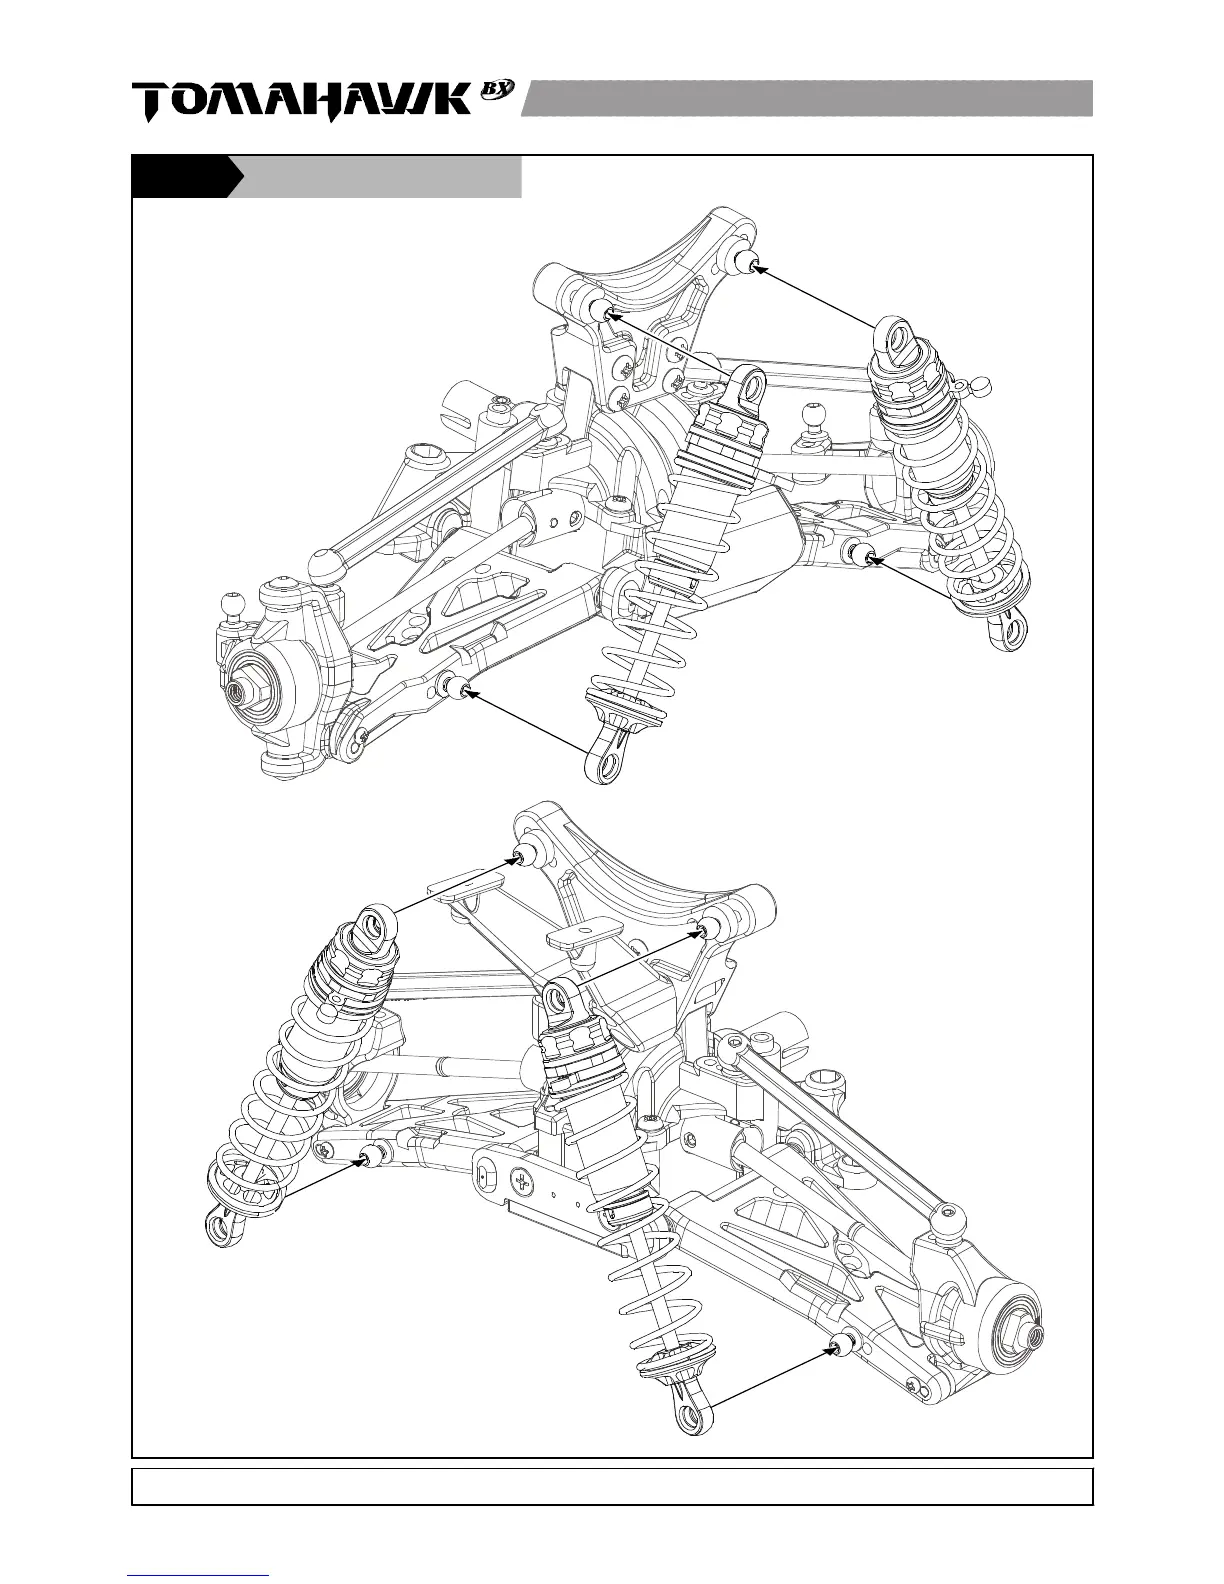
STEP7
Shock Absorber 避震器組
〈Front Shock Absorbers〉
〈將前避震器與前擺臂懸吊結合〉
〈Rear Shock Absorbers〉
〈將後避震器與後擺臂懸吊結合〉
STEP8
Steering Bellcrank 轉向曲柄組
STEP8
Steering Bellcrank 轉向曲柄組
Swing Post Screw
轉向曲柄固定螺絲
5x8x2.5mm
Ball Bearing
軸承
6mm(L)
Ball Stud
球頭座
3
2
4
Note direction
注意組裝方向
Rear
此面朝後
Top View
上視圖
Side View
側視圖
Rear
此面朝後
Marked "B-ST"
標示 "B-ST"
Front Chassis Brace
前補強板
Marked "B-ST"
標示 "B-ST"
3x8mm
BT Philip Machine Screw
圓頭十字螺絲
3x18mm
BT Philip Machine Screw
圓頭十字螺絲
2
2
1
3x6mm
F/H Philip Machine Screw
平頭十字螺絲
Apply grease
使用潤滑油膏(黃油)
2.5x12mm
F/H Self-Tapping Screw
平頭十字螺絲
2.5x8mm
F/H Self-Tapping Screw
平頭十字螺絲
STEP9
Steering Servo轉向伺服機 / Throttle/Brake Control Servo油門/煞車伺服機
6mm(S)
Ball Stud
球頭座
1
1
2
97°
Neutral
中立點
Neutral
中立點
90°
Note direction
Cross with servo
注意安裝方向
與伺服機呈90°
Marked "T"
標示 "T"
Marked "T"
標示 "T"
T
Back
背面
T
Back
背面
Marked "T" for Thunder Tiger stock servo. Find the appropriate servo horn mount for your
servo from the chart below. Install the servo horn arm with the stock mounting screw.
See the graphic for the correct neutral angle.
標示"T"搭配原廠伺服幾使用。請參考列表找尋適合各家廠牌伺服機所使用之拉桿座,然後
配合拉桿鎖附於伺服機上。
拉桿角度請依圖示調整於中立位置(約90度)。
Steering Servo Type
轉向伺服機
ACE R/C S1903/ S2008MG
ACE R/C DS1015/DS1313
Airtronics / Sanwa
Futaba
Hitec
TH/BK Servo Type
油門/煞車伺服機
ACE R/C S1903/ S2008MG
ACE R/C DS1015/DS0313
Airtronics / Sanwa
Futaba
Hitec
T
T
A
T
H
T
T
A
T
H
STEP9
Steering Servo轉向伺服機 / Throttle/Brake Control Servo油門/煞車伺服機
3x10mm
BT Philip Tap Screw W / Washer
圓頭十字墊圈螺絲
4
Thread servo cord through.
將伺服機連接線/插頭依圖示穿進電池盒。
TH / BK
油門 / 煞車伺服機
ACE R/C S1903/ S2008MG
ACE R/C DS1015/DS1313
Airtronics / Sanwa
Futaba
Hitec
Spacer
調整墊片
thin
thick + thin
See Note:
See Note:
See Note:
Note: !!!The use of the servo spacer may very
depending on the manufacturer's stock servo
you purchased. Check the servo to see if a
spacer is needed.
注意!!!由於市售伺服機規格不一,伺服機的
安裝調整請依各家廠牌伺服機實際安裝情況為
準來使用調整墊片。
STEP10
Radio Box 電池盒
2x12mm
BT Philip Machine Screw
圓頭十字螺絲
2.5x5mm
F/H Philip Machine Screw
平頭十字螺絲
Connect as per instruction manual
依說明書指示將伺服機及電源開關連結於接收機
2
2
RX
TH
ST
BATT
CH2
CH1
ON
OFF
Hint
組裝提示
STEP6
Rear Suspension 後擺臂懸吊組
STEP5
Rear Differential Unit後差速箱
3x12mm
BT Philip Machine Screw
圓頭十字螺絲
6mm(L)
Ball Stud
球頭座
14x10.5x0.1mm
Diff Shim
差速箱墊片
2
2
4
2
Hint
組裝提示
Apply grease
使用潤滑油膏(黃油)
Hint
組裝提示
〈Front Bumper〉
〈前防撞版〉
STEP4
Front Suspension 前擺臂懸吊組
3x5mm
F/H Philip Machine Screw
平頭十字螺絲
4
3x14mm
BT Philip Machine Screw
圓頭十字螺絲
6mm(L)
Ball Stud
球頭座
2
4
2x10mm
Pin
銷
4x3
Set Screw
內六角螺絲
2.5x12mm
F/H Philip Machine Screw
平頭十字螺絲
4
1
3
1
1
2.5x8mm
F/H Philip Machine Screw
平頭十字螺絲
1
5x11x4mm
Ball Bearing
軸承
4x3mm
Set Screw
內六角螺絲
2.6x1.9mm
O-Ring
O型環
4mm
E-clip
E型扣環
2
4
2
2
2.5mm
E-clip
E型扣環
1
4x3mm
Set Screw
內六角螺絲
Front Axle 前驅軸/Rear Axle 後驅軸
STEP4
Front Suspension 前擺臂懸吊組
Marked "B-CM-Rear"
標示 "B-CM-Front"
〈Rear Wing Mount〉
〈尾翼支架〉
3x16mm
BT Philip Machine Screw
圓頭十字螺絲
8x14x4mm
Ball Bearing
軸承
2
2.6x1.9mm
O-Ring
O型環
1
Hint
組裝提示
Spur Gear Shaft 驅動直軸
Factory Set-up
原廠設定
〈Front Shock Tower〉
〈前避震器支架〉
Leave one unit of drive axle for
later step.
將剩餘組件留待接下步驟組裝
STEP3
Apply grease
使用潤滑油膏(黃油)
Always adjust the front and rear
bushings at the same time. Your car
may not run stable if front and rear
bushings are unbalanced.
調整時請同時更換前後擺臂軸套。
不平衡的設定將增加車輛行駛的不
穩定性。
Roll
Center
Position
Low Speed Track High Speed Track
多彎高速路面
中間
(原廠設定)
Low
Mid. Low
High
Medium
(Factory Set-up)
Mid. High
滾動中心位置
最低 偏低 最高偏高
Track
路況
arm
mount
bushings
擺臂軸套
MARK
Adjust the backlash
with the shims.
用來調整差速器本
體與齒輪箱之間
距,減少共振。
Always adjust the front and rear bushings at the same
time. Your car may not run stable if front and rear
bushings are unbalanced.
調整時請同時更換前後擺臂軸套。不平衡的設定將增加
車輛行駛的不穩定性。
Roll
Center
Position
Low Speed Track High Speed Track
多彎高速路面
中間
(原廠設定)
Low High
Medium
(Factory Set-up)
滾動中心位置
最低 最高
Track
路況
arm
mount
bushings
擺臂軸套
Hint
組裝提示
4x4
Set Screw
內六角螺絲
1
3x8mm
BT Philip Tap Screw W / Washer
圓頭十字墊圈螺絲
4
Front Shock Shaft
前避震器軸
2
or
Rear x2
後2組
Front x2
前2組
Rear x2
後2組
Front x2
前2組
Camber Adjustment
外傾角調整
For Ready Set Camber Linkage
For Optional Turnbuckle Linkage
Not Recommended Set Up
適用原廠固定式上臂拉桿
適用改裝可調式上臂拉桿
非原廠建議調整孔位
2
14x10.5x0.1mm
Diff Shim
差速箱墊片
3
4x3mm
Set Screw
內六角螺絲
4
2
Toe Adjustment
前束角調整
For Ready Set Steering Linkage
For Optional Turnbuckle Linkage
適用原廠固定式轉向拉桿
適用改裝可調式轉向拉桿
Camber Adjustment
外傾角調整
For Ready Set Camber Linkage
For Optional Turnbuckle Linkage
Not Recommended Set Up
適用原廠固定式上臂拉桿
適用改裝可調式上臂拉桿
非原廠建議調整孔位
Camber Adjustment
外傾角調整
For Ready Set Camber Linkage
For Optional Turnbuckle Linkage
適用原廠固定式上臂拉桿
適用改裝可調式上臂拉桿
A B
A B
A B
B
B
AB
A B AB
Also see P.9
另參考第9頁
A B AB
 Loading...