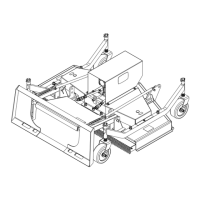
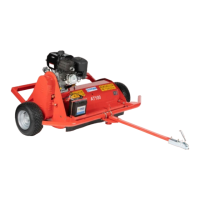
The document describes the Titan Skid Steer Finish Mower, available in two models: FMSS6 and FMSS5, with product numbers 191539 and 191540 respectively. This attachment is designed for cutting short grass and lawns when matched with a loader.
Function Description
The Skid Steer Finish Mower is an attachment for skid steer loaders, specifically designed for maintaining lawns and cutting short grass. It operates by utilizing the loader's hydraulic system to power its blades. The mower's design allows for height adjustment to achieve the desired cutting height, and it is equipped with safety features to ensure safe operation.
Important Technical Specifications
The manual provides detailed specifications for both FMSS5 and FMSS6 models:
FMSS5:
- Weight: 588 lb (266.5 Kg)
- Dimensions (L x W x H): 57" x 61" x 20" (1460mm x 1558mm x 500mm)
- Cutting Width: 60" (1500mm)
- Cutting Height: 0.4"-3.35" (10mm-85mm)
- Wheel Sizes: 8.3"x3.2" (210x80mm)
- Blade Size: 6 mm (0.236 in) x 50 mm (1.97 in) x 510 mm (20.08 in)
FMSS6:
- Weight: 828 lb (285 Kg)
- Dimensions (L x W x H): 61" x 73" x 20" (1540mm x 1858mm x 500mm)
- Cutting Width: 72" (1800mm)
- Cutting Height: 0.4"-3.35" (10mm-85mm)
- Wheel Sizes: 8.3"x3.2" (210x80mm)
- Blade Size: 6 mm (0.236 in) x 50 mm (1.97 in) x 600 mm (23.62 in)
Common Specifications for both models:
- Spindle Type: Ball bearing
- Blade Material: 65Mn
- Number of Blades: 3
- PTO Speed: 540 rpm
- Oil Pressure: 17.5/20 MPa
- Flow Ranges: 60-75 L/min
Usage Features
The mower is designed for ease of assembly and operation, with a strong emphasis on safety.
Assembly and Set-Up:
- The mower is shipped in a package, and the user needs to remove the packing and check for defects or omissions.
- Assembly involves installing the wheel frame and fittings onto the mower deck body. This requires bolts, plain washers, spring washers, and nuts of specified sizes (e.g., M16x95 bolts, M8x20 bolts).
- The wheel bracket assembly and fittings are then installed on the wheel frame. Spacers of different heights are used to achieve the desired mowing height. A safety lock pin secures the wheel bracket.
- A crucial step before the first operation is to fill the gearbox with the proper amount of SAE 90 gear oil. The manual warns against overfilling or underfilling, which can cause severe damage.
- The rotation direction of the hydraulic motor must be adjusted to align with the blade edge.
Mower Installation (Bob-Tach System):
- The installation process is similar to installing a bucket attachment on a loader.
- The Bob-Tach levers on the loader must be fully raised.
- The loader engine is started, the "PRESS TO OPERATE LOADER" button is pressed, and the parking brake is released.
- The lift arms are lowered, and the Bob-Tach is tilted forward.
- The loader is driven slowly forward until the top edge of the Bob-Tach is under the top flange of the attachment mounting frame.
- The Bob-Tach is tilted backward until the attachment is slightly off the ground, ensuring the mounting frame fits against the front of the Bob-Tach.
- The engine is stopped, and the Bob-Tach levers are pushed down until they are fully engaged and locked, with wedges extending through the attachment mounting frame holes. This is critical for safety to prevent the attachment from coming off.
Mower Removal:
- The attachment is lowered flat on the ground, preferably on planks or blocks in muddy conditions or to prevent freezing.
- The engine is stopped, and auxiliary hydraulic pressure is released.
- Auxiliary hydraulic hoses are disconnected.
- The Bob-Tach levers are pulled up until fully raised, with a warning to hold them tightly due to spring tension.
- The loader engine is started, the "PRESS TO OPERATE LOADER" button is pressed, and the parking brake is released.
- The Bob-Tach is tilted forward, and the loader is driven backward, away from the attachment.
Mowing Procedure:
- The best cutting procedure and ground speed depend on ground conditions and grass type. The mower is designed for short grass and lawns.
- The manual warns that sharp turns can damage the turf.
- Before operating, the mowing area must be cleared of debris to prevent thrown objects, which can cause serious injury or death.
- The mower should never be operated near other persons.
- All shields must be installed and in good condition. Blades and mounting hardware should be checked and replaced if damaged; welding or modifying blades is prohibited.
- The mower deck height is adjusted to the desired cutting height.
- The mower is carried low to the ground when driving.
- With the engine at low RPM, the lift arm is fully lowered until the mower caster wheels are flat on the ground.
- The Bob-Tach is tilted forward, ensuring the chains are slack, and lift arms are adjusted so the side bar is centered in the mower's slide channels.
- Auxiliary hydraulics must be engaged and activated before operation.
- Engine speed is increased to full RPM, and blade rotation is started.
Cutting Height Adjustment:
- The mower must be removed from the loader and lifted from the ground to easily remove wheel brackets after releasing the safety lock pin.
- Cutting height is adjusted by combining spacers of different heights (H=6, H=12, H=32) on the wheel bracket.
- All wheel height adjustments must be the same to prevent uneven mowing. The cutting height range is between 0.4 to 3.35 inches.
Maintenance Features
Regular maintenance is crucial for the longevity and safe operation of the mower.
Daily Inspection (Every 25 hours of operation):
- Attachment Mount Frame: Inspect Bob-Tach wedge mounts, mounting flange, and all welds for wear or damage each time the attachment is removed.
- Blades: Check for cracks or damage; replace if necessary. Ensure blade mounting hardware is torqued to 350 N.m (260 ft-lb).
- Deck and Shield: Repair if damaged or replace if necessary.
- Decals: Check for damaged or missing decals; replace if necessary.
- Hydraulic System: Check for damaged or leaking hydraulic hoses or fittings; replace if necessary.
- Cleaning: Clean debris, leaves, grass, and flammable material from the deck area and pulley covers.
- Lubrication: Lubricate all 7 grease points.
- Belts: Check blade belts for condition and wear; adjust or replace as necessary.
- Hardware: Check for loose, damaged, or missing nuts and bolts; retighten or replace if necessary.
Cleaning the Mower:
- Remove the mower from the loader and lift it to provide working space.
- Use water or air pressure to clean debris from the bottom of the mower deck, being careful when removing objects wrapped around blades and shafts.
- Remove motor and belt covers, clean debris, and then reinstall the covers.
Belt Replacement:
- Remove the mower from the loader.
- Loosen specific bolts (item 10, item 11) and push the gearbox forward to release the belts.
- Remove item 14 and the pressure lubricator.
- Replace old belts with new ones.
- Reinstall the pressure lubricator and item 14.
- Tighten the inner item 10, then the outer item 10 to lock the gearbox position. Retighten item 11.
- Reinstall items 3, 8, 9 and retighten items 4, 7.
- Reconnect item 1 with the mower main body.
Blade Replacement and Sharpening:
- Remove the mower from the loader and lift it for access.
- Check and remove old blades.
- Dull blades should be removed and sharpened at a 31° angle, then balanced.
- Blades should be replaced when they reach a width of 47.5mm.
- Always replace all three blades with blades of equal weight to prevent vibration. Only genuine TITAN replacement blades should be used.
Lubrication Points:
- Gearbox:
- Type: SAE EP 90W Gear Oil.
- Check Level: Through the cap for gearbox oil level. Oil should be level with the middle side of the plug hole.
- Procedure: Remove the top cap and side plug, add oil until it flows from the middle side plug hole.
- Warning: Do not overfill or underfill, as this can cause gearbox seizing or damage and driveline shaft twisting.
- Blade Spindles (Item 1):
- Type: Multi-purpose grease.
- Quantity: 6 to 8 pumps.
- Frequency: Every 25 hours.
- Wheel Frames (Item 2):
- Type: Multi-purpose grease.
- Quantity: 2 to 3 pumps.
- Frequency: Every 25 hours.
Storage:
- At the end of the season or for long periods of disuse, thoroughly clean the attachment of dirt and grease.
- Lubricate the attachment.
- Inspect Bob-Tach wedge mounts, mounting flange, and all welds for wear and damage.
- Check for loose hardware, missing guards, or damaged parts; replace if necessary.
- Check for damaged or missing decals; replace if necessary.
- Store the attachment in a dry, protected shelter, flat on the ground.
- In muddy conditions or to prevent freezing, place the attachment on planks or blocks before removing it from the machine.
The manual includes a dedicated "Safety Labels" section and emphasizes reading the entire Operator's Manual. Key safety points include:
- General Safety: Familiarity with all functions, operating from the loader only, ensuring guards are in place, never leaving the mower unattended with the engine running, watching for obstacles, and keeping all persons clear of the working area. No passengers are allowed.
- Safety Alert Symbol (!): Indicates potential personal safety hazards requiring extra precaution.
- Signal Words:
- DANGER: Indicates imminently hazardous practices leading to death or severe injury.
- WARNING: Indicates potentially hazardous situations leading to death or severe injury.
- CAUTION: Indicates potentially hazardous situations leading to minor or moderate injury.
- High-Pressure Fluids Hazard: Escaping fluid under pressure can cause severe injury. Pressure must be relieved before disconnecting hydraulic lines. Use paper or cardboard, not body parts, to check for leaks. Wear protective gloves and safety glasses. Seek immediate medical attention for fluid injection injuries.
- Protective Equipment: Wear appropriate clothing, hearing protection (earmuffs or earplugs), and avoid radio headphones.
- Thrown Objects: Clear mowing area of debris, never operate near others, keep shields installed, and replace damaged blades.
- Attachment Rollaway: Always park on flat ground and block the attachment before removing it from the machine.
- Working on Raised Machine: Never work on a machine with the attachment raised unless secured by an approved support device.
- Hydraulic Fluid: Diesel fuel or hydraulic fluid under pressure can penetrate skin or eyes. Wear safety goggles.
- Electrical Shock: Some activities might cause electric shock.
- Sharp Objects: Sharp objects are involved; use protective covers during maintenance.
The manual includes a "Troubleshooting" section to address common issues such as poor cutting, blades not rotating, blades not stopping, and vibration, providing causes and solutions. It also includes a "Bolt Torque" chart for common bolt sizes to ensure proper tightening.
The Titan Skid Steer Finish Mower is backed by a one (1) year limited warranty, with terms, exclusions, and limitations detailed on the manufacturer's website.