The provided document is an Operator's Manual for Titan Flail Ditch Bank Mowers, specifically covering models 125FLAILDB, 145FLAILDB, 165FLAILDB, 200FLAILDB, and 220FLAILDB, with corresponding part numbers 191519, 191520, 191521, 191525, and 191526.
Function Description
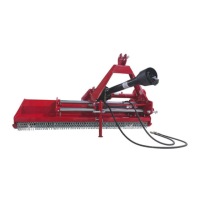
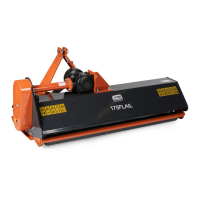
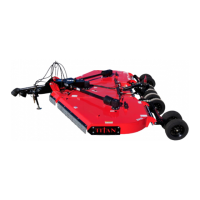
The Titan Flail Ditch Bank Mowers are designed for Category 1, Three-Point Hitch Mounting on tractors. These fixed bar flail mowers are versatile tools ideal for various applications, including ripping, leveling, finish grading, and backfilling. Their primary use cases are at outdoor arenas, building sites, and for the maintenance of farm and ranch lanes or roadways. The mowers are designed to cut grass and other vegetation efficiently, with features that allow for adjustment of cutting height and proper operation on different terrains.
Important Technical Specifications
The manual includes a "TITAN-TFMO Series Mower Specifications" table (Section 5) that details key technical data for three models: FLAILDB 125, FLAILDB 145, and FLAILDB 165.
Common Specifications:
- PTO Turning Speed: 540 r/min for all listed models.
- PTO Spline: 6x8x1600mm for all listed models.
Model-Specific Specifications:
FLAILDB 125:
- Dimensions (L x W x H): 1400x1450x760mm
- Structure Weight: 280Kg
- Cutting Width: 1250mm
- Working Efficiency: 3900-9800m²/h
- Power Required: 20-50HP
FLAILDB 145:
- Dimensions (L x W x H): 1600x1450x760mm
- Structure Weight: 300Kg
- Cutting Width: 1450mm
- Working Efficiency: 4500-11000m²/h
- Power Required: 25-50HP
FLAILDB 165:
- Dimensions (L x W x H): 1800x1450x760mm
- Structure Weight: 340Kg
- Cutting Width: 1650mm
- Working Efficiency: 5100-12200m²/h
- Power Required: 30-50HP
The tractor horsepower rating should not exceed 50 PTO horsepower for any of these models.
Usage Features
The manual outlines several usage features and operational guidelines to ensure safe and effective use of the flail ditch bank mowers.
Assembly and Hook-Up:
- The mower requires assembly, including the swing arms sub-assembly, hitch tube weldment, and boot sub-assembly. Specific instructions are provided for each step, emphasizing the correct tightening of locknuts.
- For tractor hook-up, it's crucial to ensure the tractor drawbar does not interfere with the mower, especially when raised.
- Lower link arms of the tractor should be aligned with the hitch clevises on the mower, and lower hitch pins inserted into ball swivels.
- The tractor top link attaches to the upper floating hitch, with adjustments to place the upper hitch pin vertically above or slightly behind the lower hitch pins for proper mower flotation. The mower should be run with the back 15 degrees lower than the front.
Operating Instructions:
- Pre-Operation Check: Before mowing, users must check the oil level in the gearbox, ensure all plugs are properly replaced and tightened, verify all mower blades, bolts, and nuts are tight, confirm guards and shields are in place, grease the driveline shaft and all other grease fittings, and clear the area to be mowed of foreign objects.
- PTO Engagement: The PTO should be engaged with the tractor throttle at approximately ¼ open to start blades rotating. It's important not to engage the PTO while adjusting the offset of the mower to prevent damage to the driveline shaft and gearbox. Also, avoid engaging the PTO with the mower in the fully raised position or at full throttle.
- Mowing Speed: Begin mowing at a slow forward speed and gradually increase until the desired speed is achieved, maintaining 540 rpm PTO. Faster blade speed generally results in better cutting.
- Terrain and Obstacles: Reduce tractor ground speed when turning and ensure clearance from obstacles like buildings, trees, or fences. Avoid sharp turns or backing up while the mower is on the ground.
- Grass Conditions: Grass is best cut when dry to prevent plugging and clumping. For extremely tall grass, it's recommended to raise the cutting height, mow the area, then lower the cutting height and mow a second time.
- Safety: The operator should be familiar with all functions, operate from the driver's seat, and ensure all guards are secured. Hands, feet, and clothing must be kept away from power-driven parts. Loose-fitting clothing should be avoided. No passengers should be carried on the tool.
Adjustments:
- Leveling the Mower: The mower should be leveled on even ground using the tractor drawbars. The lower drawbars should be stabilized, and a level placed on the mower deck to adjust for left-to-right levelness. The upper drawbar is adjusted to position the upper hitch pin correctly for flotation.
- Cutting Height Adjustment: The cutting height is adjusted by changing the position of the rear roller. This involves removing bolts, lifting or lowering both sides of the roller equally, and then replacing and retightening the bolts.
Transporting:
- Always disengage the PTO before raising the mower to transport position.
- Ensure the driveline does not contact the tractor or mower when raised.
- Comply with state and local laws regarding transport.
- The maximum transport speed for the implement is 20 mph, and this should not be exceeded. Slower speeds are necessary on rough terrain.
- Sudden braking with a towed load can cause swerving, so speed should be reduced if the load lacks brakes.
- Guideline for tow load weight ratios: 20 mph when weight is less than or equal to the tractor's weight; 10 mph when weight is double the tractor's weight. Do not tow a load more than double the tractor's weight.
Maintenance Features
The manual provides detailed instructions for maintaining the flail ditch bank mowers to ensure longevity and safe operation.
Important Note Before Use:
- Add SAE 90 Gear Oil to the gearbox. Do not overfill.
- Ensure the roller weldment is adjusted to the proper setting before first use.
Tractor Shut Down Procedure (for maintenance/inspection):
- Park the tractor on level ground, not a steep incline.
- Place the tractor in park and set the park brake.
- Disengage the PTO.
- Shut off the engine and remove the key.
- Wait for the PTO shaft to stop completely.
- Wear safety glasses.
General Maintenance Practices:
- Work in a clean, dry area.
- Lower the implement to the ground, put the tractor in park, turn off the engine, and remove the key before maintenance.
- Allow the implement to cool completely.
- Do not grease or oil the implement while it is in operation.
- Inspect all parts for good condition and correct installation.
- Remove buildup of grease, oil, or debris.
- Remove all tools and unused parts from the implement before operation.
Belt Tension:
- Check belt tension after the first 20 hours of use, and then every 40 hours.
- Apply approximately 22 pounds of pressure halfway between the pulleys; the belt should deflect about 3/8”.
- To adjust tension: Remove the pulley cover, loosen gearbox mounting bracket bolts and adjusting bracket bolts, loosen tension lock nuts, turn the tension bolt until desired tension is achieved, then retighten all bolts in reverse order. The gearbox should be adjusted so its extension runs straight (parallel) with the flail mower. Excessive tension can lead to premature failure and safety hazards.
Knife Replacement:
- Ensure the replacement knife is the same type and similar weight as others to maintain rotor balance. Hammer blades are standard, with Y-type blades as an option.
- To replace: Remove the locknut and bolt for the hammer blade (or bolt, spacer, and locknut for Y-type blade), replace the knife, and reinstall/retighten.
- Y-type blades have crushing edges on both leading and trailing sides; they can be turned 180 degrees and reinstalled when one edge wears out.
V-Belt Installation:
- Similar to belt tension adjustment, this involves removing the pulley cover, loosening bolts, disengaging belt tension, replacing the belt, adjusting tension, and retightening bolts.
Gearbox Lubrication:
- Type of Lubrication: SAE EP 90W Gear Oil.
- Check Oil Level: Remove the cap for inlet gearbox oil and the plug for gearbox oil level (located on the right-hand side). Oil should be level with the middle side of the plug hole. Add oil if necessary through the top cap and side plug until it flows from the middle side plug hole. Do not overfill, as this can cause gearbox seizing or damage and driveline shaft twisting.
- Frequency: Check every 25 hours.
Bearing and Pivot Lubrication:
- Type of Lubrication: Multi-purpose grease.
- Quantity: 5 to 10 pumps for bearings, 3 to 5 pumps for pivots.
- Lubrication points are clearly indicated in the manual's diagrams.
Storage:
- At the end of the season or for long periods of non-use:
- Clean off dirt and grease.
- Check blades for wear and replace if needed.
- Inspect for loose, damaged, or worn parts and adjust/replace.
- Store the unit inside if possible for longer life.
- Repaint worn or scratched parts to prevent rust.
- Replace all damaged or missing safety labels.
Safety Labels:
- The mower is equipped with safety labels that must be read and followed. These include warnings about filling gearboxes with SAE 90 gear lube (as they are shipped without oil), grease positions, and general hazards.
Troubleshooting:
- A troubleshooting table is provided to address common issues such as belt slipping, patches of uncut grass, excessive vibration, gearbox noise, and a locked gearbox/twisted PTO shaft. Solutions range from cleaning the mower deck and pulley grooves to tightening belts, replacing knives, checking gear oil, and replacing specific components.
Warranty:
- The product comes with a one (1) year limited warranty, details of which can be found at www.palletforks.com/warranty.html. The warranty is exclusive and in lieu of all other warranties, express or implied.
The manual emphasizes the importance of reading and understanding all instructions and safety warnings, as proper operation, transport, maintenance, and storage are critical for personal safety and equipment longevity.