EasyManua.ls Logo

Titan TED-1 User Manual

Titan TED-1
2 pages
To Next Page IconTo Next Page
Page #1 background imageLoading...
Page #1 background image
4
ASSEMBLY DIAGRAM
INSTRUCTION MANUAL
Titan CTS
www.titancts.com
3040 White Horse Road | Greenville, SC 29611 | 864.385.7030
TED-1 Pump
NO
1
2
3
4
5
6
7
8
9
10
10-1
10-2
10-3
11
12
13
14
15
16
17
18
19
20
21
22
23
24
25
26
27
28
29
30
31
32
33
34
35
36
37
38
39
40
41
42
43
44
RAW MAT`L
PP
PP
POM
PP
STAINLESS STEEL(SUS 304)
M4x10
Φ3, RED
CEM
10k
5A
VITON
POM
NBR
PP
STAINLESS STEEL(SUS 304)
VITON
PE
PE
POM
VITON
VITON
POM
ZDC
POM
STAINLESS STEEL(SUS 304)
POM
VITON
PP
PP
STAINLESS STEEL(SUS 304)
PE
PP
PP
STAINLESS STEEL(SUS 304)
POM
VITON
VITON
PP
STAINLESS STEEL(SUS 304)
VITON
PP
Q`TY
1
1
1
1
1
6
1
1
1
1
1
2
1
2
2
2
1
1
1
1
1
1
1
1
2
1
1
1
1
1
1
1
3
2
3
2
1
1
1
1
1
1
1
1
1
1
1
FRONT COVER
BACK COVER
NOZZLE HOLDER
HOLDER COVER
NOZZLE HOOK
SCREW
TOGGLE SWITCH
WATERPROOF CAP
LED LAMP
PCB ASS`Y
RESISTOR
FUSE HOLDER
FUSE
CONNECTOR WIRE
CONNECTER PIN
MOTOR WIRE PACKING
BODY
O-RING(BODY)
DRUM BUNG ADPTER
INNER PIPE
SUCTION PIPE PACKING
SUCTION PIPE
MOTOR WIRE
MOTOR COVER
O-RING(MOTOR COVER, HANDLE)
MOTOR
MOTOR PACKING
MOTOR CASE
IMPELLER
IMPELLER CASING
FILTER
END CAP
O-RING
(HOSE ADAPTER, SPOUT ADAPTER)
HOSE ADAPTER
JOINT NUT
HOSE CLAMP
DISCHARGE HOSE
HANDLE
NOZZLE CAP
NOZZLE SPRING
NOZZLE PISTON
O-RING(PISTON L)
O-RING(PISTON S)
NOZZLE LEVER
SPOUT
O-RING(SPOUT)
SPOUT ADAPTER
PART NAME
Question and Answer IconNeed help?

Do you have a question about the Titan TED-1 and is the answer not in the manual?

Titan TED-1 Specifications

General IconGeneral
BrandTitan
ModelTED-1
CategoryWater Pump
LanguageEnglish

Summary

Assembly Diagram

Precautions for Use

Safety Warnings

Summarizes critical DANGER, WARNING, and CAUTION statements to prevent injury or damage.

Names of Parts

Specifications

Directions for Use

Step 1: Insert Suction Pipe

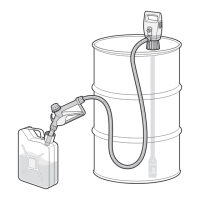
Insert the suction pipe into the drum or tank.

Step 2: Secure Drum Adapter

Tighten the drum bung adapter to ensure a secure fit.

Step 3: Activate Pump

Turn the pump on and pull the nozzle lever to start liquid transfer.

Step 4: Complete Transfer

Release the nozzle lever when liquid supply is complete.

Step 5: Storage and Cleanup

Clear hose, store nozzle in holder, and turn off the pump.

Related product manuals