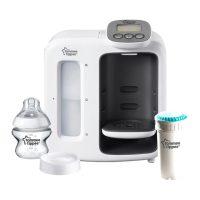
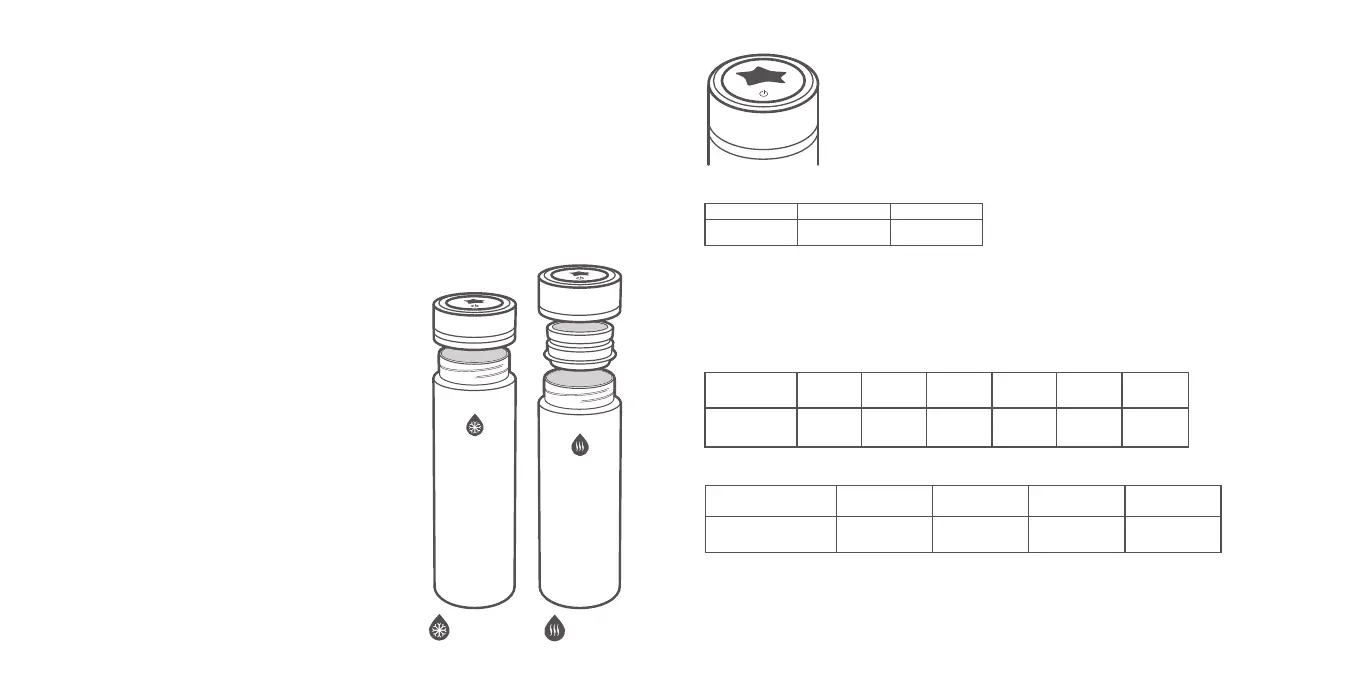
DIGITAL LID
COOLING TIMES
Cooling times should be used as a guide only. Always check food temperatures before
feeding. Always follow formula powder manufacturer’s instructions for making a feed.
COOLING FLASK RESET TIMES
The cooling flask works by absorbing heat from hot liquids. After being exposed to heat,
it will require a minimum of 3 hours before being ready to use again.
When testing the temperature of milk (on the cooling flask)
The integrated thermometer in the digital lid will activate the digital
screen when it comes into contact with water or milk. The digital lid
will tell you when a feed is ready for baby (blue star), but also when
water is still hot enough to start making a feed (red or orange star).
To help maintain battery life switch the digital lid o between feeds
by pressing the power symbol for 3 seconds.
Blue Star
Feed is ready
Amber Star
Feed is too hot,
please wait
Red Star
Feed is too hot,
please wait
Feed size
(ml / fl oz)
Sterilisation /
Cleaning method
Boiled water
Sterilisation
UV
Sterilisation
Electric steam
Sterilisation
Dishwasher
90ml
3 fl oz
150ml
5 fl oz
210ml
7 fl oz
120ml
4 fl oz
180ml
6 fl oz
240ml
8 fl oz
Time to cool
(minutes)
Reset Time
(hours)
2m 3m 5m2m 4m
4h 4h 3h 3h
5m
BEFORE USE
• Clean and disinfect the surface you are going to use. It is important that you wash your hands.
• Fill the kettle with fresh tap water (do not use water that has been boiled before). Boil the water.
Take care when handling fresh boiled water.
HOW TO USE
Hot flask
(If included) Fill the hot flask with boiling water to take out of home with you. Water will remain hot for
up to 4 hours if filled to the max level excluding the neck. Always ensure the pouring insert is in place
before you screw the lid on.
Using the cooling flask
1. Press and hold the power symbol for 3 seconds to turn the lid on/o. The lid will automatically turn
o after 12 hours to reserve battery power.
2 .
Add boiling water to the cooling flask, using the graduation marks on the inside of the flask as a guide.
3. Measure out the formula as per manufacturer instructions
and store in the milk powder dispenser until it’s ready to use.
4.
When you’re ready to feed, screw the digital lid and turn the
cooling flask upside down for a minimum of 5 seconds. Tap the
power symbol to display the star on the digital lid, it should
turn red or orange.
5.
Add the correct amount of formula powder, as per
manufacturer’s guidelines.
6.
Ensure the lid is screwed on correctly and shake well to mix
the powder with the hot water, ensuring it’s fully dissolved.
Shaking the cooling flask starts the cooling process.
7.
The time it takes for the feed to cool depends on the feed size,
refer to the cooling times table. To check if a feed is ready to
dispense into a baby bottle, tilt the cooling flask upside down
for a minimum of 5 seconds so the milk touches the digital
lid. Tap the power symbol to display the star, the lid will show
a blue star when the feed is ready. Don’t dispense the feed
before 2 minutes.
8.
Decant your feed into a clean, sterile bottle, and follow bottle
feeding instructions. Always check the temperature before
feeding your baby. Once a feed is made, use immediately.
Under most circumstances the digital lid will not show a red star when attached to the
cooling flask. This is because the cooling flask will start cooling the feed immediately and
brings the feed temperature below the range that would show a red star.
Coolin g flask
Hot flask