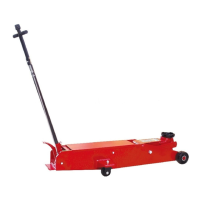
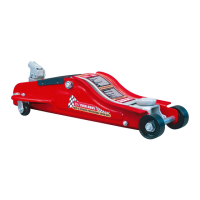
This document is an owner's manual for the Torin BIG RED JACKS Long Frame Service Jack, specifically for models T80501 (TR50001) and T81001 (TR100001).
Function Description
The Torin Long Frame Service Jack is a heavy-duty hydraulic lifting device designed for lifting a portion of a vehicle. It features a single hydraulic pump piston that effortlessly raises the lift arm. The jack is intended for use on hard, level surfaces with less than 3 degrees of slope. It is crucial to note that this is a lifting device only; once a vehicle is lifted, it must be immediately supported by appropriately rated jack stands before any work is performed underneath. The jack is not designed to support or stabilize a load for extended periods, nor should a vehicle be moved or dollied while on the jack. Pump piston dust shields and wiper seals protect the hydraulic system from contaminants, ensuring longevity and reliable operation. An overload valve bypass system is integrated to prevent jack damage and user injury. Its compact design allows for use in confined spaces and can easily fit under low vehicles. The jack meets ASME PASE safety standards.
Important Technical Specifications
The manual provides specifications for two models:
-
T80501 (TR50001):
- Capacity: 5 TON
- Lifting Range Min. (inch): 5-15/16
- Lifting Range Max. (inch): 22
- Lifting Range Min. (cm): 15
- Lifting Range Max. (cm): 56
-
T81001 (TR100001):
- Capacity: 10 TON
- Lifting Range Min. (inch): 6-5/16
- Lifting Range Max. (inch): 22
- Lifting Range Min. (cm): 16
- Lifting Range Max. (cm): 56
The safe operating temperature for the jack is between 40°F – 105°F (4°C - 41°C).
Usage Features
Assembly and Initial Setup:
The assembly involves inserting the handle into the handle sleeve and securing it with a bolt and nut. Before first use, an "Air Purge Procedure" is mandatory to remove any trapped air from the hydraulic system. This involves removing the cover plate, closing the release valve by turning the handle knob clockwise, pumping the foot pedal until the saddle reaches maximum lift height (8-10 full pedal strokes), then lowering the saddle to its lowest resting position by turning the handle knob counter-clockwise. Finally, the oil fill plug is pushed slightly to the side to purge trapped air, and the cover plate is replaced.
Raising the Jack:
- Block the vehicle's wheels for stability to prevent inadvertent shifting.
- Position the jack near the desired lift point, referencing the vehicle manufacturer's owner's manual for approved lifting points.
- Ensure the saddle is centered and firmly contacts the load lifting point.
- Assemble the handle, aligning it with the slots.
- Close the release valve by turning the handle clockwise until firmly closed.
- Pump the handle to lift the saddle until it contacts the load, then continue pumping to raise the vehicle to the desired height.
- Immediately support the lifted load with appropriately rated vehicle support stands before working on the vehicle.
Lowering the Jack:
- Raise the load high enough to allow clearance for the jack stands to be removed, then carefully remove them.
- Grasp the handle firmly with both hands to prevent rapid lowering.
- Carefully open the release valve by slowly turning the handle counter-clockwise. Bystanders should be kept clear during this process.
- After removing the jack from under the load, keep it in the lowered position to reduce exposure to rust and contamination.
Safety Considerations:
- Always use jack stands to support a lifted vehicle; never rely solely on the jack.
- Do not exceed the rated capacity.
- Use on hard, level surfaces.
- Do not move or dolly the vehicle while on the jack.
- Lift only on vehicle areas specified by the manufacturer.
- No alterations should be made to the product.
- Only use attachments/adapters supplied by the manufacturer.
- Center the load on the saddle prior to lifting.
- Use wheel chocks on opposing wheels.
- Wear ANSI-approved safety glasses and heavy-duty work gloves.
- Do not adjust the safety valve.
- Do not use the jack if tired, incoherent, dizzy, or under the influence of drugs/alcohol.
- Never use motor oil, brake fluid, alcohol, glycerine, detergent, or dirty oil in the jack. Only use anti-foaming, good-grade hydraulic jack oil. Mixing fluids can cause damage and sudden loss of load.
Maintenance Features
Inspection:
Before each use, inspect the jack for damage, wear, broken, or missing parts. Ensure all components function properly and that the jack is properly lubricated. Decals should be clean and visible.
Binding:
If the jack binds under a load, use equipment with equal or greater load capacity to lower the load safely. After un-binding, clean, lubricate, and test the equipment. Rusty components, dirt, or worn parts can cause binding.
Cleaning:
If moving parts are obstructed, use cleaning solvent or a good degreaser to clean the equipment. Remove any existing rust with a penetrating lubricant.
Lubrication:
Proper lubrication is essential for safe and effective operation.
- Use a good lubricant on all moving parts.
- For light-duty use, lubricate once a month.
- For heavy and constant use, lubricate weekly.
- Never use sandpaper or abrasive material on surfaces.
- Periodically check pump piston and ram for rust/corrosion; clean as needed with an oil cloth.
Rust Prevention:
Daily check rams and pump plungers for rust/corrosion. Lift the equipment without a load to its highest point and inspect under and behind lifting points; clean any visible rust.
Grease Fittings:
Some models have grease fittings that require regular greasing and lubrication.
Adding Jack Oil:
- Position the jack on level ground and lower the saddle.
- Remove the cover plate and oil fill plug.
- Fill the oil case until the oil level is just beneath the lower rim of the oil fill hole.
- Replace the oil plug and cover plate, then perform the Air Purge Procedure.
Replacing Jack Oil:
- Position the jack on level ground and lower the saddle.
- Remove the cover plate.
- Open the release valve by turning the handle counter-clockwise.
- Remove the oil fill plug.
- Turn the jack on its side to drain old oil from the oil fill hole.
- Position the jack on level ground with the saddle lowered. Fill the oil case until the oil level is just beneath the lower rim, keeping dirt and foreign materials clear.
- Replace the oil plug and cover plate, then perform the Air Purge Procedure.
Storage:
- Lower the lifting arm.
- Place the handle in the upright position.
- Store in a dry location, preferably indoors.
- If stored outdoors or in caustic environments, lubricate all parts before and after use, and ensure the jack is in the fully retracted position to prevent corrosion.
Troubleshooting:
The manual includes a troubleshooting guide for common issues such as the jack not lifting, not holding a load, not lowering, poor lifting, or not lifting to full extension. Solutions include checking the release valve, ensuring capacity is not exceeded, purging air from the system, checking/adding oil, draining excessive oil, lubricating moving parts, checking for binding/obstruction, and replacing the power unit if malfunctioning.