ReplacingtheGrassDeector
WARNING
Anuncovereddischargeopeningcouldallowthe
lawnmowertothrowobjectsatyouorbystanders,
resultinginseriousinjury.Also,contactwiththe
bladecouldoccur.
Donotoperatethelawnmowerunlessyouinstalla
coverplate,amulchplate,grassdeectororbagger.
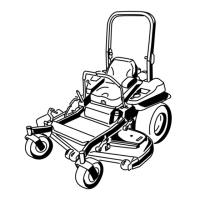
1.Removethelocknut,thebolt,thespring,andthespacer
holdingthedeectortothepivotbrackets(Figure102).
2.Removethedamagedorworngrassdeector(Figure
102).
Figure102
1.Bolt
5.Springinstalled
2.Spacer6.Grassdeector
3.Locknut
7.J-hookendofspring
4.Spring
3.Placethespacerandthespringontograssdeector.
4.PlacetheJ-endofthespringbehindthedeckedge.
Note:MakesurethattheJ-endofthespringis
installedbehindthedeckedgebeforeinstallingthebolt
asshowninFigure102.
5.Installtheboltandthenut.
6.PlacetheJ-hookendofthespringaroundthegrass
deector(Figure102).
Important:Thegrassdeectormustbeable
torotate.Liftthedeectoruptothefullopen
positionandensurethatitrotatesintothefull
downposition.
Cleaning
CleaningundertheMower
ServiceInterval:Beforeeachuseordaily
1.Disengagetheblade-controlswitch(PTO),movethe
motion-controlleverstotheNEUTRAL-LOCKposition,
andsettheparkingbrake.
2.Shutofftheengine,removethekey,andwaitforall
movingpartstostopbeforeleavingtheoperating
position.
3.Raisethemowertothetransportposition.
DisposingofWaste
Engineoil,batteries,hydraulicuid,andenginecoolantare
pollutantstotheenvironment.Disposeoftheseaccordingto
yourstateandlocalregulations.
63

 Loading...