g026961
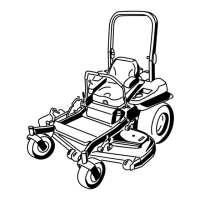
Figure77
LeftSideShown
1.L-bracket4.Rearlinkageassembly
2.Linkagestop
5.Caliper
3.Gap
6.Wheelhub
9.Disengagetheparkingbrake,thelevershould
beinthedownposition.
10.Turnthewheelhubbyhandinbothdirections
relativetothecaliper;thewheelhubshould
movefreelybetweenthecaliper.
11.Ifagapisneededorthewheelhubdoesnot
movefreely:
A.Disengagetheparkingbrake.
B.Disconnectandne-tunetherearlinkage
assembly:
•Shortenthelinktocreateagap.
•Lengthenthelinktoallowwheelhub
movement.
C.Connecttherearlinkageassembly.
12.Engagetheparkingbrakeandcheckthegap.
13.Repeatsteps9through13untilavisiblegapis
achievedandthewheelhubrotatesfreely.
14.Repeatthisprocedureforthebrakeonthe
oppositeside.
15.Rotatethedrive-wheelreleasehandleto
theoperatingposition;refertoUsingthe
Drive-Wheel-ReleaseValves(page34).
16.Installthereartiresandtorquethelugnuts;refer
toCheckingtheWheel-LugNuts(page51).
17.Removethejackstands.
BeltMaintenance
InspectingtheBelts
ServiceInterval:Every50hours
Replacethebeltifitisworn.Thesignsofawornbelt
includesquealingwhilethebeltisrotating;theblades
slippingwhilecuttinggrass;andfrayededges,burn
marks,andcracksonthebelt.
ReplacingtheMowerBelt
1.Disengagetheblade-controlswitch(PTO),move
themotion-controlleverstotheNEUTRAL-LOCK
position,andengagetheparkingbrake.
2.Shutofftheengine,removethekey,andwait
forallmovingpartstostopbeforeleavingthe
operatingposition.
3.Lowerthemowertothe76mm(3inch)
height-of-cut.
4.Removethebeltcovers(Figure78).
g027729
Figure78
1.Pushthetabdown2.Removethebeltcover
5.Usearatchetinthesquareholeintheidlerarm
toremovetensionontheidlerspring(Figure79).
6.Removethebeltfromthemower-deckpulleys.
7.Removethebeltguideonthespring-loaded
idlerarm(Figure79).
8.Removetheexistingbelt.
9.Installthenewbeltaroundthemowerpulleys
andtheclutchpulleyundertheengine(Figure
79).
56