BrakeMaintenance
ServicingtheBrake
Beforeeachuse,checkbrakesonbothalevelsurface
andslope.
Alwayssettheparkingbrakewhenyoustopthemachine
orleaveitunattended.Iftheparkingbrakedoesnot
holdsecurely,anadjustmentisrequired.
CheckingtheParkingBrake
ServiceInterval:Beforeeachuseordaily
1.Parkthemachineonalevelsurface,disengagethe
PTO.
2.Stoptheengine,removethekey,andwaitforall
movingpartstostopbeforeleavingtheoperating
position.
3.Applytheparkingbrake.Settingtheparkingbrake
shouldtakeareasonableamountofforce.Ifthe
parkingbrakedoesnotholdsecurely,anadjustment
isrequired.RefertoAdjustingtheParkingBrake.
AdjustingtheBrakes
Iftheparkingbrakedoesnotholdsecurely,an
adjustmentisrequired.
1.Checkthebrakebeforeyouadjustit;referto
CheckingtheBrakes.
2.Parkthemachineonalevelsurface,disengagethe
PTO,andsettheparkingbrake.
3.Stoptheengine,removethekey,andwaitforall
movingpartstostopbeforeleavingtheoperating
position.
4.Releasetheparkingbrake;refertoReleasingthe
ParkingBrakeOperation.
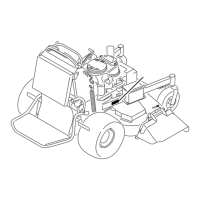
5.Toadjustthebrake,removethehairpincotter
andclevispinfromthelowerbrakeleverandyoke
(Figure60).
6.Loosenthejamnut(Figure60).
7.Rotatetheyoke.Totightenthebrake,rotatethe
yokeup.Toloosenthebrake,rotatetheyokedown
(Figure60).
Note:Thebrakerodshouldbethreadedintoboth
yokesthesamedistance.
8.Securetheyoketolowerbrakeleverwiththehairpin
cotterpinandclevispin(Figure60).
9.Tightenthejamnut(Figure60).
10.Checkthebrakeoperationagain;refertoChecking
theBrake.
Figure60
1.JamNut4.Hairpincotterpin
2.Yoke5.Lowerbrakelever
3.Clevispin
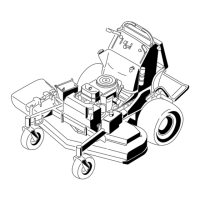
11.Afterthebrakeisadjusted,theleverswitchneeds
tobechecked.
12.Checkthegapbetweenthebrakeleverandthe
switchasshowninFigure61.Thegapneedstobe
an1/8inch(3mm)withthebrakeengaged.
13.Ifneeded,loosenthescrewsholdingtheswitchand
adjusttheswitch.
Figure61
1.1/8inch(3mm)gap
neededbetweenswitch
andbrakelever
3.Switch
2.Brakelever
42
 Loading...