EasyManua.ls Logo

Toshiba e-STUDIO 203 User Manual

Toshiba e-STUDIO 203
116 pages
To Next Page IconTo Next Page
Page #1 background imageLoading...
Page #1 background image
MULTIFUNCTIONAL DIGITAL SYSTEMS
Operator's Manual
for Copying Functions

Table of Contents

Other manuals for Toshiba e-STUDIO 203

Question and Answer IconNeed help?

Do you have a question about the Toshiba e-STUDIO 203 and is the answer not in the manual?
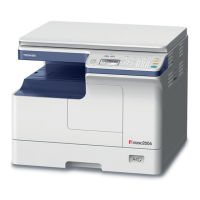
Toshiba e-STUDIO 203 Specifications

General IconGeneral
FunctionsPrint, Copy, Scan
Print Speed (Black)20 ppm
Standard Paper Capacity250 sheets
DisplayLCD
Scanner TypeFlatbed
Copy Speed (Black)20 cpm
Paper Capacity (Bypass)50 sheets
InterfaceUSB 2.0
Scan Resolution600 x 600 dpi
ConnectivityUSB
Paper SizeA4, A5, B5, Legal, Letter
Paper Weight (Bypass)64-163 g/m²
Paper SizesA4, A5, B5, Legal, Letter

Summary

ENERGY STAR Compliance

User Notices and Regulations

EU and German Specific Notices

Provides information relevant to users in the EU and Germany, including regulatory compliance.

Manuals and Documentation

Getting Started with the Manual

Manual Contents Overview

Outlines the scope and topics covered in this operator's manual.

Understanding Safety Symbols

Explains the meaning of warning, caution, and note symbols used for safety.

TOSHIBA Quality Assurance

Recommended Toner Cartridges

Advises using genuine TOSHIBA toner for optimal performance and feature utilization.

e-STUDIO163/203 Key Features

Compact and Efficient Design

Focuses on the equipment's space-saving, lightweight, and user-friendly physical design.

Extended Functionality with Options

Lists features enhanced by optional components like ADF and PFU.

Energy Saving and Eco-Friendly Aspects

Describes the equipment's ecological design, including toner recycling and energy-saving modes.

General Precautions for Operation

Installation and Moving Safety Procedures

Critical safety instructions for installing, moving, and connecting the equipment.

Equipment Placement and Environment

Cautions regarding suitable locations, ventilation, and avoiding adverse environmental conditions.

Safe Usage Guidelines

Warnings and cautions for safe operation, handling of liquids, and electrical safety.

Certification Labels and Warning Symbols

Location and explanation of certification labels and warning symbols on the device.

Maintenance and Supply Handling Safety

Safety precautions for maintenance, cleaning, and handling consumables like toner cartridges.

Legal Disclaimer

Chapter 1: Preparation Steps

Chapter Introduction

Overview of the initial setup and preparation procedures for the equipment.

Component Identification

External Components (Front/Right)

Identifies front and right-side parts like Platen Cover, Bypass Tray, ADF, and Paper Feed Unit.

Internal Components (Left/Inner)

Details left-side and internal parts including Original Glass, Control Panel, and Power Switch.

Connectivity and Access Points

Covers USB terminal, AC-IN, receiving tray, and toner cartridge access.

Optional Equipment Configuration

Available Optional Components Overview

Lists and illustrates optional add-ons like ADF, Expansion Memory, and Paper Feed Unit.

Control Panel Overview and Functions

Key Buttons and Indicator Lamps

Explains functions of buttons like [SORT], [DATA] lamp, message lamps, and zoom controls.

Mode Selection and Operation Buttons

Details buttons for media type, interrupt, energy saver, clear/stop, start, digital keys, original mode, density, and paper jam lamps.

Display and Paper Source Selection

Covers LED display, copy quantity/zoom select, and drawer/original selection buttons.

Automatic Selection Modes

Explains the Automatic Paper Selection (APS) and Automatic Magnification Selection (AMS) functions.

Power Management Operations

Powering the Equipment On

Step-by-step guide to turn the equipment ON and initiate warm-up.

Activating Energy Saving Mode

How to manually enter and exit the energy saving mode.

Paper Loading Procedures

Loading Copy Paper

Instructions for placing copy paper into the equipment's paper sources.

Acceptable Paper Types and Sizes

Lists supported media types, weights, and sizes for drawers and bypass tray.

Recommended Paper Stocks

Lists specific paper recommendations from TOSHIBA for best results.

Unacceptable Paper Types

Lists paper types to avoid to prevent jams or equipment damage.

Proper Paper Storage

Guidelines for storing paper to maintain quality and prevent issues.

Loading Paper into Drawers

Drawer Loading Steps

Detailed instructions for inserting paper into the equipment's drawers.

Adjusting Paper Guides

How to adjust the side guides to match the loaded paper size.

Securing the Paper Stack

Ensuring the paper stack is correctly positioned and secured by guides.

Registering Paper Size in Equipment

Process to inform the machine about the loaded paper size.

Paper Size Registration

Registering Standard Paper Sizes

Step-by-step guide for registering common paper sizes like A3, A4.

Registering Non-Standard Paper Sizes

Procedure for registering other paper sizes using specific code numbers.

Chapter 2: Making Copies

Placing Originals for Copying

Instructions for preparing and placing originals on the glass or ADF.

Performing Basic Copy Operations

Step-by-step guide to execute a copy job.

Using the Bypass Tray for Copying

Instructions for using the bypass tray for special media or paper types.

Placing Booklet Originals

Specific instructions for copying bound documents like books or catalogues.

Using the Automatic Document Feeder

Guide on how to load and scan originals using the ADF.

ADF Precautions and Limitations

Warnings about paper types that may cause issues with the ADF.

Loading Originals into the ADF

Step-by-step instructions for placing originals into the Automatic Document Feeder.

Executing a Copy Job

Steps to initiate copying, including setting quantity and modes.

Managing Copy Jobs: Pause and Resume

How to stop, pause, and restart a copying process.

Interrupt Copying Function

Procedure for temporarily stopping a job to perform another.

Bypass Tray Usage Guide

Instructions for using the bypass tray with various paper types and sizes.

Registering Bypass Tray Paper Size

Process to set the paper size for the bypass tray in advance.

Bypass Copying with Standard Paper

How to perform copies using standard paper loaded in the bypass tray.

Chapter 3: Advanced Copying Functions

Default Copy Settings Overview

Explains the initial default settings for various copy parameters.

Paper Selection Methods

Details Automatic Paper Selection (APS) and Manual Paper Selection.

Image Zoom and Magnification Control

How to enlarge or reduce copy images using AMS or manual settings.

Original and Copy Size Specification

Manually specifying both original and copy paper sizes for reproduction.

Manual Reproduction Ratio Adjustment

Setting the reproduction ratio precisely using zoom buttons.

Sort Copying Functionality

Enables outputting copies in sets, sorted by page order.

Selecting Copy Image Mode

Adjusting image quality settings (TEXT/PHOTO, PHOTO, TEXT) for optimal results.

Adjusting Copy Image Density

Manually adjusting the brightness/darkness of the copied image.

Chapter 4: Equipment Settings and Management

Switching Operational Sound On/Off

Procedure to toggle audible operational sounds on or off.

Checking Total Copy Count

How to view the total number of sheets processed by the equipment.

Chapter 5: Troubleshooting Common Issues

Interpreting Control Panel Lamps

Explains the meaning of lit or blinking lamps indicating equipment status or errors.

Troubleshooting Paper Jams

Identifies common jam locations and provides release instructions.

Replacing the Toner Cartridge

Step-by-step guide for safely replacing the toner cartridge.

Troubleshooting Before Service Call

Lists common issues and their solutions before contacting technical support.

Toner-Related Troubleshooting

Addresses issues related to the toner lamp, cartridge installation, and compatibility.

Paper Handling Troubleshooting

Solutions for paper jams, multiple feeding, and incorrect paper registration.

Image Quality Troubleshooting

Diagnosing and resolving problems like light/dark density, stains, fogging, and missing parts.

Chapter 6: Maintenance and Cleaning

Daily and Weekly Inspections

Recommended cleaning routines for key components to ensure optimal performance.

Cleaning the Charger Unit

Instructions for cleaning the charger to prevent image staining.

Cleaning the Transfer Charger Wire

Procedure for cleaning the transfer charger wire to maintain image quality.

Chapter 7: Technical Specifications and Options

e-STUDIO163/203 Detailed Specifications

Comprehensive technical data including dimensions, weight, power, and performance metrics.

Specifications of Available Options

Technical details for optional accessories such as the Automatic Document Feeder and Paper Feed Unit.

Product Packing List

Lists all items included in the product package upon purchase.

Related product manuals