EasyManua.ls Logo

TP-Link TL-SG608E - User Manual

TP-Link TL-SG608E
2 pages
Print Icon
To Next Page IconTo Next Page
Loading...
Installation Guide
© 2022 TP-Link 7106509918 REV1.0.0
1000 Mbps (Green)
On: Running at 1000 Mbps
Flashing: Transmitting/receiving data
10/100 Mbps (Yellow)
On: Running at 10/100 Mbps
Flashing: Transmitting/receiving data
LED Explanation
Power
On: Power on
O: Power o
Link/Act
Connection
Ethernet Ports (1-8)
TL-SG608E
PC PC
Router
LAN PortWAN Port
Internet
8-Port Gigabit Easy Smart Switch
Conguration
The switch is plug and play. To congure the switch, you can use the
Web-based GUI or the conguration utility.
The utility is only supported on Windows now.
Using the Conguration Utility
1. Go to https://www.tp-link.com/support and search the model number of
your switch. Download the Easy Smart Conguration Utility from the
product Support web page on your PC.
Using the Web-based GUI
Note: If the switch gets a new IP address from the DHCP server, your
connection to the switch will be lost. Enter the new IP address in your
browser to access the switch again.
1. Find out the IP address of the switch.
By default, the switch receives an IP addess from a DHCP server (or a
router that functions as a DHCP server) in your network. You can nd
out this IP address on the DHCP server.
If the switch cannot receive an IP address from a DHCP server, it uses
the static IP address of 192.168.0.1, with a subnet mask of
255.255.255.0.
2. Congure IP address on your PC to make sure the switch and PC are in
the same subnet.
If the switch uses an IP address assigned by a DHCP server, set your PC
to obtain an IP address automatically from the DHCP server.
If the switch uses 192.168.0.1 as the IP address, congure your PC’s IP
address as 192.168.0.x (”x” ranges from 2 to 254), and subnet mask as
255.255.255.0.
Launch a web browser on your PC, enter the IP address of the switch in
the address bar and press Enter. Log in with admin as both user name
and password.
3.
Now you can congure the switch using the Web-based GUI. For further
information, refer to the User Guide.
Go to https://www.tp-link.com/support, search the model number of your
switch, and you can nd this guide on the product Support web page.
Now you can congure the switch using the conguration utility. For further
information, refer to the Easy Smart Conguration Utility User Guide.
Go to https://www.tp-link.com/support, search the model number of your
switch, and you can nd this guide on the product Support web page.
Double click the icon on the desktop, and the
utility Home page will display a list of TP-Link
switches on the local network.
3.
2. Decompress the downloaded le, run the
installation wizard and follow the prompts to
install the Easy Smart Conguration Utility.
4.
If the switch uses an IP address assigned by
a DHCP server, set your PC to obtain an IP
address automatically from the DHCP
server.
If the switch uses 192.168.0.1 as the IP
address, congure your PC’s IP address as
192.168.0.x (”x” ranges from 2 to 254), and
subnet mask as 255.255.255.0.
Click to nd out IP parameters of the switch.
Double click the switch that you want to congure. Log in with admin as
both user name and password.
5.
Question and Answer IconNeed help?

Do you have a question about the TP-Link TL-SG608E and is the answer not in the manual?

Summary

Installation Guide Overview

LED Explanation

Details the meaning of the Power and Link/Act LEDs on the switch for status indication.

Switch Configuration

Using the Web-based GUI

Guides users on how to find the switch's IP and access its configuration via a web browser.

Using the Configuration Utility

Details on downloading, installing, and using the utility for switch configuration on Windows.

Product Specifications

General Specifications

Lists technical details including standards, protocols, data transfer rates, and network media.

Environmental and Physical Specifications

Outlines operating and storage temperatures, and humidity ranges for the device.

Frequently Asked Questions

Power LED Troubleshooting

Provides troubleshooting steps when the switch's Power LED is not illuminated.

Link;Act LED Troubleshooting

Offers solutions for issues where the Link/Act LED does not light up for connected devices.

Safety and Compliance

Device Safety Precautions

Covers essential safety guidelines, including avoiding water, disassembly, and using approved chargers.

Overview

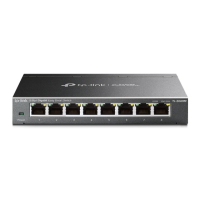
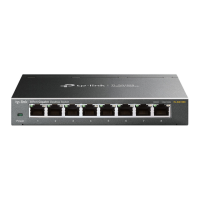
This document describes the TP-Link 8-Port Gigabit Easy Smart Switch, a network device designed for easy integration and management within a local area network.

Function Description

The TP-Link 8-Port Gigabit Easy Smart Switch serves as a central hub for connecting multiple wired network devices, enabling high-speed data transfer across a local network. It features eight 10/100/1000 Mbps auto-negotiation RJ45 ports, allowing it to automatically detect and adapt to the speed of connected devices, ensuring optimal performance. The "Easy Smart" designation indicates that while it offers plug-and-play simplicity, it also provides basic management features through a web-based graphical user interface (GUI) or a dedicated configuration utility. This allows users to monitor and configure network settings, offering more control than an unmanaged switch without the complexity of a fully managed switch. The switch supports standard Ethernet protocols, including IEEE802.3i, IEEE802.3u, IEEE802.3ab, IEEE802.3x, IEEE802.1p, and IEEE802.1q, ensuring compatibility with a wide range of network equipment and supporting features like flow control, Quality of Service (QoS), and VLANs. Its store-and-forward transfer method ensures data integrity by checking for errors before forwarding packets.

Usage Features

The switch is designed for straightforward deployment, offering both plug-and-play functionality and configurable management options.

Initial Setup and Connection:

  • Plug and Play: For basic connectivity, simply connect your network devices (e.g., PCs, routers, servers) to the switch's Ethernet ports. The switch will automatically detect the connection speed and establish communication.
  • Power Connection: Ensure the power adapter is properly connected to the switch and a power source. The Power LED will illuminate when the device is powered on.
  • Link/Act LEDs: Each port has corresponding Link/Act LEDs (Green for 1000 Mbps, Yellow for 10/100 Mbps) that indicate the connection status and activity. A solid light signifies an active link, while a flashing light indicates data transmission or reception.
  • Wall Mountable: The switch is designed to be wall-mounted, offering flexibility in placement and helping to keep the network area tidy.

Configuration and Management: The Easy Smart Switch provides two primary methods for configuration: a Web-based GUI and a Windows-only Configuration Utility.

  • Web-based GUI:

    • IP Address Discovery: The switch typically obtains an IP address from a DHCP server (e.g., your router). If no DHCP server is available, it defaults to a static IP address of 192.168.0.1.
    • PC IP Configuration: To access the GUI, your PC must be on the same subnet as the switch. If the switch uses a DHCP-assigned IP, configure your PC to obtain an IP automatically. If the switch uses 192.168.0.1, configure your PC's IP address to a value like 192.168.0.x (where 'x' is 2-254) with a subnet mask of 255.255.255.0.
    • Accessing the GUI: Open a web browser, enter the switch's IP address in the address bar, and press Enter. Log in using "admin" for both the username and password.
    • Configuration: Once logged in, you can configure various network settings, monitor port status, and manage features like VLANs and QoS.
    • Dynamic IP Handling: If the switch's IP address changes (e.g., due to a DHCP lease renewal), you will need to re-enter the new IP address in your browser to regain access.
  • Configuration Utility (Windows Only):

    • Download and Installation: Download the Easy Smart Configuration Utility from the TP-Link support website for your specific switch model. Install it on a Windows PC.
    • Device Discovery: Launch the utility, and it will display a list of TP-Link switches detected on your local network.
    • IP Parameter Check: Use the utility to find out the switch's IP parameters. Similar to the web-based GUI, ensure your PC's IP configuration matches the switch's subnet for proper communication.
    • Accessing Configuration: Double-click the desired switch in the utility's list. Log in with "admin" for both username and password.
    • Configuration: The utility provides an interface to configure the switch's settings, offering an alternative to the web-based GUI.

Network Performance:

  • Gigabit Speeds: Supports 1000 Mbps (Gigabit Ethernet) for high-bandwidth applications, as well as 10/100 Mbps for backward compatibility.
  • Full Duplex Support: Maximizes data transfer efficiency by allowing simultaneous sending and receiving of data.
  • MAC Address Learning: Automatically learns and updates MAC addresses of connected devices, optimizing data forwarding.

Maintenance Features

The Easy Smart Switch is designed for reliability and ease of troubleshooting, with several features that aid in maintenance and problem resolution.

LED Indicators for Status Monitoring:

  • Power LED: A solid Power LED indicates that the switch is receiving power and operating normally. If it's off, it suggests a power supply issue, prompting checks of the power adapter, power source, and voltage compatibility.
  • Link/Act LEDs: These per-port LEDs are crucial for diagnosing connectivity issues.
    • A solid light indicates a successful physical link. If a Link/Act LED is off for a connected device, it suggests a problem with the cable connection, the connected device being off, or a faulty port.
    • A flashing light indicates active data transmission, confirming network traffic through that port.
    • The color of the LED (Green for 1000 Mbps, Yellow for 10/100 Mbps) quickly informs the user about the current link speed, which can be useful for identifying potential bottlenecks or misconfigurations.

Troubleshooting Guidance: The manual provides clear guidance for common issues:

  • Power LED Off:
    • Verify the power adapter is securely connected to both the switch and a working power outlet.
    • Confirm the power supply voltage meets the switch's requirements.
    • Ensure the power source itself is active.
    • Check if the LED status is enabled in the switch's configuration (though it's on by default).
  • Link/Act LED Off:
    • Ensure Ethernet cables are firmly plugged into both the switch port and the connected device.
    • Verify that the connected device is powered on and functioning correctly.
    • Check the Ethernet cable length; it should be less than 100 meters (328 feet) to ensure reliable signal transmission.
    • Confirm that the LED status is enabled in the switch's configuration.

Firmware Updates and Documentation:

  • Support Website: TP-Link provides a comprehensive support website (https://www.tp-link.com/support) where users can find:
    • User Guides: Detailed documentation for both the Web-based GUI and the Configuration Utility, offering in-depth explanations of all features and settings.
    • Firmware Updates: Periodically, TP-Link may release firmware updates to improve performance, add features, or address security vulnerabilities. Users are encouraged to check the support page for their specific model.
    • Troubleshooting Resources: FAQs and other support materials to help resolve issues.
  • Community Forum: Users can visit the TP-Link Community (https://community.tp-link.com) to ask questions, find answers, and interact with other users and engineers, providing a peer-support avenue for troubleshooting and best practices.

Safety Information: Adhering to safety guidelines is a crucial part of device maintenance:

  • Environmental Protection: Keep the device away from water, fire, humidity, and hot environments to prevent damage.
  • No Disassembly: Do not attempt to disassemble, repair, or modify the device yourself. For service, contact TP-Link support.
  • Proper Power Supply: Use only the recommended power adapter and avoid damaged chargers or USB cables. Ensure the adapter is installed in an easily accessible location.

By following these guidelines and utilizing the available management and support resources, users can effectively maintain the TP-Link 8-Port Gigabit Easy Smart Switch for reliable and long-term network performance.

TP-Link TL-SG608E Specifications

General IconGeneral
Switching Capacity16 Gbps
MAC Address Table8K
Operating Humidity10% to 90% non-condensing
Fan QuantityFanless
Packet Forwarding Rate11.9 Mpps
Jumbo Frame9 KB
Quality of Service4 Priority Queues
IGMP SnoopingYes
Port MirroringYes
Cable DiagnosticsYes
Transmission MethodStore-and-Forward
Ports8 x 10/100/1000Mbps RJ45 ports
Dimensions158 x 101 x 26 mm (6.22 x 3.98 x 1.02 in)
Operating Temperature0°C to 40°C (32°F to 104°F)
Standards and ProtocolsIEEE 802.3, IEEE 802.3u, IEEE 802.3x, IEEE 802.1Q, IEEE 802.1p
Network Media10BASE-T: UTP category 3, 4, 5 cable (maximum 100 m) 100BASE-TX: UTP category 5, 5e cable (maximum 100 m) 1000BASE-T: UTP category 5, 5e, 6 cable (maximum 100 m)
LED IndicatorPower
VLAN802.1Q VLAN
Green TechnologyYes, Green Technology saves power consumption

Related product manuals