EasyManua.ls Logo

Tradesman 8560 User Manual

Default Icon
7 pages
To Next Page IconTo Next Page
Page #1 background imageLoading...
Page #1 background image
TRADESMAN
®
MAGNESIUM SERIES
OWNERS MANUAL
15 Gauge
2-1/2” Angle Finish Nailer
Model #8560
CAUTION - FOR YOUR OWN SAFETY
READ YOUR OWNER'S MANUAL THROUGH COMPLETELY AND
CAREFULLY BEFORE ATTEMPTING TO SET-UP OR OPERATE YOUR
NEW AIR TOOL. READ AND UNDERSTAND ALL SAFETY RULES.
Your new Pneumatic Tool is a well built, carefully inspected and versatile
product, capable of giving you many years of dependable service. It comes
complete in one carton with a minimum of final assembly and setup required
by you. When unpacking, be sure to check all packages and packing material
for loose parts before discarding.
NOTICE: On the nameplate of your machine you will find the serial number of
your unit. Record this number on this manual cover for future reference.
SERIAL # __________ MFG. DATE # _________ PURCHASE DATE: __________
POWER TOOL SPECIALISTS, INC. E. WINDSOR, CT 06088 PRINTED IN TAIWAN
“LIMITED” TWO YEAR WARRANTY POLICY
All current model TRADESMAN air tools manufactured by POWER TOOL SPECIALISTS are
warranted to the original purchaser thereof to be free from defects in material used in their
manufacture or workmanship for a period of TWO years from the date of initial retail purchase. Labor
on warranted parts will be covered for a period of ONE year. This warranty does not cover any parts
that have been subjected to misuse, abuse, alteration, overload, accident or normal wear of moving
parts. Any machine or part that is returned to us, together with a sales slip or other proof of date of
initial retail purchase, postage prepaid, will be repaired or replaced without cost if the unit is found
defective. Such repairs or replacement will be made within a reasonable time. (not exceeding 60
days following receipt by POWER TOOL SPECIALISTS)
Only POWER TOOL SPECIALISTS is authorized to perform warranty service to its products.
This warranty gives you specific legal rights. You also have implied warranty rights. In the
event you have a problem with this warranty service or performance, you may be able to go to
Small Claims Court, a State Court or a Federal District Court.
How to Obtain Replacement Parts and Service
The merchandise you have purchased from us has been carefully engineered and
manufactured under POWER TOOL SPECIALISTS rigid quality standards and should give you
satisfactory and dependable operation. However, like all mechanical merchandise, it may
occasionally require adjustment, replacement parts, or maintenance. Should you ever need
assistance or parts, please contact or write your nearest authorized service center or the
National Parts & Service Center.
DO NOT RETURN THIS PRODUCT TO THE YOUR LOCAL DEALER
PROVIDE THE FOLLOWING INFORMATION: 6. Do not return the product to us unless you have first
1. Model and serial number found on nameplate. obtained a Return Authorization Number (RA#) and
2. The date and store name from which you ship to address.
purchased your tool. 7. Pack the product in its original packaging or any
3. State briefly the trouble you are having. other secure box so no further damage occurs.
4. Give the specific part numbers and description 8. Enclose a letter inside the package giving us your
found in the manual for all parts you require. name, RA#, address and phone number.
(Not reference number) 9. You must also enclose a copy of your sales receipt.
Replacement parts will be made available at 10. Clearly mark the outside of the package with the
current prices. If requested, prices will be RA #. We will not accept any return without an RA#
quoted in advance. marked on the outside of the package.
5. Requests for warranty service must be 11. Ship the product prepaid to the address given to you
accompanied by dated proof of purchase. by the PTS returns department.
For your nearest Authorized Service Center please:
CALL: WRITE:
1-800-243-5114
Power Tool Specialists, Inc.
INTERNET:
3 Craftsman Road
www.tradesman-rexon.com
East Windsor, CT 06088

Questions and Answers:

Tradesman 8560 Specifications

General IconGeneral
BrandTradesman
Model8560
CategoryNail Gun
LanguageEnglish

Summary

Limited Two Year Warranty Policy

Safety and Operation Precautions

Read Manual Thoroughly

Read owner's manual completely and carefully before attempting to set-up or operate the new air tool.

Obtaining Parts and Service

Information Required for Service

Provide model/serial number, purchase date/store, brief trouble description, and part numbers.

Return Authorization and Shipping

Obtain RA#, pack securely, include sales receipt copy, clearly mark package, and ship prepaid.

Tool Operation Safety Warnings

General Operational Safety Rules

Covers air supply, pressure limits, handling, trigger use, PPE, and proper tool operation.

Air Supply and Pressure Safety

Use filtered, lubricated air; do not exceed 120 PSI; disconnect air supply before servicing.

Handling and Usage Safety

Do not place body parts in discharge area, keep trigger unpulled when carrying, use handle for carrying.

Personal Protective Equipment (PPE)

Always wear safety glasses (ANSI Z87.1), ear, and head protection in the workplace.

General Usage Prohibitions

Never point tool at yourself or others, avoid accidental firing, ensure employer provides instructions.

Air Supply System Requirements

Air Supply System Requirements

Use pressure-regulated air, hoses with adequate rating, and fittings that discharge air upon disconnection.

Oiler and Filter Usage

Use an oiler for lubrication and a filter for impurities to improve efficiency and tool life.

Quick Connector Recommendation

Install a 3/8" quick connector with a .315" inside diameter for better performance.

Testing the Tool

Pre-Operation Safety Check

Depress contact safety without trigger; tool must not cycle. Reconnect air, then test trigger function.

Cycle Test Procedure

Hold tool clear, trigger must not cycle. Then, engage safety and trigger; tool must cycle for proper function.

Loading and Unloading Fasteners

Loading the Nailer

Insert fasteners into the magazine rear, ensure points rest on the bottom, and slide magazine fastener slide to lock.

Unloading the Nailer

Press center button on magazine slide, release latch, and remove fasteners from the rear opening.

Tool Features

Magazine and Safety Features

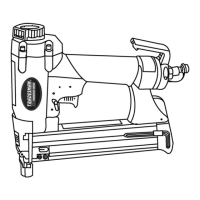
Features large capacity magazine, safety lock on nosepiece, tapered nosepiece, and trigger safety switch.

Fastener Depth Adjustment

Depth Adjustment Method

Adjust fastener depth by rotating the contact trip up or down until the desired setting is achieved.

Operating Modes

Single-Fire Mode

Tool drives one fastener per trigger pull and contact trip engagement.

Rapid-Fire Mode

Tool drives fasteners continuously when trigger is held and contact trip is engaged.

Operation Guide

Pre-Operation Checks

Wear PPE, inspect tool, ensure proper working order, do not point at self/others, respect tool.

Tool Connection and Testing

Connect to air compressor with correct hose, load fasteners, and test penetration by driving nails.

Lubrication

Lubrication Procedure

Disconnect air supply, add one drop of pneumatic tool oil daily or use in-line oiler.

Oil Usage Warning

Wipe off excessive oil. Never use detergent oil or additives; use pneumatic tool oil only.

Clearing Jams

Disconnect Air Supply

Disconnect tool from air compressor before clearing jams, servicing, relocating, or during non-operation.

Jam in Discharge Area

Remove fasteners, open cover plate guard, pull clamp handle, and grab jammed fastener with pliers.

Jam Inside Magazine

Disconnect air, slide magazine fastener rearward, and remove jammed fastener with pliers.

Cleaning the Tool

Cleaning Procedure

Disconnect air supply. Remove tar buildup from nosepiece; avoid solvent in cylinder. Dry tool thoroughly.

Cleaning Fluid Warning

Never use gasoline or flammable liquids; vapors may ignite causing explosion and serious injury.

Exhaust Port and Belt Hook

Exhaust Port Adjustment

Rotate the exhaust port 360° to direct air away from the operator.

Belt Hook Installation

Loosen two bolts, place hook assembly onto rear of tool, and tighten bolts.

Troubleshooting

Common Issues and Solutions

Addresses low power, erratic action, blowing air, tool not running, or noisy operation with specific causes.

Parts List

Component Identification

Lists parts with I.D. numbers, descriptions, sizes, and quantities for the 8560 model.

Related product manuals