Do you have a question about the Traeger TFB88P UB and is the answer not in the manual?
Install the leg braces, noting that two people are required for this task.
Connect the flue pipe and chimney cap assembly to the grill body.
Securely attach the handle to the grill assembly.
Position the interior parts and bucket correctly within the grill.
Identify all necessary parts and hardware components required for assembly.
Attach the side lift bar to the grill body, following specific instructions.
Mount the grill legs securely to the grill body, ensuring proper fastener order.
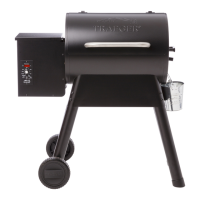
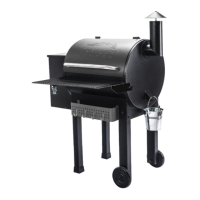
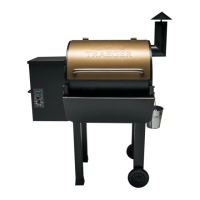
This document serves as an assembly and safety guide for Traeger Wood Fired Grills, specifically referencing models TFB88P UB/ZB/ZBO and TFB57P UB/ZB/ZBO. It emphasizes the importance of proper installation and adherence to safety guidelines to prevent property damage, bodily injury, or even death. The manual strongly recommends reading all instructions thoroughly before attempting installation or use.
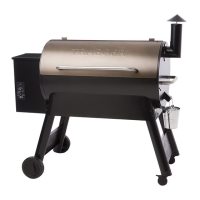
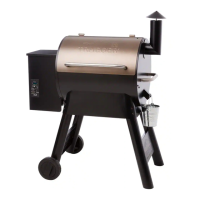
The primary function of the Traeger Wood Fired Grill is to cook food using wood pellets as fuel, imparting a distinct smoky flavor. It is designed for outdoor use and requires careful attention to clearances from combustible materials to ensure safe operation. The assembly process is detailed with step-by-step instructions and illustrations, highlighting the need for at least two people due to the grill's significant weight.
The assembly process begins with installing the side lift bar, which is crucial for maneuvering the heavy grill body. The guide notes that the grill should be assembled on a clean, flat surface, as it will need to be laid on its back and front at different stages. This initial step involves attaching the side lift bar using specific fasteners (Bolt E).
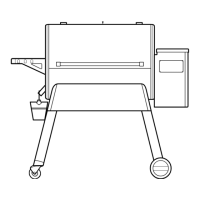
Next, the legs are installed, a critical step that again requires two people to lift the grill. The fasteners for the legs must be assembled in a specific order: Washer B, Leg, Spring Washer C, and Hex Nut D. The illustrations clearly show the orientation of the legs and the placement of each fastener. There are multiple steps involved in attaching the legs, with each step specifying the number of bolts, washers, spring washers, and hex nuts required.
The installation of leg braces is a subsequent step that also requires two people. These braces provide additional stability to the grill structure. The instructions detail how to attach these braces, indicating the number of fasteners needed for each side.
Following the structural assembly, the flue pipe and chimney cap assembly are attached. This component is essential for directing smoke and exhaust gases safely away from the cooking area. The guide illustrates the proper orientation and attachment points for these parts, specifying the number of fasteners required.
The handle is then attached to the grill, providing a convenient way to open and close the lid. The instructions show the placement of the handle and the necessary fasteners.
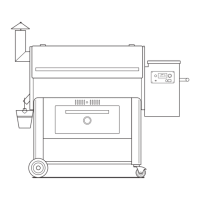
Finally, the interior parts and the bucket are placed. While the specific interior parts are not detailed in this section, the illustration shows the placement of the cooking grates, heat baffle, and grease drain pan, along with the grease bucket that collects drippings. This step prepares the grill for its initial seasoning and subsequent cooking operations.
The Traeger Wood Fired Grill is designed for outdoor cooking. It uses wood pellets, which are fed into a combustion chamber to create heat and smoke. The "wood fired" aspect implies a unique flavor profile imparted to food, distinguishing it from gas or charcoal grills.
The manual strongly emphasizes safety during operation. Users are warned that many parts of the grill become very hot during operation and remain hot afterwards. Therefore, extreme care must be taken to avoid burns.
The guide includes critical warnings regarding clearances from combustible materials. When operating the grill under overhead combustibles, a minimum clearance of 40 inches is required. Additionally, a minimum distance of 12 inches must be maintained from the grill to any other combustible materials. Failure to adhere to these clearance requirements is identified as a major cause of fires.
The manual explicitly states that the grill should never be left unattended, especially when young children are present. This highlights the potential hazards associated with an open flame and hot surfaces.
Users are also warned never to move the grill while it is operating. This is a crucial safety instruction to prevent spills, fires, or injuries. Before attempting to move or transport the grill, it must be allowed to cool thoroughly.
While specific maintenance features are not detailed in this excerpt, the mention of "seasoning your grill" implies an initial preparation step, typically involving burning off manufacturing residues and creating a protective layer on the cooking surfaces. The guide directs users to refer to their Owner's Manual for detailed operation instructions, which would undoubtedly include maintenance procedures such as cleaning, ash removal, and pellet storage guidelines.
The overall tone of the manual is instructive and safety-conscious, aiming to ensure that users assemble and operate their Traeger grill correctly and safely. The use of illustrations and clear, concise language helps users navigate the assembly process effectively.
| Model | TFB88P UB |
|---|---|
| Category | Grill |
| Type | Pellet Grill |
| Temperature Range | 180°F to 450°F |
| Hopper Capacity | 18 lbs |
| Power Source | Electric |
| Warranty | 3 years |
| Cooking Area | 884 sq in |
| Ignition | Electric |
| Temperature Control | Digital |