EasyManua.ls Logo

Traeger TFB52QPC - User Manual

Traeger TFB52QPC
19 pages
Print Icon
To Next Page IconTo Next Page
Loading...
OWNER’S MANUAL
TFB52QPC
RESIDENTIAL PELLET GRILL
FOR OUTDOOR USE ONLY!
“TASTE THE DIFFERENCE”
Please read this entire manual before assembly, installation of your Traeger Pellet Grill.
Failure to follow these instructions could result in property damage, bodily injury or even
death. Contact your local building or fire official about restrictions and installation
inspection requirements in your area.
SAVE THESE INSTRUCTIONS
Question and Answer IconNeed help?

Do you have a question about the Traeger TFB52QPC and is the answer not in the manual?

Summary

Safety Precautions

Fire Hazards and Clearances

Details required distances from combustibles to prevent fires.

Electrical Safety Warnings

Advises on the dangers of hazardous voltage and servicing.

Fuel and Lighting Warnings

Prohibits flammable liquids and mandates specific lighting gels.

General Operational Warnings

Covers outdoor use, pellet types, storage, cleaning, and accessory use.

Introduction and Components

Manual Overview and Part Identification

Introduces the manual and references component diagrams.

Assembly Components and Tools

Lists all parts included and tools provided for assembly.

Assembly Instructions

Mounting the Legs

Step-by-step guide for attaching leg assemblies and pegboard.

Attaching the Door Handle

Instructions for installing the chrome door handle.

Attaching the Flue Pipe and Chimney Cap

Guide for connecting the flue pipe and chimney cap.

Positioning the Heat Baffle

Details on placing the heat baffle over the firepot.

Positioning the Grease Drain Pan

Instructions for correctly placing the grease drain pan.

Positioning the Porcelain Grills

Guide for placing the cooking grates and warming shelf.

Installing the Front Shelf

Steps for attaching the front shelf to the grill.

Hanging the Grease Bucket

Instructions for hanging the grease collection bucket.

Hanging the Grill Hooks to Pegboard

Guide for attaching grill hooks to the pegboard.

Initial Firing Instructions

Step-by-Step Firing Procedure

Detailed steps for the first time the grill is started.

Starting the Grill Safely

Key warnings and notes for safe initial grill operation.

Subsequent Start-Up and Controls

Procedure for Subsequent Start-Up

Steps for starting the grill after initial use.

Troubleshooting Fire Ignition Issues

Safety steps for dealing with a fire that goes out.

Control Shutdown and Safety Features

Explains automatic shutdown and safety alarms.

Operating Tips

Temperature Dial and Cooking Modes

Explains temperature settings and smoking mode.

Grill Operation Guidelines

Advice on moving, door use, pellet adding, and baffle placement.

Digital Thermostat Control Functions

Describes how the digital control cycles the auger.

Carbon Monoxide Safety

Critical safety information regarding carbon monoxide.

Grill Maintenance

Creosote and Grease Formation

Explains the formation and risks of creosote and grease.

Cleaning the Flue (Smoke Stack)

Instructions for cleaning the grill's smoke stack.

Cleaning Grease from Grill Interior

Steps for cleaning the grease drain and tube.

Cleaning Outside Surfaces and Storage

How to clean exterior and prepare for storage.

Cleaning the Porcelain Grill

Recommended method for cleaning the cooking grates.

Cleaning Ash from Firepot

Instructions for removing ash from the firepot area.

Ash Disposal Procedures

Guidelines for safe disposal of collected ashes.

Frequently Asked Questions

Troubleshooting Grill Ignition

Common issues and solutions for igniting the grill.

Troubleshooting Pellet Delivery

Addresses problems with pellets not reaching the firepot.

Auger Jam Removal Procedure

Steps to clear jams in the pellet auger system.

Fire Extinguishing on Smoke Setting

How to handle a fire going out while on smoke mode.

Traeger Support

Digital Control Start-Up Settings

Recommended dial settings for starting the grill.

Protecting the Grills Paint Finish

Advice on maintaining the grill's exterior appearance.

Ordering Replacement Parts

Information on how to obtain new parts for the grill.

Overview

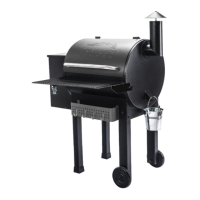
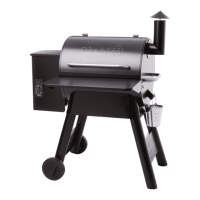
The Traeger Wood Pellet Grill, model TFB52QPC, is a residential outdoor cooking appliance designed to provide a distinct smoky flavor to food. It operates by burning wood pellets, which are fed into a firepot by an auger, and the heat and smoke are distributed throughout the cooking chamber.

Function Description:

The primary function of the Traeger TFB52QPC is to grill, smoke, and cook food outdoors using wood pellets as fuel. It features a digital thermostat control that allows users to set and maintain desired cooking temperatures. The "SMOKE" setting is specifically designed for smoking and adding smoke flavor, operating within a temperature range of 150 to 180 degrees F. Higher temperature settings are available for grilling, and mid-range settings for slow cooking. The grill includes a hopper for storing pellets, an auger to feed them to the firepot, a hot rod for ignition, and a draft inducer fan to circulate heat and smoke.

Important Technical Specifications:

  • Model: TFB52QPC
  • Fuel Type: Wood Pellets (specifically Traeger Brand BBQ Wood Pellets, rated for 8500 BTU per LBS with an ash content of 2%). Heating fuel pellets are not to be used.
  • Minimum Clearance to Combustibles: 12 inches from the grill to combustibles, and 40 inches from overhead combustibles.
  • Power: Operates on 120v electrical outlet.
  • Temperature Control: Digital thermostat control with settings for SMOKE, MEDIUM/MID RANGE (slow cooking), and HIGH/HIGHER (grilling).
  • Safety Features:
    • Low Temperature Alarm ("LEr"): Shuts off power to internal components if the grill stays below 125 degrees for 10 minutes.
    • High Temperature Alarm ("HEr"): Shuts off power to internal components if the grill reaches an internal temperature of 550 degrees.
  • Dimensions (based on diagrams):
    • Minimum distance from back and ends of grills to combustible materials: 12 inches.
    • Minimum overhead clearance: 40 inches.

Usage Features:

  • Assembly: The grill requires assembly, including mounting leg assemblies, attaching the chrome door handle, flue pipe, and chimney cap, positioning the heat baffle and grease drain pan, installing porcelain grills and warming shelf, hanging the grease bucket, and installing the front shelf and grill hooks. Tools (open-end wrenches and hex key) are supplied.
  • Initial Firing/Pellet Charging: Before initial use or when the grill runs out of pellets, the auger tube must be "charged" with pellets. This involves removing internal components, plugging in the grill, turning it ON to "smoke" to confirm auger and fan operation and hot rod heating, then filling the hopper and setting the temperature to HIGH to allow pellets to travel to the firepot. Once pellets are in the firepot, the grill should be set to SMOKE to ignite them.
  • Seasoning: Before cooking the first batch of food, the grill must be seasoned by running it on HIGH for 45 minutes with the door closed.
  • Preheating: The grill should be allowed to preheat for approximately 10 minutes with the door closed before placing food inside.
  • Operation:
    • The temperature dial can be adjusted at any time.
    • The grill is designed to operate with the door closed to avoid greatly lengthening cooking time.
    • The auger operates continuously until the selected temperature is reached (except in SMOKE mode), then cycles on/off to maintain temperature. In SMOKE mode, the auger cycles on for 15 seconds and off for 65 seconds, without temperature control, to achieve 150-180 degrees F.
  • Shutdown Cycle: An automatic shutdown cycle runs for ten minutes after setting the temperature dial to "Shutdown Cycle," allowing the draft induction fan to burn off excess pellets in the firepot before powering off.
  • Safety Precautions:
    • Never move the grill when hot or operating.
    • Never add pellets by hand to a hot firepot.
    • Never use gasoline or lighter fluid to manually light the grill; only Alcohol Gel according to instructions.
    • Ensure the heat baffle is properly seated to prevent direct heat/flame and grease fires.
    • Do not put water into the firepot, as it will jam the auger.
    • Be aware of carbon monoxide poisoning symptoms and ensure proper ventilation.
    • In case of a grease fire, turn the switch OFF and keep the door closed. If it doesn't go out, lightly sprinkle baking soda.
    • Always disconnect the power cord before servicing or cleaning.

Maintenance Features:

  • Creosote and Grease Removal:
    • Flue exhaust (smoke stack) should be inspected at least twice a year for creosote and grease buildup. Cleaning involves unscrewing the chimney cap, scraping accumulation with a non-metallic tool, and wiping with paper towels or rags.
    • Grease Drain, Grease Drain Tube, and Grease Bucket should be inspected at least twice a year.
    • The Grease Drain Pan should be lined with heavy-duty aluminum foil for easy cleanup, and the foil changed frequently.
    • The V-shaped Grease Drain and Grease Drain Tube should be periodically cleaned by scraping accumulation and pushing it into the grease bucket.
  • Ash Removal:
    • The firepot should be inspected occasionally and cleaned to remove ash buildup, but ONLY when the grill is COLD.
    • Ash can be swept from around the firepot with a whisk broom and removed with a metal fireplace shovel.
    • A vacuum cleaner (preferably utility-type with a metal collection canister) is recommended for cleaning ash from inside the firepot, again, ONLY when the grill is COLD. Ash must be disposed of in a metal container with a tight-fitting lid, placed on a non-combustible surface, and retained until thoroughly cooled.
  • Porcelain Grill Cleaning: Best done while still warm with a long-handled cleaning brush.
  • Outside Surface Cleaning: Wipe with a disposable rag or cloth dampened with warm soapy water. Do NOT use oven cleaner, abrasive cleansers, or abrasive cleaning pads.
  • Storage: If stored outdoors, ensure water does not get into the pellet hopper to prevent auger jamming. A Traeger Grill Cover is highly recommended.
  • Paint Finish Protection: Use a protective cover and touch-up paint for scratches. Apply high-quality car wax to outside surfaces every 90 days, but ONLY to a cold grill.

Traeger TFB52QPC Specifications

General IconGeneral
BrandTraeger
ModelTFB52QPC
CategoryGrill
LanguageEnglish

Related product manuals